
Taking stunning photos on your iPhone is easier than ever, thanks to the impressive camera capabilities of the latest models. However, sometimes you want to add that extra touch of professionalism to your pictures. One way to achieve this is by blurring the background, bringing the main subject into sharp focus and creating a beautiful bokeh effect. Whether you’re capturing a portrait, food shot, or a still life, learning how to blur the background on your iPhone can make a world of difference in the overall look and feel of your photos. In this article, we’ll guide you through the simple steps to achieve this effect using built-in features and popular editing apps. Get ready to take your iPhone photography skills to the next level and impress your friends with stunningly artistic shots.
Inside This Article
- Why Blur Background on iPhone Photos?
- Methods to Blur Background on iPhone Photos
- Using Portrait Mode
- Using Third-Party Apps
- Adjusting Depth of Field in Editing Apps
- Tips for Achieving a Better Blur Effect
- Conclusion
- FAQs
Why Blur Background on iPhone Photos?
Blurry backgrounds, also known as bokeh, can bring a touch of artistry and professionalism to your iPhone photos. The technique of blurring the background emphasizes the subject, making it stand out and creating a visually pleasing effect. Whether you’re capturing portraits, still life, or even landscapes, adding a blur to the background can enhance the overall composition and draw attention to the main subject of your photo.
Additionally, blurring the background helps to create a sense of depth and separation between the subject and the background, giving your photos a three-dimensional quality. This can make your images more engaging and visually appealing to viewers, evoking emotions and capturing their attention.
Not only does blurring the background add an artistic touch, but it can also be used strategically to remove distractions. By obscuring the background, you can eliminate any clutter or unwanted elements that may detract from the main focus of the photo. This allows you to create cleaner, more focused images that highlight your subject and convey your intended message.
With the advancements in iPhone camera technology, specifically the introduction of Portrait Mode and editing apps, blurring the background on your iPhone photos has become easier than ever. You no longer need expensive equipment or extensive knowledge of photography techniques to achieve a professional-looking blur effect. With just a few taps, you can create stunning images that rival those taken with high-end cameras.
Now that we understand the benefits and significance of blurring the background, let’s explore the various methods you can use to achieve this effect on your iPhone photos.
Methods to Blur Background on iPhone Photos
Blurry backgrounds can add depth and focus to your iPhone photos, making your subjects stand out with a professional-looking effect. Fortunately, there are several methods you can use to achieve this effect directly on your iPhone. Whether you want to capture stunning portraits or create beautifully blurred landscapes, here are three effective methods to blur the background on iPhone photos:
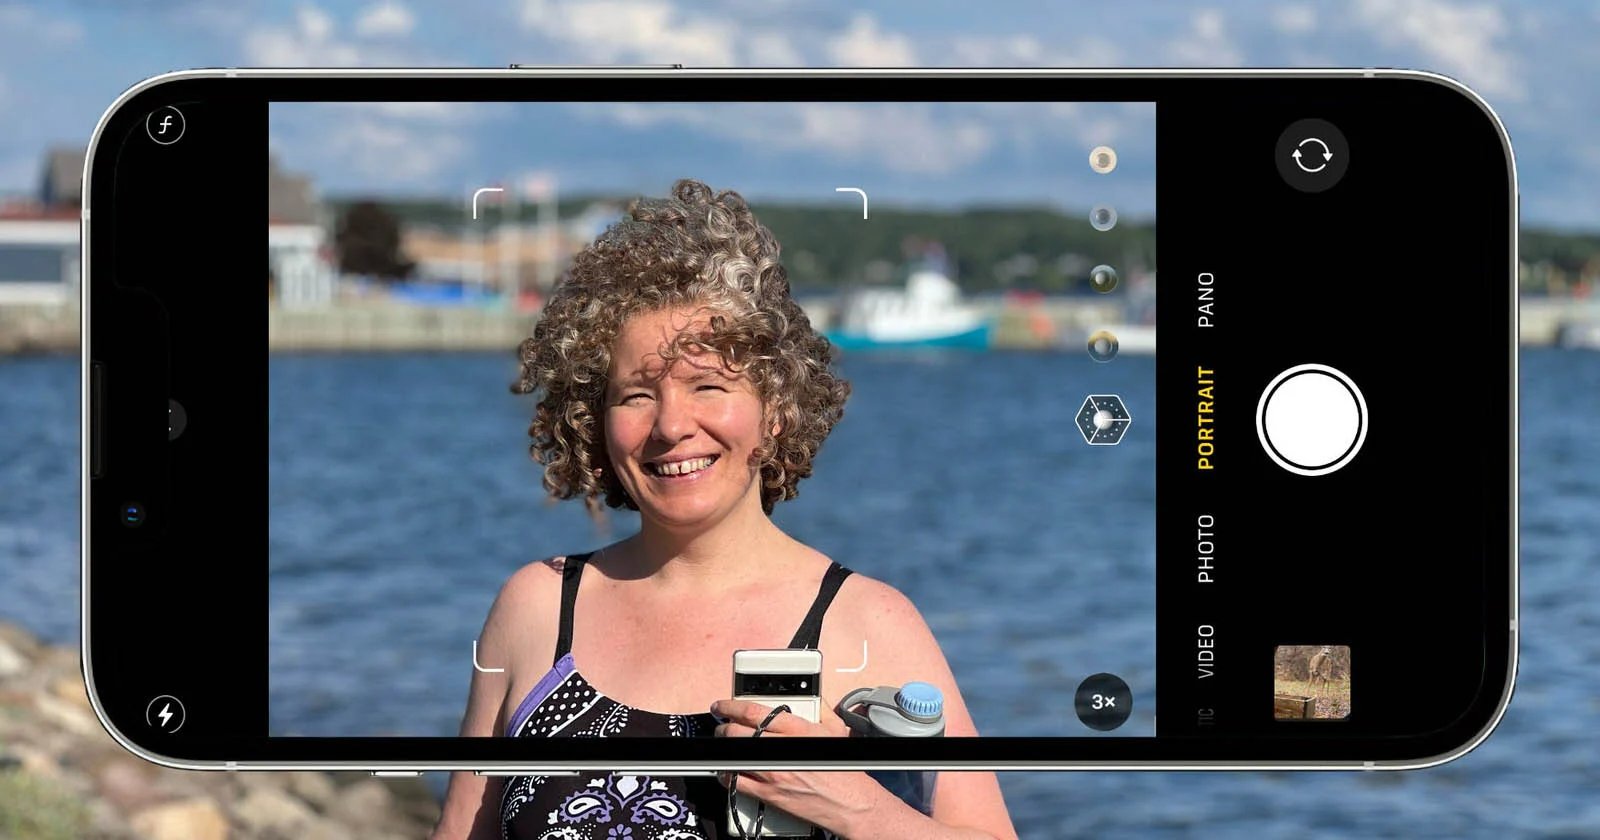
1. Using Portrait Mode
One of the easiest ways to blur the background on your iPhone is by using the built-in Portrait Mode. This feature is available on newer iPhone models, such as the iPhone XR, iPhone XS, and iPhone 11 series. Portrait Mode utilizes the phone’s dual-camera system or depth-sensing technology to create a shallow depth of field, resulting in a beautifully blurred background.
To use Portrait Mode, open the Camera app on your iPhone and swipe to select the “Portrait” mode. Make sure your subject is within the recommended distance and clearly defined. Once you’ve composed your shot, tap the shutter button to capture the photo. Afterward, you can adjust the intensity of the background blur using the editing tools in the Photos app.
2. Using Third-Party Apps
If your iPhone doesn’t have Portrait Mode or you want more control over the background blur, consider using third-party apps specifically designed for blurring photos. There are various apps available on the App Store that offer advanced editing tools for creating a blurred background effect.
Some popular third-party apps suitable for blurring the background on iPhone photos include Snapseed, AfterFocus, and Focos. These apps allow you to manually define the areas to blur and adjust the intensity of the blur effect, giving you greater flexibility and creative freedom.
3. Adjusting Depth of Field in Editing Apps
If you’ve already taken a photo and want to add a blur effect to the background, you can achieve this using editing apps. Apps like Snapseed, Adobe Lightroom, and VSCO provide advanced editing tools that allow you to adjust the depth of field and create a blurred background.
To blur the background using editing apps, import your photo into the chosen app and locate the tool or feature that controls the depth of field. Adjust the settings to increase the blur gradually until you achieve the desired effect. Keep in mind that some editing apps offer more precise control over the blur effect than others, so experiment with different apps to find the one that best suits your needs.
Tips for Achieving a Better Blur Effect
Here are a few tips to help you achieve a better blur effect on your iPhone photos:
- Focus on your subject: To create a visually appealing blur effect, make sure to focus accurately on your subject. The background blur is most effective when the subject is sharply in focus.
- Find a suitable distance: To enhance the blur effect, experiment with different distances between your subject and the background. A greater distance can result in a stronger blur effect.
- Consider lighting conditions: Good lighting can enhance the overall quality of your photos. Soft, diffused lighting can accentuate the blur effect and add more depth to your images.
- Use a tripod or stabilize your iPhone: Blurring the background requires a steady hand or the use of a tripod. This ensures that the subject remains in focus while the background blurs seamlessly.
Remember, practice makes perfect. Experiment with different methods and settings to achieve the best results. With a bit of practice and creativity, you’ll be capturing stunning photos with beautifully blurred backgrounds using your iPhone.
Using Portrait Mode
One of the easiest ways to blur the background on iPhone photos is by using the Portrait Mode feature. This feature is available on newer iPhone models, starting from the iPhone 7 Plus and later. It utilizes the dual-camera system or depth-sensing technology to create a depth-of-field effect, blurring the background and keeping the subject in sharp focus.
To use Portrait Mode, open the Camera app on your iPhone and select the mode by swiping to the right until you reach “Portrait.” The background will automatically blur, giving your photos a professional and artistic look. When taking the photo, make sure the subject is well-lit and placed at an appropriate distance from the camera to ensure a satisfying blur effect.
Portrait Mode also allows you to customize the level of background blur. After selecting the mode, you will see a yellow notification that says “Natural Light” or “Depth Effect.” Tap on the “f” icon at the top of the screen to adjust the aperture and create a more or less pronounced blur effect. Experiment with different settings to find the desired look for your photo.
It’s important to note that Portrait Mode works best with human subjects and certain objects. It may struggle to apply the desired blur effect on complex scenery or objects with intricate details. In these cases, you may want to consider using other methods, such as third-party apps or editing tools, to achieve a better result.
Overall, using Portrait Mode is a convenient way to blur the background on iPhone photos, giving them a professional and artistic touch without the need for advanced photography skills or additional equipment.
Using Third-Party Apps
If the built-in Portrait Mode on your iPhone doesn’t provide the level of background blur you desire, you can turn to third-party apps. These apps offer additional features and customization options to help you achieve the perfect blur effect in your photos.
One popular app for blurring the background on iPhone photos is “AfterFocus.” This app allows you to adjust the blur strength and apply selective focus to specific areas of the image. It also provides various filters and effects to enhance the overall look of your photo.
Another highly recommended app is “Blur Photo Editor.” It offers a range of blur options, including motion blur and circular blur, giving you more artistic control over the background blur effect. You can easily adjust the intensity and size of the blur to create stunning images.
If you prefer a more intuitive interface, “Snapseed” is a great choice. This powerful photo editing app not only allows you to apply background blur but also offers a range of other advanced editing tools. It’s perfect for users who want to have complete control over every aspect of their photos.
When using third-party apps, be sure to explore the different settings and options available to achieve the desired level of background blur. Remember to experiment and find the app that best suits your style and preferences.
Once you’ve chosen a third-party app, simply download it from the App Store, open it, and import the photo you want to edit. Then, look for the blur or focus adjustment tool and apply it to the background of your photo. Some apps may have a dedicated “blur” option, while others may refer to it as “depth of field” or “bokeh.”
After applying the blur effect, you can preview the changes and make any necessary adjustments before saving the final image. These third-party apps often offer additional features, such as filters, cropping tools, and image enhancements, giving you endless possibilities to create stunning photos.
Remember, the key to achieving a natural and aesthetically pleasing background blur is to strike a balance between the subject and the blurred elements. Use these third-party apps to enhance your iPhone photography skills and create captivating images with beautifully blurred backgrounds.
Adjusting Depth of Field in Editing Apps
While using the built-in Portrait mode or third-party apps can help you achieve a beautiful background blur, sometimes you may not have the opportunity to use these features at the time of capturing the photo. However, you can still achieve a similar effect by adjusting the depth of field in editing apps on your iPhone.
Depth of field refers to the range of distance in a photo that appears sharp and in focus. By manipulating the depth of field in editing apps, you can create a blurred background and make the subject of your photo stand out.
Many editing apps available on the App Store offer the option to adjust the depth of field. Here’s how you can do it:
- Open the editing app of your choice on your iPhone.
- Select the photo you want to edit and open it in the editing interface.
- Look for the depth of field adjustment tool or filter in the app’s editing tools.
- Adjust the depth of field slider according to your preference.
- Preview the changes and make further adjustments if necessary.
- When you’re satisfied with the result, save the edited photo to your iPhone’s camera roll.
It’s important to note that adjusting the depth of field in editing apps is not as accurate as using the device’s built-in features or specialized apps. The level of control and the quality of the blur effect may vary depending on the app you use.
Experiment with different editing apps and make sure to choose one that offers sufficient control over the depth of field. Some popular options include Snapseed, Adobe Photoshop Express, and VSCO.
While adjusting the depth of field in editing apps can be a bit more time-consuming compared to using the device’s native features, it provides you with more flexibility to edit and fine-tune your photos after they have been taken.
So, if you find yourself in a situation where you want to blur the background in your iPhone photo but didn’t capture it using special features, don’t worry. With the right editing app and a little patience, you can achieve stunning background blur effects even after taking the photo.
Tips for Achieving a Better Blur Effect
When it comes to achieving a better blur effect on your iPhone photos, there are a few tips and tricks that can take your photography skills to the next level. Whether you’re using the Portrait mode or a third-party app, these tips will help you create stunning images with a beautifully blurred background.
1. Choose the Right Subject: Selecting the right subject can make a significant difference in the final result. Look for subjects that have clear separation from the background, such as a person or object against a plain backdrop. This will make it easier for the camera to isolate the subject and create a more pronounced blur effect.
2. Pay Attention to Lighting: Good lighting can greatly enhance the depth and quality of the blur effect. It’s important to have sufficient light on the subject, as well as a well-lit background. This will help create a more pleasing and natural-looking blur. Avoid using flash, as it can create harsh shadows and decrease the overall quality of the photo.
3. Keep the Distance: Maintaining a proper distance between the subject and the background is crucial for achieving a better blur effect. By keeping some distance between the subject and the background, you allow the camera to create a more noticeable depth of field, resulting in a more pleasing and attractive blur.
4. Use a Lower Aperture: If you have control over the aperture settings in your camera app or editing software, choosing a lower aperture can help create a more pronounced blur effect. A wider aperture, such as f/1.8 or f/2.2, allows more light to enter the lens and creates a shallower depth of field, resulting in a stronger background blur.
5. Experiment with Backgrounds: Don’t be afraid to experiment with different backgrounds to enhance the blur effect. Consider using textures, colors, or patterns that complement the subject and create an interesting contrast. Experimenting with different backgrounds can add depth and visual interest to your photos.
6. Use Manual Focus: Some camera apps and third-party apps offer manual focus control. This can be especially useful when trying to achieve a specific blur effect. By manually adjusting the focus point, you can precisely control which area of the photo appears sharp and which area appears blurred.
7. Edit with Caution: If you’re using editing apps to enhance the blur effect, it’s important to use them with caution. Avoid overediting or applying excessive filters, as this can compromise the overall quality of the image. Make subtle adjustments to maintain a natural look and ensure the blur effect enhances the photo rather than overpowering it.
Remember, mastering the art of creating a better blur effect takes practice and experimentation. By following these tips and techniques, you’ll be able to capture stunning iPhone photos with a beautifully blurred background that adds depth and visual appeal to your images.
Conclusion
Learning how to blur the background on your iPhone photos is a valuable skill that can instantly elevate the quality of your images. Whether you’re capturing portraits, food shots, or nature scenes, blurring the background can add depth and focus to your subject.
Thanks to the advanced camera capabilities built into iPhones, you don’t need specialized equipment or expensive software to achieve this effect. The built-in Portrait mode and editing tools in the Photos app make it easy to blur the background and create professional-looking images.
By following the step-by-step process outlined in this article, you can take advantage of the depth effect feature on your iPhone and master the art of background blur. Experiment with different subjects, lighting conditions, and compositions to unleash your creativity and capture stunning photos that stand out from the crowd.
So go ahead, grab your iPhone and start blurring those backgrounds. Get ready to impress your friends and followers with your newfound photography skills!
FAQs
Q: Can I blur the background on iPhone photos?
Yes, you can blur the background on iPhone photos. The newer iPhone models come with advanced camera features that include the ability to add depth-of-field effects, such as blurring the background of a photo. This feature is commonly referred to as “Portrait Mode.”
Q: How do I use Portrait Mode on my iPhone?
To use Portrait Mode on your iPhone, open the Camera app and swipe to the “Portrait” mode. Ensure that your subject is within a few feet of the camera and that there is good lighting. The iPhone will automatically detect the subject and blur the background. You can also adjust the level of blur using the depth control slider.
Q: Is Portrait Mode available on all iPhone models?
No, Portrait Mode is not available on all iPhone models. It was first introduced on the iPhone 7 Plus and has been included in newer models such as the iPhone 8 Plus, iPhone X, iPhone XR, iPhone XS, iPhone 11, and subsequent models released after them. However, some older iPhone models may not have this feature.
Q: Can I add a depth-of-field effect to existing photos on my iPhone?
Yes, you can add a depth-of-field effect to existing photos on your iPhone. After capturing a photo, you can open it in the Photos app, tap “Edit,” and then tap the “Depth” option to adjust the level of background blur. Keep in mind that the best results are achieved with photos that have clear subjects and well-defined backgrounds.
Q: Are there third-party apps that can help me blur the background on iPhone photos?
Yes, there are several third-party apps available on the App Store that can help you blur the background on iPhone photos. These apps provide more advanced editing options and allow you to modify the depth-of-field effect even after capturing the photo. Some popular apps for this purpose include PortraitCam, Focos, and AfterFocus.