
Introduction:
The iPhone 13 is one of the most powerful smartphones on the market, boasting an array of impressive features. One of the standout features is the ability to blur the background in your photos, giving them a professional and artistic look. Whether you want to capture stunning portraits or add depth to your landscape shots, the iPhone 13’s advanced camera technology allows you to achieve stunning bokeh effects. In this article, we will explore how to blur the background on the iPhone 13 and take your photography skills to the next level. Whether you are a photography enthusiast or simply looking to up your Instagram game, this guide will provide you with the step-by-step instructions you need to create stunning images with the blurred background effect on your iPhone 13. So, let’s dive in and uncover the secrets behind capturing stunning photos with blurred backgrounds on your iPhone 13.
Inside This Article
- Method 1: Portrait Mode
- Method 2: Using Third-Party Apps
- Method 3: Editing Tools in the Photos App
- Conclusion
- FAQs
Method 1: Portrait Mode
One of the easiest and most accessible ways to blur the background on the iPhone 13 is by using the Portrait Mode feature. This feature leverages the advanced camera technology on the iPhone 13 to create a stunning depth-of-field effect that naturally blurs the background while keeping the subject in focus.
To use Portrait Mode, open the Camera app on your iPhone 13 and select the “Portrait” option at the bottom of the screen. Once in Portrait Mode, position your subject in the frame and make sure there is an adequate distance between the subject and the background. You’ll notice a yellow “Depth Effect” indicator on the screen when the iPhone 13 has detected the proper depth.
When you’re ready to capture the photo, simply press the shutter button. The iPhone 13 will then utilize its computational photography capabilities to analyze the scene and create a stunning portrait with a beautifully blurred background. After capturing the photo, you can access it in the Photos app and further adjust the depth-of-field effect using editing tools.
Portrait Mode on the iPhone 13 offers various lighting options, such as Natural Light, Studio Light, Contour Light, Stage Light, and Stage Light Mono. These lighting options allow you to experiment with different effects and create professional-looking portraits with ease.
It’s worth noting that Portrait Mode works best when capturing photos of people or objects with distinct shapes and clear boundaries. While it may not be as effective for blurred backgrounds in landscape or macro shots, it still offers impressive results in most situations.
By utilizing the power of Portrait Mode on your iPhone 13, you can effortlessly achieve a stunning blurred background effect that adds a touch of artistry and professionalism to your photos.
Method 2: Using Third-Party Apps
If you’re looking for more control and advanced features when it comes to blurring the background on your iPhone 13, you can turn to third-party apps. These apps offer a range of editing tools and options that allow you to achieve professional-looking blurred backgrounds in your photos. Here are some popular third-party apps you can consider:
1. Snapseed: Snapseed is a powerful and user-friendly photo editing app that offers a variety of features, including a selective blur tool. With this tool, you can easily apply blur to specific areas of your photo while keeping other parts in sharp focus. You can adjust the intensity of the blur and also add other effects to enhance your photo.
2. AfterFocus: AfterFocus is another great app for blurring backgrounds. It uses an advanced algorithm to simulate depth-of-field and allows you to create realistic bokeh effects. You can choose between different blur styles, adjust the blur strength, and even manually select the areas you want to keep in focus.
3. Focos: Focos is a popular app among iPhone users for creating stunning depth-of-field effects. It uses the dual-camera system of your iPhone 13 to capture depth information and then allows you to adjust the amount of blur and the focal point after you’ve taken the photo. You can also add other creative effects like light leaks and filters.
4. Enlight Photofox: Enlight Photofox is a comprehensive photo editing app that offers a wide range of tools, including a customizable blur tool. You can apply blur to the background of your photo and also experiment with other creative effects and adjustments to make your images truly stand out.
To use these third-party apps, simply download them from the App Store, import your photo into the app, and follow the instructions provided to apply the blur effect. Each app may have its own unique features and interface, so make sure to explore and experiment to find the one that suits your needs and preferences.
Using third-party apps can give you more flexibility and control when it comes to blurring the background on your iPhone 13. With the right app and a bit of practice, you can easily achieve professional-looking blurred backgrounds in your photos.
Method 3: Editing Tools in the Photos App
Another way to blur the background on your iPhone 13 is by utilizing the editing tools available in the built-in Photos app. This method allows you to adjust the depth of field and create a similar effect to portrait mode without actually taking the photo in portrait mode. Here’s how you can do it:
1. Open the Photos app on your iPhone 13 and select the photo you want to edit.
2. Tap on the Edit button located at the top right corner of the screen.
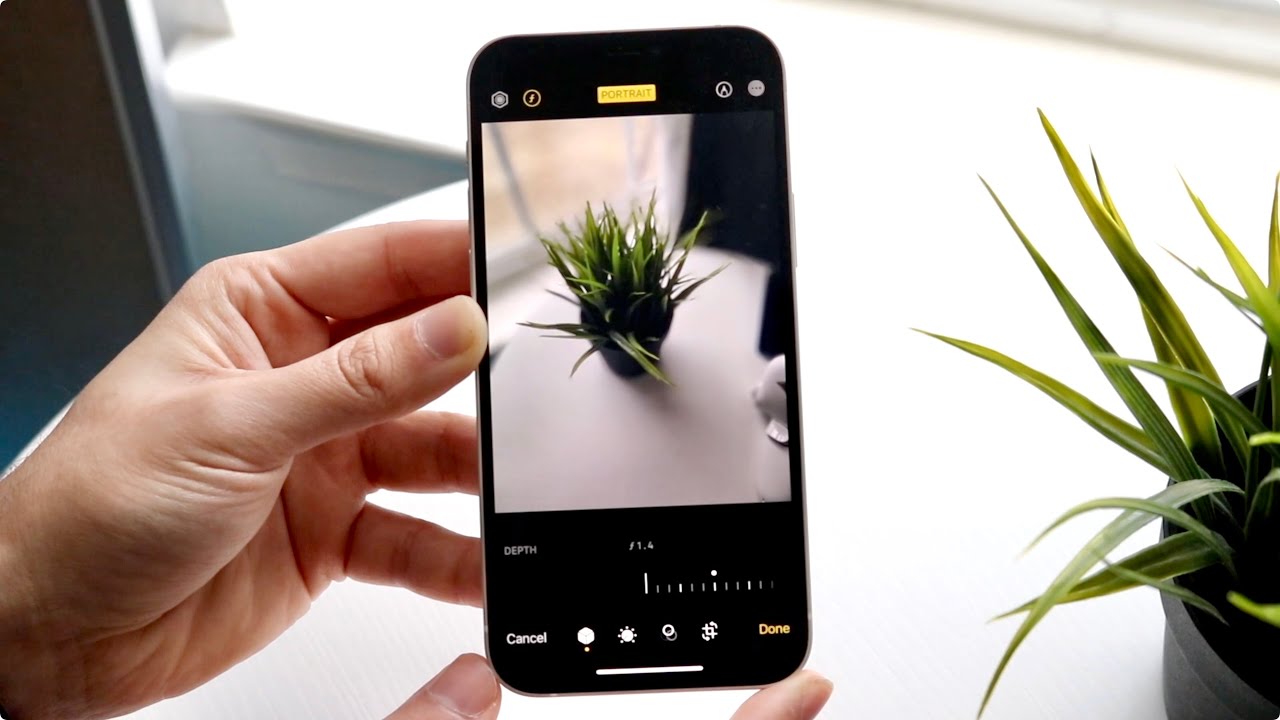
3. At the bottom of the screen, you will see various editing options. Tap on the “Depth” icon, which resembles a three-circle symbol, to access the depth control.
4. Move the depth slider to the right to increase the blur effect or to the left to reduce it. Keep adjusting until you achieve the desired level of background blur.
5. Additionally, you can experiment with other editing tools such as adjusting the brightness, contrast, or applying filters to further enhance the overall look of the image.
6. Once you are satisfied with the changes, tap on the “Done” button to save the edited photo.
7. You can now enjoy your beautifully blurred background photo taken on your iPhone 13.
It’s important to note that the effectiveness of this method may vary depending on the original photo quality and lighting conditions. For best results, try using photos with clear subject-background separation and adequate depth of field.
With the editing tools in the Photos app, you have the flexibility to adjust and personalize the background blur effect to your liking, even after capturing the photo. It offers a convenient way to enhance your images without the need for additional apps or accessories.
Now that you know all the methods to blur the background on your iPhone 13, you can unleash your creativity and capture stunning photos with a professional-looking blur effect. Enjoy capturing memories and adding an artistic touch to your photography!
Conclusion
In conclusion, the iPhone 13 offers a seamless and convenient way to blur the background of your photos. With its advanced camera system and powerful software capabilities, capturing stunning portraits with a bokeh effect has never been easier. Whether you’re a professional photographer or an amateur enthusiast, the iPhone 13 provides a range of options to customize the level of background blur and achieve the desired artistic effect.
By following the steps outlined in this article, you can confidently experiment with blurring the background of your photos and elevate the visual appeal of your images. With the combination of the amazing camera capabilities of the iPhone 13 and your creativity, the possibilities are endless.
So go ahead and unleash your inner photographer with the iPhone 13, and let your subjects truly stand out by creating beautiful, blurred backgrounds in your photos.
FAQs
1. Can I blur the background on my iPhone 13 photos?
Absolutely! With the advanced camera capabilities of the iPhone 13, you can easily blur the background in your photos to create stunning images with a professional look.
2. How do I blur the background on my iPhone 13?
To blur the background on your iPhone 13, follow these steps:
– Open the Camera app and select Portrait mode.
– Make sure your subject is within the recommended distance.
– Frame your shot and tap on the capture button.
– After capturing the photo, you can adjust the level of background blur using the Depth Control feature.
3. Can I blur the background on my existing photos?
Yes, you can! The iPhone 13 allows you to add or adjust the background blur effect even on photos you have already taken. Simply go to the Photos app, select the photo you want to edit, tap on Edit, and adjust the Depth Control to achieve the desired background blur effect.
4. What is the benefit of blurring the background?
Blurring the background in your photos can help draw attention to your subject and create a more visually appealing image. It adds depth and dimension to your photos, making your subject stand out and giving your photos a professional look.
5. Can I control the intensity of the background blur on the iPhone 13?
Yes, you can! The iPhone 13 offers a Depth Control feature that allows you to adjust the intensity of the background blur. This gives you the freedom to create the perfect balance between sharpness and blur to achieve the desired aesthetic for your photos.