
Welcome to our comprehensive guide on how to backup files to OneDrive! In this fast-paced digital era, it has become crucial to ensure the safety and accessibility of our important files and documents. OneDrive, Microsoft’s cloud storage service, offers a convenient and reliable solution for backing up your files. Whether you want to protect your cherished memories, safeguard critical work documents, or create a secure backup for your mobile apps, OneDrive has got you covered.
In this article, we will walk you through the step-by-step process of backing up files to OneDrive, regardless of whether you’re using a computer, smartphone, or tablet. From setting up your OneDrive account to selecting the files you want to backup, and from understanding the different backup methods available to accessing your files from anywhere, we’ll cover it all. So, let’s dive in and discover the power of OneDrive for keeping your data safe and accessible at all times!
Inside This Article
- What is OneDrive? – Overview of OneDrive and its features
- Setting Up OneDrive- Steps to create and set up a OneDrive account
- Uploading Files to OneDrive – How to manually upload files to OneDrive – Using the OneDrive desktop app for automatic syncing
- Organizing and Managing Files in OneDrive: Creating folders and moving files within OneDrive, Renaming, deleting, and recovering files and folders
- Syncing Files across Devices- Enabling file syncing across multiple devices using OneDrive- Troubleshooting common syncing issues
- Sharing Files and Folders in OneDrive: How to share files and set permissions for collaboration: Collaborating in real-time with Office Online integration
- Backup and Restore Files with OneDrive – Using OneDrive as a Backup Solution for Important Files – Restoring Previous Versions of Files from OneDrive Backup
- Additional Tips and Best Practices – Maximizing storage space and managing file versions in OneDrive – Enhancing security and privacy settings in OneDrive
- Conclusion
- FAQs
What is OneDrive? – Overview of OneDrive and its features
OneDrive is a cloud-based file hosting service developed by Microsoft. It allows users to store, share, and synchronize files across multiple devices. With OneDrive, you can access your files from anywhere with an internet connection, making it a convenient solution for remote work and collaboration.
One of the key features of OneDrive is its seamless integration with Microsoft Office suite. It enables you to create, edit, and collaborate on documents, spreadsheets, and presentations directly from the OneDrive web interface or desktop application. This integration makes it easier to work on files with colleagues, as multiple users can edit the same document in real-time.
Another notable feature of OneDrive is its file syncing capability. Once you upload a file to OneDrive, it will be automatically synchronized across all your devices running the OneDrive app. This means you can start working on a document on your computer and continue editing it on your phone or tablet without interruption.
One of the advantages of using OneDrive is the ample storage space it provides. Depending on your subscription plan, you can get up to 1 TB (terabyte) of storage, which is more than enough to store an extensive collection of files, including documents, photos, videos, and music.
OneDrive also offers strong data security measures, including encryption and two-factor authentication, to ensure that your files are protected from unauthorized access. Additionally, it has version history functionality that allows you to restore previous versions of files, making it a reliable backup solution.
Furthermore, OneDrive has cross-platform compatibility, meaning it can be accessed from Windows, macOS, iOS, Android, and even web browsers. This makes it easy to switch between devices and platforms while maintaining access to your files.
Setting Up OneDrive- Steps to create and set up a OneDrive account
Setting up a OneDrive account is quick and easy. Follow these simple steps to create your account and start enjoying the benefits of cloud storage:
1. Visit the OneDrive website: Go to the official Microsoft OneDrive website by typing “OneDrive” in your preferred search engine or by directly entering “onedrive.live.com” in your browser’s address bar.
2. Sign in or create a Microsoft account: If you already have a Microsoft account, sign in using your email address and password. If you don’t have one, click on the “Sign up for free” or “Create one” button, and you will be guided through the process of creating a new Microsoft account. Make sure to provide accurate information and choose a strong password for your account.
3. Verify your email address: After creating your Microsoft account, you may need to verify your email address. Check your inbox for a verification email from Microsoft and follow the instructions provided. This step is crucial to ensure the security and authenticity of your account.
4. Download the OneDrive app (optional): To access OneDrive conveniently from your computer, you can download the OneDrive desktop app. This app allows for seamless file syncing and automatic backups. Simply click on the “Download” or “Get OneDrive on all your devices” button on the OneDrive website and follow the installation instructions.
5. Explore the OneDrive interface: Once you have signed in to your OneDrive account, take some time to familiarize yourself with the interface. You will find options to upload files, create folders, and manage your files and settings. OneDrive offers a user-friendly and intuitive interface, making it easy to navigate and organize your files.
6. Customize your settings (optional): To personalize your OneDrive experience, you can customize various settings according to your preferences. These settings include language preferences, file saving options, notifications, and more. Access the settings menu by clicking on your profile picture or initials, usually located in the top right corner of the OneDrive interface.
Once you have completed these steps, you are all set to start using OneDrive. Whether you want to store important documents, share files with others, or backup your files for added security, OneDrive offers a convenient and reliable platform for all your cloud storage needs.
Uploading Files to OneDrive – How to manually upload files to OneDrive – Using the OneDrive desktop app for automatic syncing
One of the key features of OneDrive is the ability to effortlessly upload files and documents to the cloud. In this section, we will explore two methods of uploading files to OneDrive: manually uploading files and utilizing the OneDrive desktop app for automatic syncing.
Manually Uploading Files to OneDrive:
If you want to upload files to OneDrive manually, follow these simple steps:
- Open your OneDrive account in a web browser.
- Navigate to the folder where you want to upload the files.
- Click on the “Upload” button, usually located at the top of the page.
- Select the files you want to upload from your computer.
- Click on the “Open” button to start the upload process.
- Wait for the files to finish uploading. The upload progress will be displayed on the screen.
- Once the upload is complete, the files will be available in your OneDrive account.
This method allows you to manually choose which files you want to upload to OneDrive, giving you complete control over your file storage.
Using the OneDrive Desktop App for Automatic Syncing:
If you want a more seamless and automated way to upload files to OneDrive, you can use the OneDrive desktop app. The desktop app syncs files between your computer and your OneDrive storage, ensuring that your files are always up to date.
To use the OneDrive desktop app for automatic syncing, follow these steps:
- Download and install the OneDrive desktop app from the official Microsoft website.
- Once installed, sign in to your OneDrive account using your credentials.
- Choose the folders on your computer that you want to sync with OneDrive.
- The OneDrive desktop app will automatically start syncing the selected folders and files to your OneDrive storage.
- Any changes made to the synced files on your computer will be automatically saved and reflected in your OneDrive account.
By using the OneDrive desktop app, you can seamlessly upload files to OneDrive without the need for manual intervention. This ensures that you always have the most up-to-date versions of your files available across all your devices.
Whether you prefer the manual method or utilizing the OneDrive desktop app, uploading files to OneDrive is a simple and convenient way to store and access your data from anywhere.
Organizing and Managing Files in OneDrive: Creating folders and moving files within OneDrive, Renaming, deleting, and recovering files and folders
OneDrive offers a variety of features to help you organize and manage your files effectively. In this section, we will explore two essential tasks in OneDrive: creating folders and moving files, as well as renaming, deleting, and recovering files and folders.
Creating folders in OneDrive is a simple and efficient way to keep your files organized. To create a folder, navigate to the desired location within your OneDrive account. Click on the “New” button and select “Folder” from the drop-down menu. Give your folder a descriptive name and click “Create.” Your new folder will now be available for you to start organizing your files.
Once you have created folders, you can easily move files within OneDrive. To do this, select the file you want to move and click on the “Move” button in the toolbar. Choose the destination folder and click “Move” to complete the process. This allows you to keep related files together, making it easier to find and access them later.
Renaming files and folders in OneDrive is a convenient way to give them more descriptive or meaningful names. Simply right-click on the file or folder you want to rename and select “Rename” from the context menu. Type in the new name and press Enter. The file or folder will now be updated with the new name, making it easier to identify and manage.
If you no longer need a file or folder in OneDrive, you can delete it. To delete a file or folder, right-click on it and select “Delete” from the options. Alternatively, you can select the file or folder and click on the “Delete” button in the toolbar. Deleted files are initially moved to the “Recycle Bin” in OneDrive, where they can be restored if needed.
In case you accidentally delete a file or folder, OneDrive provides a simple way to recover it. Open the “Recycle Bin” in OneDrive and search for the deleted item. Right-click on it and select “Restore” to bring the file or folder back to its original location. It’s important to note that items in the “Recycle Bin” are automatically purged after a specified period, so make sure to restore them as soon as possible.
By effectively organizing and managing your files in OneDrive, you can maintain a clutter-free and efficient digital workspace. Creating folders, moving files, and utilizing the options to rename, delete, and recover files and folders will ensure that you have full control over your data, making it easy to find and access your files when you need them.
Syncing Files across Devices- Enabling file syncing across multiple devices using OneDrive- Troubleshooting common syncing issues
One of the most convenient features of OneDrive is the ability to sync files across multiple devices. This means you can access and work on your files from any device connected to your OneDrive account, ensuring seamless productivity and accessibility. Here we will guide you through the process of enabling file syncing across devices and provide solutions to common syncing issues.
Enabling file syncing across multiple devices using OneDrive:
To enable file syncing across multiple devices using OneDrive, follow these steps:
- Install the OneDrive app on all the devices you want to sync files with. The app is available for Windows, Mac, Android, and iOS.
- Launch the OneDrive app and sign in with your OneDrive account credentials.
- Select the folders or files you want to sync across devices. You can either choose specific files or sync the entire contents of your OneDrive.
- Wait for the files to sync. This process may take some time, depending on the size of your files and the speed of your internet connection.
- Once the syncing process is complete, you can access and manage your files from any synced device. Any changes made to the files will be automatically updated across all devices.
Troubleshooting common syncing issues:
While OneDrive syncing is generally smooth, you may encounter some common issues. Here are a few troubleshooting steps to help you overcome these problems:
- Check your internet connection: Slow or unstable internet connections can hinder the syncing process. Ensure that you have a stable and reliable internet connection.
- Restart the OneDrive app: Sometimes, a simple restart of the OneDrive app can resolve syncing issues. Close the app completely and relaunch it to see if the problem is resolved.
- Check for updates: Make sure you are using the latest version of the OneDrive app. Check for updates and install them if available.
- Check available storage: If your OneDrive storage is full, syncing may fail. Clear up space on your OneDrive or upgrade your storage plan to resolve the issue.
- Verify file size and file type limitations: OneDrive has certain limitations on file sizes and types that can be synced. Make sure your file meets the requirements to avoid syncing issues.
- Reset OneDrive: As a last resort, you can try resetting the OneDrive app. This will clear all the sync settings and start fresh. Note: Resetting OneDrive will remove all currently synced files, so make sure to have a backup.
By following these steps and troubleshooting techniques, you can ensure a smooth syncing experience across your devices. Enjoy the convenience of accessing your files anytime, anywhere with OneDrive!
Sharing Files and Folders in OneDrive: How to share files and set permissions for collaboration: Collaborating in real-time with Office Online integration
One of the key features of OneDrive is the ability to share files and folders with others, making collaboration seamless and efficient. Whether you’re working on a team project or need to share documents with clients or colleagues, OneDrive offers a variety of options for sharing and collaborating. In this section, we will explore how to share files and folders in OneDrive, set permissions for collaboration, and take advantage of real-time collaboration with Office Online integration.
When it comes to sharing files in OneDrive, there are multiple ways to do so. The simplest method is to right-click on a file or folder and choose the “Share” option. This will open a sharing pane where you can enter the email addresses of the recipients or select contacts from your address book. You can also choose whether recipients can view or edit the file, giving you control over the level of collaboration.
Furthermore, OneDrive allows you to create shared links that can be easily sent via email, chat, or other communication platforms. With shared links, you can grant access to specific files or folders without requiring the recipient to have a OneDrive account. This is especially useful when sharing files with external partners or clients who may not be using OneDrive.
Another powerful collaboration feature offered by OneDrive is the ability to set permissions for shared files and folders. Once you have shared a file or folder, you can manage permissions by clicking on the “Manage access” option. This allows you to add or remove users, change their access levels, and even set expiration dates for shared links.
What sets OneDrive apart from other cloud storage services is its deep integration with Office Online. With Office Online integration, multiple users can simultaneously edit Word, Excel, or PowerPoint documents in real-time. Changes made by one user are instantly updated for others, enabling seamless collaboration and eliminating the need for constant file sharing and version control.
In addition to real-time collaboration, Office Online also provides a range of tools and features that enhance productivity. Users can comment on documents, track changes, and even chat with collaborators within the document itself. This makes the collaboration process more streamlined and efficient.
Whether you need to share files with colleagues, clients, or external partners, OneDrive offers a comprehensive set of sharing and collaboration features. By utilizing shared links, setting permissions, and taking advantage of the Office Online integration, you can enhance collaboration and productivity, making OneDrive a preferred choice for teams and individuals working together.
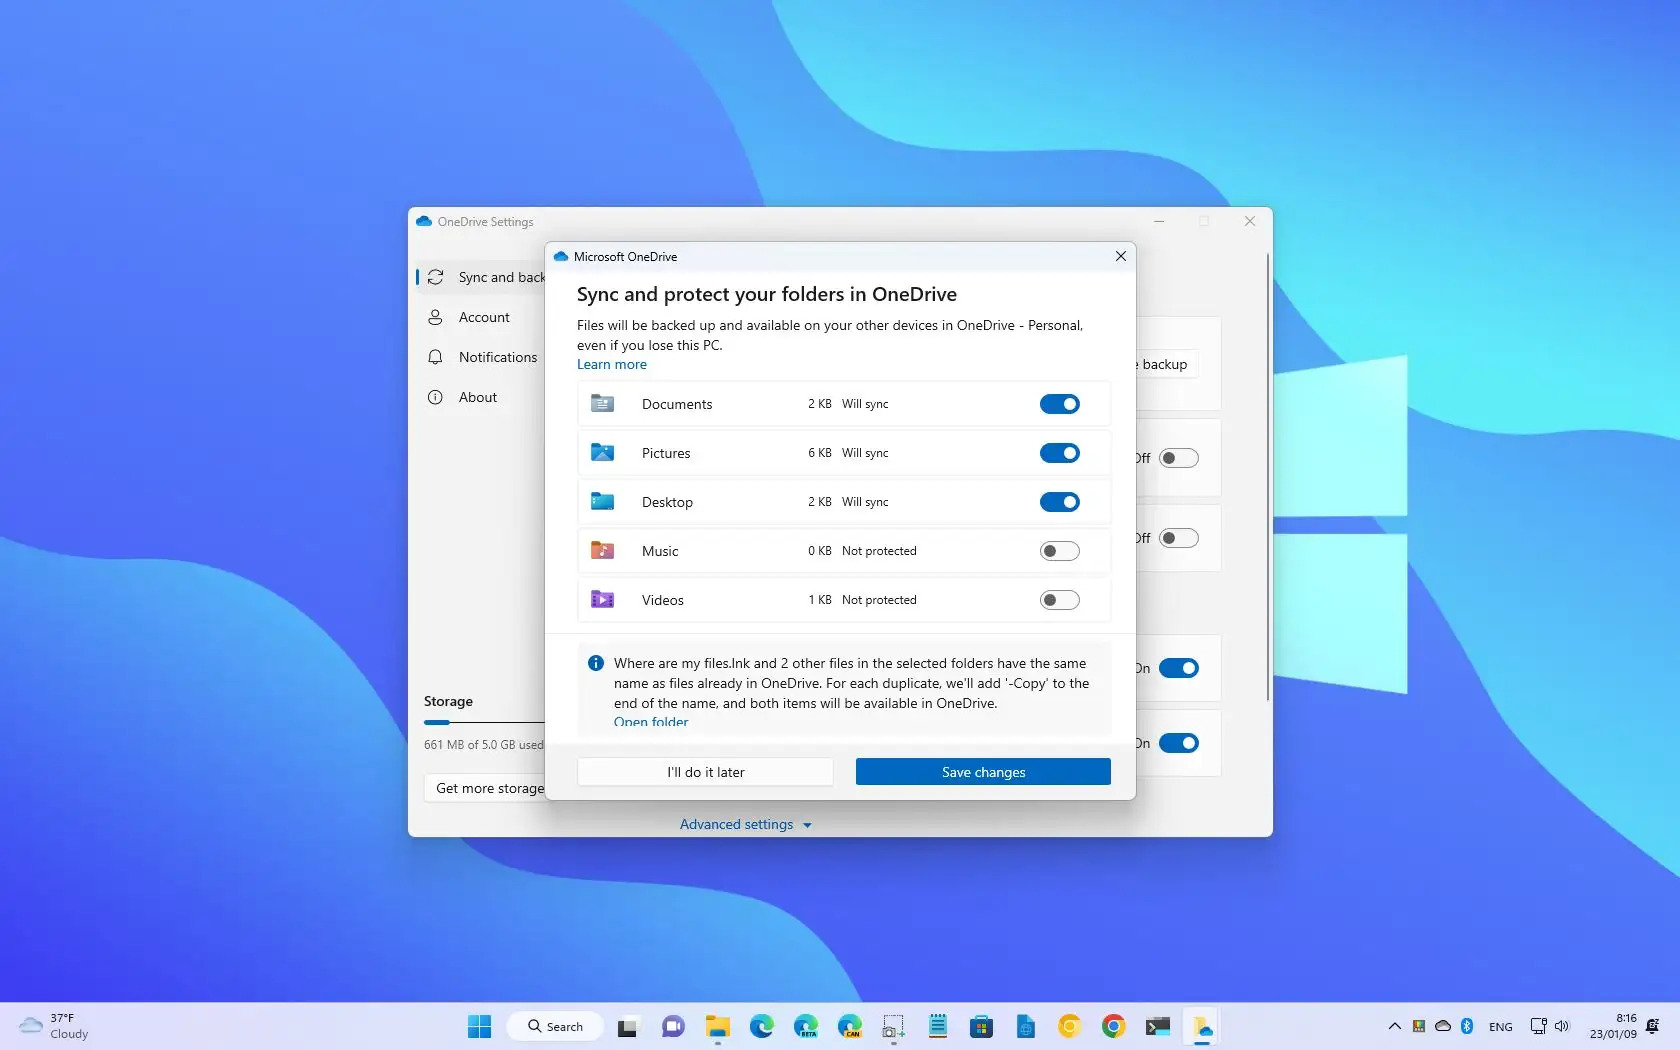
Backup and Restore Files with OneDrive – Using OneDrive as a Backup Solution for Important Files – Restoring Previous Versions of Files from OneDrive Backup
One of the key features of OneDrive is its ability to serve as a reliable backup solution for your important files. Whether you accidentally delete a file, experience a computer crash, or want to access an older version of a document, OneDrive has you covered. In this section, we’ll explore how you can utilize OneDrive for file backup and restoration.
Using OneDrive as a backup solution is simple and convenient. By storing your files in the cloud, you can ensure that your data is secure and accessible from anywhere. To begin, you’ll need to upload the files you want to back up to your OneDrive account. This can be done manually by selecting the files and choosing the “Upload” option, or you can set up automatic syncing with the OneDrive desktop app. With automatic syncing enabled, your files will be backed up to OneDrive in real-time, ensuring that you never lose important data.
Once your files are backed up, you can easily restore previous versions of files from your OneDrive backup. This can be extremely useful if you’ve made changes to a document and later realize you want to revert back to an earlier version. To access previous versions, simply right-click on the file in OneDrive and select “Version history.” This will display a list of all the available versions of that file. You can then choose the version you want to restore and OneDrive will replace the current file with that specific version.
It’s important to note that the version history feature in OneDrive is available for Microsoft Office files, including Word documents, Excel spreadsheets, and PowerPoint presentations. This means that you can easily revert back to a previous draft of a document, undoing any unwanted changes. However, for non-Office files, such as PDFs or images, only the most recent version is stored in OneDrive. So, it’s advisable to make additional backups of important non-Office files using other methods, such as external hard drives or cloud storage services.
By maintaining a regular backup routine with OneDrive, you can enjoy peace of mind knowing that your important files are safe and secure. In the event of accidental deletions or data loss, you can easily restore previous versions of files from your OneDrive backup. So, take advantage of this powerful feature and ensure the longevity and accessibility of your valuable data.
Remember, backing up your files is not only important for protection against data loss but also for the preservation of your work. So, make it a habit to regularly back up your files to OneDrive and enjoy the benefits of a reliable and convenient backup solution.
Additional Tips and Best Practices – Maximizing storage space and managing file versions in OneDrive – Enhancing security and privacy settings in OneDrive
When it comes to using OneDrive effectively, there are some additional tips and best practices that can help you optimize your experience. Let’s explore two important aspects: maximizing storage space and managing file versions, as well as enhancing security and privacy settings in OneDrive.
Maximizing storage space and managing file versions in OneDrive
OneDrive offers a generous amount of storage space, but it’s always a good idea to make the most out of it. Here are some tips to help you maximize your storage space:
- Organize files into folders: Creating well-structured folders can help keep your files organized and make it easier to find what you need. This will also prevent duplicate files from taking up unnecessary space.
- Use the OneDrive desktop app: By using the OneDrive desktop app, you can take advantage of the Files On-Demand feature. This feature allows you to access your files without actually downloading them, saving valuable storage space.
- Delete unnecessary files: Regularly go through your OneDrive files and delete any unnecessary or outdated files. This will free up space and ensure that you’re only storing what you actually need.
- Manage file versions: OneDrive keeps a version history of your files, allowing you to revert back to previous versions if needed. However, this can also take up storage space. You can manage file versions by setting a limit on how many versions you want to keep or by completely disabling the feature if you don’t need it.
Enhancing security and privacy settings in OneDrive
When it comes to storing your files in the cloud, security and privacy are of utmost importance. Here are some tips to enhance the security and privacy settings in OneDrive:
- Enable two-factor authentication: Two-factor authentication adds an extra layer of security to your OneDrive account by requiring a second verification step, such as a code sent to your mobile device, in addition to your password.
- Set up strong passwords: Use a unique and strong password for your OneDrive account to prevent unauthorized access. Avoid using easily guessed passwords and consider using a password manager to help you create and store complex passwords.
- Manage sharing settings: Be cautious when sharing files and folders in OneDrive. Review and adjust the sharing settings to ensure that only authorized individuals have access and that sensitive information remains protected.
- Regularly review connected apps: Check the list of connected apps in your OneDrive settings and revoke access for any apps that you no longer use or trust. This will prevent unauthorized access to your files through third-party applications.
By following these additional tips and best practices, you can effectively manage your storage space, ensure file version control, and enhance the security and privacy of your files in OneDrive. Take the time to review and implement these strategies to make the most out of your OneDrive experience.
Conclusion
In conclusion, backing up your files to OneDrive is an essential step in ensuring the safety and security of your valuable data. With its seamless integration and user-friendly interface, OneDrive provides a convenient solution for storing and accessing your files from anywhere, at any time. By following the steps outlined in this guide, you can easily set up and configure your backup process to automatically sync your files to the cloud.
Remember to regularly check and update your backup settings to ensure that all of your important files are being securely stored on OneDrive. By doing so, you can rest easy knowing that your data is protected against accidental loss, hardware failures, or other unforeseen circumstances.
So, why wait? Take action today and safeguard your files by backing them up to OneDrive. Start enjoying the peace of mind that comes with knowing your valuable data is safely stored in the cloud.
FAQs
1. Can I backup files from my mobile device to OneDrive?
Yes, you can easily backup files from your mobile device to OneDrive. OneDrive offers a mobile app that allows you to upload and sync files from your smartphone or tablet directly to your OneDrive storage. Simply install the OneDrive app on your mobile device, log in to your account, and select the files or folders you wish to backup.
2. How much storage space do I get with OneDrive?
OneDrive provides different storage plans and options, depending on your needs. By default, every Microsoft account is allocated 5 GB of free storage space on OneDrive. However, you can choose to upgrade to a paid plan which offers larger storage capacities, ranging from 100 GB to up to 1 TB per user.
3. Can I access my OneDrive files offline?
Yes, you can access your OneDrive files offline. The OneDrive mobile app allows you to mark files and folders as “available offline.” This means that a copy of those files will be downloaded and stored locally on your device, allowing you to access them even when you don’t have an internet connection.
4. How secure is OneDrive for backup?
OneDrive takes the security and privacy of your files seriously. It offers various measures to protect your data, including encryption at rest and in transit, two-factor authentication, and robust access controls. Microsoft also regularly monitors and updates its security protocols to ensure the safety of your files.
5. What happens if I accidentally delete a file from OneDrive?
If you accidentally delete a file from OneDrive, don’t worry! OneDrive has a built-in Recycle Bin feature that keeps your deleted files for a certain period of time. You can easily recover deleted files from the Recycle Bin within that timeframe. If the file has been permanently deleted from the Recycle Bin, you may be able to restore it using the version history feature, which allows you to revert to an earlier version of the file.