
The iPhone has become a versatile and indispensable tool in our daily lives, allowing us to connect with others, access information, and accomplish various tasks on the go. One important task that many iPhone users often need to do is forwarding emails. Whether you want to share an important message with a colleague, forward a funny email to a friend, or simply send a document to someone, learning how to forward emails on your iPhone can save you time and effort. In this article, we will guide you through the steps to effectively forward an email on your iPhone, ensuring that your messages reach the intended recipients seamlessly. So, let’s dive in and discover how you can effortlessly forward emails from your iPhone!
Inside This Article
- Steps to Forward an Email on Your iPhone
- Additional Options:
- Troubleshooting: Resolve forwarding issues, Check for email restrictions, Troubleshoot mail server settings
- Conclusion
- FAQs
Steps to Forward an Email on Your iPhone
Do you often find yourself needing to forward an email from your iPhone? Whether it’s a funny joke, an important message, or a valuable document, forwarding emails on your iPhone is a simple and convenient process. In this article, we will guide you through the steps to forward an email on your iPhone using the Mail app. So, let’s get started!
1. Configure your email account
The first step is to make sure your email account is properly set up on your iPhone. If you haven’t done so already, go to the Settings app and select “Mail.” From there, tap on “Accounts” and choose your email provider. Enter your email address and password, and your account will be configured.
2. Open the Mail app
Once your email account is set up, you can open the Mail app on your iPhone. The Mail app is represented by a blue envelope icon and is usually located on your home screen.
3. Select the email you want to forward
In the Mail app, find the email you wish to forward. You can browse your inbox or use the search function to locate a specific email. When you find the email you want to forward, tap on it to open it.
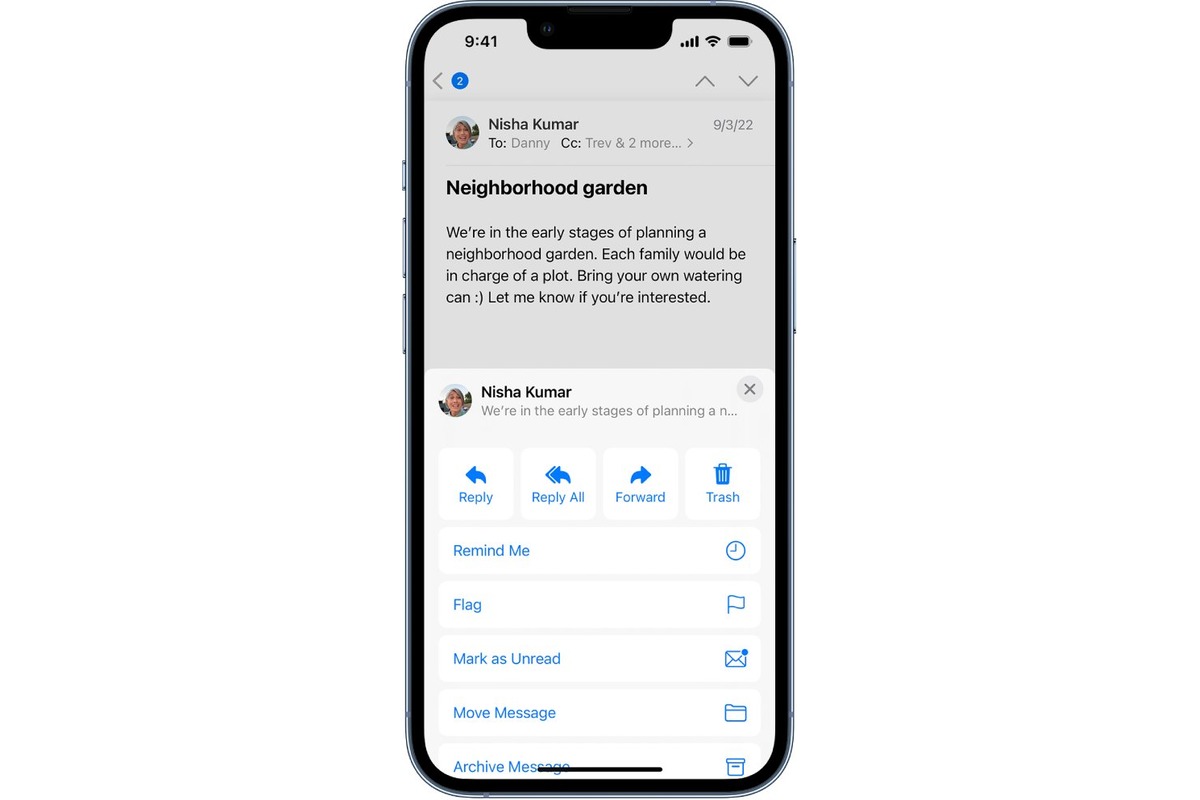
4. Tap the Forward button
With the email open, you will see several options at the bottom of the screen. Tap the forward button, which looks like a curved arrow pointing to the right. This will bring up a new email compose window with the forwarded email already included in the body of the message.
5. Add any additional message (optional)
If you want to add a personal message along with the forwarded email, you can do so in the body of the new email. Tap on the body of the email and start typing your message. You can also customize the subject line if needed.
6. Choose the recipient(s)
Finally, you just need to choose the recipient(s) for the forwarded email. You can enter email addresses manually or choose from your contacts. Once you’re done, tap the “Send” button, and the email, along with your additional message, will be forwarded to the recipient(s).
And there you have it! By following these simple steps, you can easily forward emails on your iPhone using the Mail app. Whether you need to share important information or simply pass along an interesting read, forwarding emails has never been easier. Start forwarding those emails and stay connected!
The
Additional Options:
section provides you with advanced features to customize your forwarded emails on your iPhone. These options allow you to add recipients, include a message, add attachments, and modify the subject line. Let’s explore each of these features in detail.
Add Recipients:
When forwarding an email, you can easily add additional recipients to the message. This is useful if you want to share the email with multiple people or forward it to a group. To add recipients, simply tap the “To” field and enter the email addresses of the desired recipients. You can also select contacts from your address book by tapping the “+” icon. Once you’ve added all the necessary recipients, tap “Done” to proceed.
Include a Message:
Sometimes, simply forwarding an email may not provide enough context for the recipients. In such cases, you can include a message along with the forwarded email. This message serves as a personalized note to accompany the forwarded content. To include a message, scroll down to the body of the email and tap on the blank area below the original email content. This will bring up the keyboard, allowing you to type your message. Once you’ve written your message, tap “Send” to forward the email with your added note.
Add Attachments:
If you need to forward an email with additional files or attachments, you can easily do so using your iPhone. To add attachments, open the email you want to forward and tap the arrow icon at the bottom of the screen to bring up the menu options. From the menu, select “Forward” and then tap on the blank area below the original email content. This will bring up the keyboard, along with the option to add attachments. Tap the “+” icon and choose the method you prefer to add attachments, such as selecting files from your iCloud Drive, Photos, or other file storage apps. Once you’ve added the necessary attachments, tap “Send” to forward the email with the attachments included.
Modify the Subject Line:
By default, when you forward an email, the subject line remains the same as the original email. However, if you want to modify the subject line to better describe the forwarded content, you have the option to do so. To modify the subject line, open the email you want to forward and tap the arrow icon at the bottom to bring up the menu options. From the menu, select “Forward” and then tap on the subject line to edit it. Once you’ve made the desired changes, tap “Send” to forward the email with the modified subject line.
Take advantage of these additional options to customize your forwarded emails on your iPhone. Whether you need to add recipients, include a message, attach files, or modify the subject line, these features will help you tailor your forwarded emails to your specific needs.
Troubleshooting: Resolve forwarding issues, Check for email restrictions, Troubleshoot mail server settings
Forwarding emails on your iPhone can sometimes encounter issues. Fortunately, there are a few troubleshooting steps you can take to overcome these challenges. Here are some common problems you may encounter and their solutions:
Resolve forwarding issues: If you are having trouble forwarding an email, check if there are any technical issues that might be causing the problem. Restart your iPhone and try forwarding the email again. Sometimes, a simple restart can resolve minor glitches and restore the functionality.
Check for email restrictions: Another reason why you may be unable to forward emails is due to email restrictions set by your email provider. Some email providers have certain policies in place to prevent forwarding of certain emails or attachments. Check with your email provider to see if they have any specific restrictions in place and if so, try forwarding a different email to see if the issue persists.
Troubleshoot mail server settings: If your email forwarding problem continues, it might be worth checking your mail server settings. Make sure that your incoming and outgoing mail servers are properly configured in your iPhone settings. Incorrect server settings can cause issues with email forwarding. You may need to update or reconfigure the settings as per your email provider’s recommendations.
By following these troubleshooting steps, you should be able to resolve most forwarding issues on your iPhone. However, if the problem persists, it may be a good idea to contact your email provider or the Apple support team for further assistance in resolving the issue.
In conclusion, forwarding emails on your iPhone is a simple and essential task that can be done effortlessly through the native Mail app. By following the step-by-step instructions mentioned earlier in this article, you can easily forward important emails to recipients of your choice, whether they are colleagues, friends, or family members. This feature is particularly useful when you need to share information, documents, or conversations with others, ensuring smooth communication and collaboration. With the convenience and efficiency of email forwarding at your fingertips, you can stay connected and organized, keeping your inbox streamlined and ensuring important messages reach the right people. So, next time you receive an email that requires sharing or forwarding, don’t hesitate to use your iPhone and make the most of this powerful feature.
FAQs
Q: How do I forward an email on my iPhone?
A: Forwarding an email on your iPhone is simple! Open the Mail app, locate the email you want to forward, and then tap on the forward arrow icon. Enter the recipient’s email address and any additional message you want to include, and tap send. The email will be forwarded to the desired recipient.
Q: Can I forward multiple emails at once on my iPhone?
A: Unfortunately, the built-in Mail app on the iPhone does not allow you to forward multiple emails at once. You will need to individually forward each email if you want to send them to a single recipient. However, there are third-party email apps available on the App Store that offer this functionality.
Q: Can I forward attachments with an email on my iPhone?
A: Absolutely! When forwarding an email on your iPhone, any attachments that were included with the original message will be included in the forwarded email as well. However, make sure the size of the attachment does not exceed the email service provider’s attachment size limits.
Q: Is it possible to edit the content of an email before forwarding it on my iPhone?
A: Unfortunately, the default Mail app on the iPhone does not provide an option to directly edit the content of an email before forwarding it. If you need to make changes or add additional information, you can copy the content of the email, create a new email, paste the content, make the necessary edits, and then forward it to the desired recipient.
Q: Will the recipient see that the email was forwarded from my iPhone?
A: By default, when you forward an email on your iPhone, the recipient will not see any indication that it was forwarded from a mobile device. The forwarded email will appear to be sent directly from your email address, similar to any other email you send. However, if you have your email signature enabled, it will be included in the forwarded email, which may reveal that you are using an iPhone.