
If you own multiple iPads and want to transfer your precious photos from one device to another, you’ve come to the right place. Whether you’re upgrading to a new iPad or simply want to share your photo collection with a friend or family member, knowing how to transfer photos from iPad to iPad is essential.
In this article, we will explore different solutions to help you seamlessly transfer your photos between iPads. From using iCloud Photo Library to utilizing third-party apps, we will guide you through the entire process step by step. By the end, you’ll have a comprehensive understanding of how to transfer photos from one iPad to another and be able to do it with ease and confidence.
Inside This Article
- Point 1: Using iCloud Photo Library
- Point 2: Using AirDrop
- Point 3: Using iTunes
- Point 4: Using Third-Party Apps
- Conclusion
- FAQs
Point 1: Using iCloud Photo Library
One of the most convenient ways to transfer photos from one iPad to another is by using the iCloud Photo Library. This feature allows you to sync your photos across all your Apple devices seamlessly. By enabling iCloud Photo Library on both iPads, you can easily access and transfer photos from one device to another without the need for any physical connections.
To use iCloud Photo Library for transferring photos, make sure that both iPads are connected to the internet and signed in to the same iCloud account. Follow the steps below:
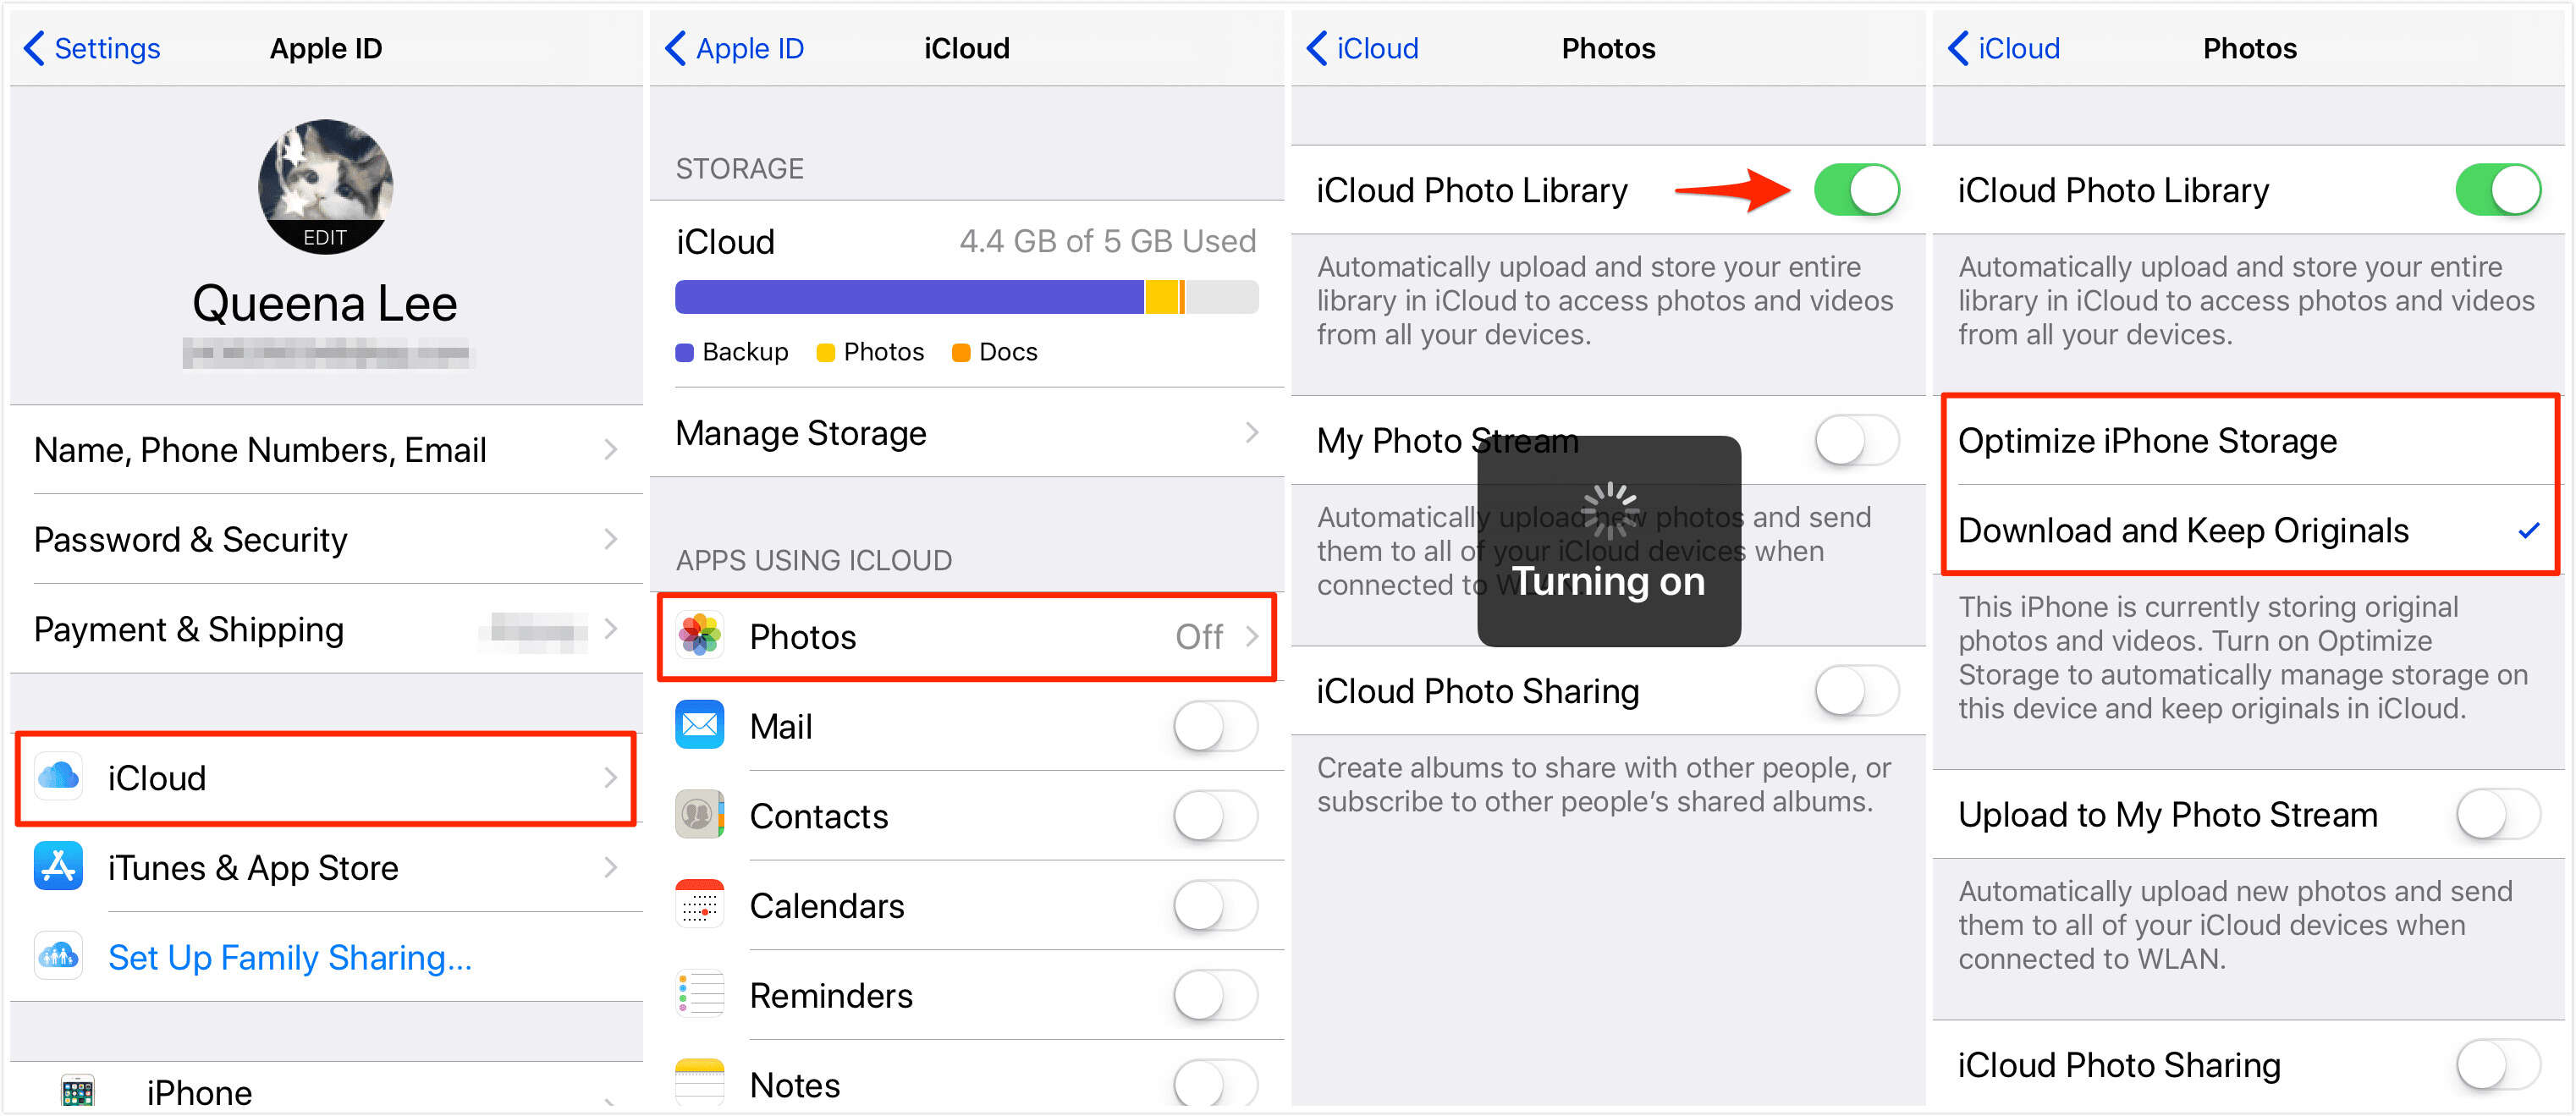
1. On the source iPad, go to “Settings” and tap on your name at the top of the screen.
2. Select “iCloud” and then choose “Photos”.
3. Toggle on the “iCloud Photo Library” option.
4. Wait for the iPad to upload all the photos to the iCloud server. This may take some time depending on the size of your photo library and the internet speed.
5. Once the photos are uploaded, take the second iPad and repeat the first two steps.
6. Make sure the “iCloud Photo Library” option is toggled on.
7. Wait for the photos to sync with the second iPad. You should now see all your photos appearing on the device.
If you want to transfer specific photos or albums, you can create albums on the source iPad and share them with the second iPad using the iCloud sharing feature. This allows you to handpick the photos you want to transfer and have them available on both devices.
With iCloud Photo Library, transferring photos from one iPad to another becomes a breeze. It eliminates the hassle of manual transfers and ensures that your photos are safely stored in the cloud, accessible from any of your Apple devices.
Point 2: Using AirDrop
AirDrop is a convenient and efficient way to transfer photos from one iPad to another. It uses a combination of Bluetooth and Wi-Fi technology to create a peer-to-peer connection between devices, allowing for seamless file transfer.
To transfer photos using AirDrop, follow these steps:
- Ensure that both iPads have AirDrop enabled. To do this, swipe up from the bottom of the screen to open the Control Center, then tap on the “AirDrop” icon. Select “Contacts Only” or “Everyone” depending on your preference.
- On the iPad from which you want to transfer photos, open the Photos app and select the photos you wish to transfer. You can select multiple photos by tapping on the “Select” option and then choosing the desired photos.
- Tap on the “Share” button, represented by a square with an arrow pointing upwards.
- From the list of sharing options, tap on the AirDrop icon.
- A list of available devices nearby will appear. Select the iPad to which you want to transfer the photos.
- On the receiving iPad, a notification will appear requesting permission to accept the AirDrop transfer. Tap on “Accept” to proceed.
- The selected photos will then be transferred from the sender’s iPad to the recipient’s iPad via AirDrop.
It’s important to note that both iPads need to be in close proximity to each other, and AirDrop needs to be enabled on both devices for successful transfer. Additionally, AirDrop requires devices running iOS 7 or later.
Using AirDrop is not only quick but also secure, as it uses encryption to protect your data during the transfer process. This method eliminates the need for any cables or internet connection, making it a convenient option for transferring photos between iPads.
Point 3: Using iTunes
If you prefer a more traditional method to transfer photos from one iPad to another, iTunes is a reliable option. iTunes not only allows you to sync your devices, but also enables you to transfer photos effortlessly. Here’s how you can use iTunes to transfer your photos:
Step 1: Connect your source iPad to your computer using the USB cable, and open iTunes.
Step 2: Select your source device by clicking on the device icon in the upper-left corner of the iTunes window.
Step 3: Go to the “Photos” tab in the left sidebar of the iTunes window.
Step 4: Check the box next to “Sync Photos” and choose the folder or albums from which you want to transfer the photos.
Step 5: Click the “Apply” or “Sync” button to start transferring the photos to your computer.
Step 6: Disconnect your source iPad from the computer and connect your target iPad.
Step 7: Select your target device in iTunes and go to the “Photos” tab.
Step 8: Check the box next to “Sync Photos” and choose the folder or albums where you want to transfer the photos to.
Step 9: Click the “Apply” or “Sync” button to start transferring the photos to your target iPad.
Using iTunes may take a bit longer than other methods, but it offers a secure and efficient way to transfer your photos. Keep in mind that iTunes can only transfer photos from your computer to your iPad, so make sure you have already imported the photos you want to transfer into your computer before starting the process.
Point 4: Using Third-Party Apps
When it comes to transferring photos from one iPad to another, using third-party apps can be a convenient and effective solution. There are various apps available in the App Store that can simplify the process and allow you to quickly transfer your photos. Here are some popular third-party apps that you can consider:
1. Dropbox: Dropbox is a popular cloud storage service that also offers a seamless way to transfer photos between devices. Simply upload your photos to your Dropbox account on one iPad and then access them on the other iPad using the Dropbox app. This method ensures that your photos are securely stored in the cloud and can be easily accessed whenever needed.
2. Google Photos: Google Photos is another excellent option for transferring photos. This app allows you to automatically sync your photos across multiple devices, including iPads. You can enable the “Backup & Sync” feature in the Google Photos app on both iPads, and it will automatically upload your photos to your Google account. Once the photos are uploaded, you can easily access them on the other iPad.
3. Photo Transfer App: Photo Transfer App is specifically designed for transferring photos between iOS devices. It allows you to transfer photos wirelessly over Wi-Fi or Bluetooth. Simply install the app on both iPads, establish a connection between them, and select the photos you want to transfer. The app will handle the rest, ensuring a quick and seamless transfer process.
4. AirMore: AirMore is a versatile app that not only allows you to transfer photos but also enables easy file management between iOS devices. With AirMore, you can transfer photos wirelessly over Wi-Fi, view and organize your photo library, and even backup and restore your photos. It offers a user-friendly interface and a range of features that make photo transfer a breeze.
5. PhotoSync: PhotoSync is a powerful photo transfer app that offers various transfer options, including Wi-Fi, Bluetooth, and even using a QR code. It allows you to transfer photos and videos between iOS devices, as well as between iOS and other platforms like Android and Windows. You can customize the transfer settings and even create automatic transfer workflows for a seamless experience.
Using third-party apps not only provides you with more flexibility in choosing the transfer method but also offers additional features for managing and organizing your photos. Before using any of these apps, make sure to read user reviews, check their compatibility with your iOS version, and consider any in-app purchases or subscription fees that may be required.
Conclusion:
In conclusion, transferring photos from one iPad to another can be a seamless process with the right solutions. Whether you choose to use iCloud, iTunes, or third-party applications like EaseUS MobiMover, you can easily transfer your precious memories from your old iPad to your new one. Each method offers its own set of advantages and considerations, so be sure to choose the one that best suits your needs.
Remember to ensure a stable internet connection and have enough storage space available on your devices before initiating the transfer. Additionally, it’s always a good idea to back up your photos and other important data before starting the transfer process.
By following the steps outlined and considering the tips provided, you can effortlessly transfer your photos from one iPad to another, preserving your memories and making them accessible on your new device. So go ahead, upgrade your iPad and transfer your photos with ease!
FAQs
1. Can I transfer photos from one iPad to another?
Yes, it is possible to transfer photos from one iPad to another. There are a few different methods you can use, including using iCloud, iTunes, or third-party apps.
2. How can I transfer photos from iPad to iPad using iCloud?
To transfer photos from one iPad to another using iCloud, follow these steps:
- Ensure that both iPads are signed in with the same Apple ID.
- On the source iPad, go to Settings → [Your Name] → iCloud → Photos, and enable “iCloud Photos.”
- Wait for the photos to sync with iCloud.
- On the destination iPad, go to Settings → [Your Name] → iCloud → Photos, and enable “iCloud Photos.”
- Allow the destination iPad to sync with iCloud and download the photos.
3. Can I transfer photos from iPad to iPad using iTunes?
Yes, you can transfer photos from one iPad to another using iTunes. Here’s how:
- Connect the source iPad to your computer and launch iTunes.
- Select the source iPad in iTunes.
- Click on the “Photos” tab.
- Choose the photos you want to transfer.
- Click on the “Sync” button to start transferring the photos.
- Disconnect the source iPad and connect the destination iPad.
- Select the destination iPad in iTunes.
- Click on the “Photos” tab.
- Check the option to sync photos and choose the photos you want to transfer.
- Click on the “Sync” button to transfer the photos to the destination iPad.
4. Are there any third-party apps that can help transfer photos from iPad to iPad?
Yes, there are several third-party apps available for transferring photos from one iPad to another. Some popular options include AirDrop, Dropbox, Google Photos, and PhotoSync. These apps offer simple and convenient ways to transfer photos wirelessly between iPads.
5. Can I transfer specific albums or folders of photos from iPad to iPad?
Yes, you can transfer specific albums or folders of photos from one iPad to another. The method you choose will depend on the transfer method you’re using. For example, when using iCloud, you can select specific albums to sync between devices. Similarly, when using iTunes, you can choose specific photo folders to transfer. Third-party apps also often allow you to select specific albums or folders for transfer.