
Are you tired of looking at the same font every day on your Android device? Well, you’re in luck! Android offers a wide range of customization options, including the ability to change the font. Changing the font on your Android device can give it a fresh new look and add a touch of personalization. Whether you want to make your device more stylish or improve readability, changing the font is a simple yet effective way to do it. In this article, we will guide you through the process of changing the font on your Android device, step by step. So, let’s dive in and give your Android device a fresh new look!
Inside This Article
- Changing the Font on Android
- Method 1: Using Built-in Android Settings
- Method 3: Using a Custom Launcher
- Method 4: Modifying the System Fonts (Rooted Devices)
- Conclusion
- FAQs
Changing the Font on Android
Are you tired of the default font on your Android smartphone? Do you want to add a personal touch and give your device a unique look? Well, you’re in luck! Android allows you to easily change the font style and size to suit your preferences. In this article, we will explore various methods to change the font on your Android device, ranging from built-in settings to third-party apps and even rooting options.
Personalizing the font on your Android device can significantly enhance your user experience. It allows you to add a dash of personality to your device, making it feel more like your own. Whether you prefer a sleek and modern font or something more playful and whimsical, changing the font can transform the entire look and feel of your device.
Method 1: Using Built-in Android Settings
The easiest way to change the font on your Android device is by using the built-in settings. Here’s how you can do it:
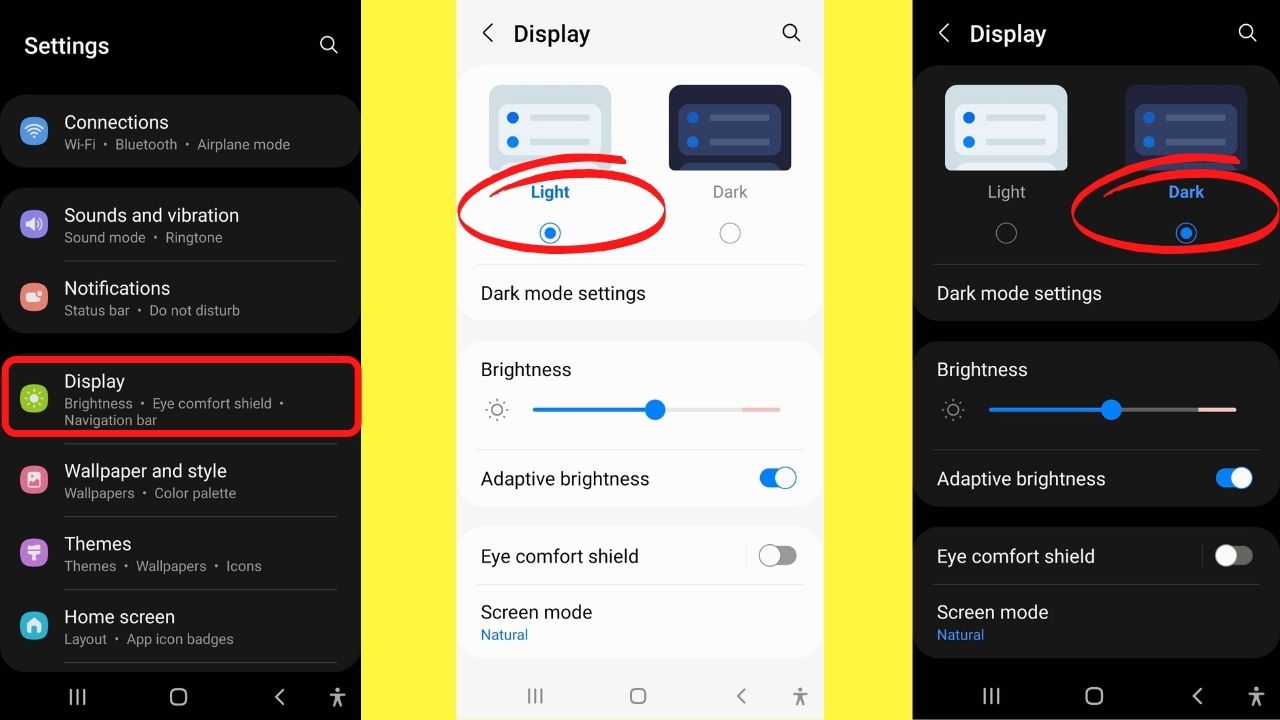
- Open the settings menu on your Android device. You can typically find it by swiping down from the top of the screen and tapping the gear icon.
- Scroll down and look for the “Display” or “Screen” section.
- Tap on “Font Size” or “Font Style”, depending on your device.
- You’ll be presented with a list of pre-installed font options. Choose the one that catches your eye.
- Once you’ve made your selection, the new font will be applied to the system immediately.
Method 2: Using Third-Party Apps
If the built-in settings don’t offer the font style you’re looking for, you can turn to third-party font changer apps. These apps provide a vast library of fonts that can be easily downloaded and applied to your Android device. Here’s how you can use a third-party font changer app:
- Head over to the Google Play Store and download a font changer app of your choice.
- Once installed, open the app and browse through the available font options.
- Choose the font that appeals to you and customize it to your liking by adjusting the size and other available options.
- Apply the font, and voila! Your device will now be adorned with the new font.
Method 3: Using a Custom Launcher
If you’re looking for a more comprehensive way to modify the font on your Android device, consider using a custom launcher. Custom launchers offer extensive personalization options, including font customization. Here’s how to change the font using a custom launcher:
- Go to the Google Play Store and install a custom launcher from the wide range of options available.
- After installing the custom launcher, go to your device’s settings and find the “Apps & Notifications” or “App Manager” section.
- Select the custom launcher as your default home app.
- Once you’ve set the custom launcher as your default, go to its settings menu and look for the font customization options.
- Choose your preferred font from the available options and apply it to your device.
Method 4: Modifying the System Fonts (Rooted Devices)
For advanced users with rooted Android devices, modifying the system fonts is an option. Rooting gives you full control over your device, allowing you to make changes that are otherwise restricted. Here’s how you can change the system fonts on rooted Android devices:
- Root your Android device using a trustworthy rooting method.
- Download and install a root-enabled file manager app from the Google Play Store.
- Open the root-enabled file manager app and navigate to the system font directory. It is usually located in the /system/fonts/ directory.
- Replace or add custom font files to the system font directory. Make sure the font files are in the correct format and have the necessary permissions.
- Once you’ve made the changes, reboot your device for the modifications to take effect.
Method 1: Using Built-in Android Settings
Accessing the device settings menu on your Android phone or tablet is the first step towards changing the font. To do this, simply open the “Settings” app, which is usually represented by a gear icon.
Once you’re in the settings menu, scroll down until you find the “Display” or “Screen” section. This section may be labeled differently depending on your device’s manufacturer or Android version.
Inside the “Display” or “Screen” section, you’ll find the options to adjust the font size and font style. Select either “Font Size” or “Font Style,” depending on what you want to change.
If you choose to change the font size, you’ll be presented with a range of options, from small to extra large. Simply choose the size that suits your preference by tapping on it.
On the other hand, if you want to change the font style, you’ll see a list of pre-installed font options. These fonts may vary depending on your device, but commonly include options like Roboto, Noto Sans, and Samsung One. Select the font style you prefer.
After you’ve selected your desired font size or font style, the changes will be applied to the system immediately. You can exit the settings menu and start experiencing the new font throughout your Android device.
Method 3: Using a Custom Launcher
Overview of custom launchers for Android:
Custom launchers are apps that allow users to customize the look and feel of their Android device’s home screen and app drawer. These launchers provide a wide range of customization options, including the ability to change the font style and size.
Installing a custom launcher from the Google Play Store:
To begin, you need to search for a custom launcher app on the Google Play Store. There are many popular options available, such as Nova Launcher, Action Launcher, and Apex Launcher. Once you’ve found a launcher that suits your preferences, simply click on the “Install” button and follow the prompts to complete the installation process.
Accessing the launcher settings:
After installing the custom launcher, you will need to set it as your default launcher to gain access to its settings. To do this, go to your device’s settings menu and navigate to the “Apps” or “Applications” section. Find the custom launcher app from the list of installed apps and select it. Then, choose the “Set as default” option to make it your default launcher.
Locating the font customization options within the launcher settings:
Once the custom launcher is set as your default, go back to the home screen and long-press on an empty area. This will bring up the launcher settings menu. Look for an option that relates to font customization or appearance settings. The exact location of this option may vary depending on the launcher you’re using.
Selecting and applying a new font from the available options:
Within the font customization settings, you should see a list of available font options. Some launchers may provide a limited selection, while others may allow you to install custom fonts from external sources. Choose the font style that you prefer, and the launcher will automatically apply it to the home screen, app drawer, and other areas of the interface.
Using a custom launcher is a convenient way to change the font on your Android device without the need for root access or complex modifications. With the wide range of custom launchers available, you can easily find one that suits your style and preferences.
Method 4: Modifying the System Fonts (Rooted Devices)
Understanding the concept of rooting an Android device is crucial before attempting to modify system fonts. Rooting grants you administrative access to your device’s entire operating system, allowing you to make changes that are otherwise restricted. It’s important to note that rooting your device comes with certain risks and may void your warranty. Ensure that you understand the process and its implications before proceeding.
Rooting an Android device requires using a reliable method. There are various methods available online, each specific to different device models and versions of the Android operating system. Research and choose the method that best suits your device to ensure successful rooting.
Once you have successfully rooted your Android device, you will need to download and install a root-enabled file manager app. This type of file manager allows you to access and modify system files that are otherwise inaccessible without root privileges. Look for a reputable file manager app on the Google Play Store that specifically mentions root access in its features.
Using the root-enabled file manager, navigate to the system font directory on your Android device. The exact location may vary depending on the device model and Android version, but it is typically found in the “/system/fonts” or “/system/font” directory. Explore the file manager app’s interface to locate this directory.
Once you have reached the system font directory, you can replace or add custom font files to personalize your device’s font. Ensure that the custom font files you are using are compatible with the Android operating system and the format supported by your device. Copy the font files into the system font directory, overwriting any existing font files if necessary.
After modifying the font files, it’s essential to reboot your Android device for the changes to take effect. Rebooting refreshes the system and loads the new font files. Once the device has restarted, the new font should be applied throughout the system, giving your Android device a fresh and customized look.
Remember, modifying system fonts on rooted devices carries potential risks, and it’s always important to exercise caution and backup your data before making any changes. Additionally, it’s advisable to consult online forums, community sites, or technology experts for guidance and recommendations specific to your device model and rooting method.
Conclusion
Changing the font on an Android device can provide a fun and personalized touch to your user experience. With the right tools and know-how, you can easily customize your device’s font to suit your unique style and preferences. Whether you want to make your text a bit more playful, elegant, or simply easier to read, there are numerous options available.
By exploring the built-in font settings or employing third-party apps, you can transform the look and feel of your Android device’s fonts without the need for root access or complex technical knowledge. So, go ahead and try out different fonts to curate a visually appealing and enjoyable smartphone experience.
Remember to follow the instructions carefully and always back up your device before making any changes. Enjoy the freedom of customizing your font and let your Android device reflect your personal style!
FAQs
1. Can I change the font on my Android device?
Yes, you can change the font on your Android device. Android provides customization options that allow you to personalize the look and feel of your device, including changing the font style.
2. How do I change the font on my Android device?
To change the font on your Android device, follow these steps:
– Go to the Settings app on your device.
– Scroll down and tap on “Display”.
– Look for the “Font” or “Font Style” option and tap on it.
– Select the font style you want from the available options.
– Once you have chosen your preferred font style, it will be applied to your device.
3. Are there specific fonts I can use on my Android device?
Android comes with a variety of built-in fonts that you can choose from. These fonts offer different styles and designs, allowing you to find one that suits your preference. Additionally, you can also download and install custom fonts from the Google Play Store or other trusted sources to further customize your device’s font options.
4. Can I change the font size as well?
Yes, along with changing the font style, you can also adjust the font size on your Android device. This feature allows you to modify the text size to make it more comfortable and easier to read. To change the font size, you can follow a similar process through the Display settings on your device.
5. Will changing the font on my Android device affect its performance?
Changing the font on your Android device does not typically have a significant impact on its performance. However, certain custom fonts may consume slightly more system resources, which could potentially lead to a minimal decrease in performance. Overall, the impact is usually negligible, and most devices can handle font customization without any noticeable issues.