
If you’re an Android user, chances are you’re familiar with the term “cache.” As you use your Android device to browse the internet, use apps, and download files, temporary files and data are stored in the cache to improve app performance and loading times. However, over time, this cache can start to take up a significant amount of storage space on your device, potentially slowing it down and causing other issues. In this article, we will guide you through the process of cleaning up cache on your Android device, helping you reclaim valuable storage space and keep your device running smoothly. Whether you’re a tech-savvy user or a beginner, we’ll provide easy-to-follow steps and tips to make the cache cleaning process a breeze.
Inside This Article
- Clearing App Cache
- Clearing System Cache
- Using a Cleaning App
- Clearing Browser Cache
- Conclusion
- FAQs
Clearing App Cache
If you are experiencing slow performance, frequent crashes, or low storage space on your Android device, clearing the app cache can help to improve its overall performance and free up some space. The app cache is a temporary storage area where applications store data and files for quick access. Over time, this cache can accumulate unnecessary data, leading to performance issues. Here’s how you can clear app cache on your Android device:
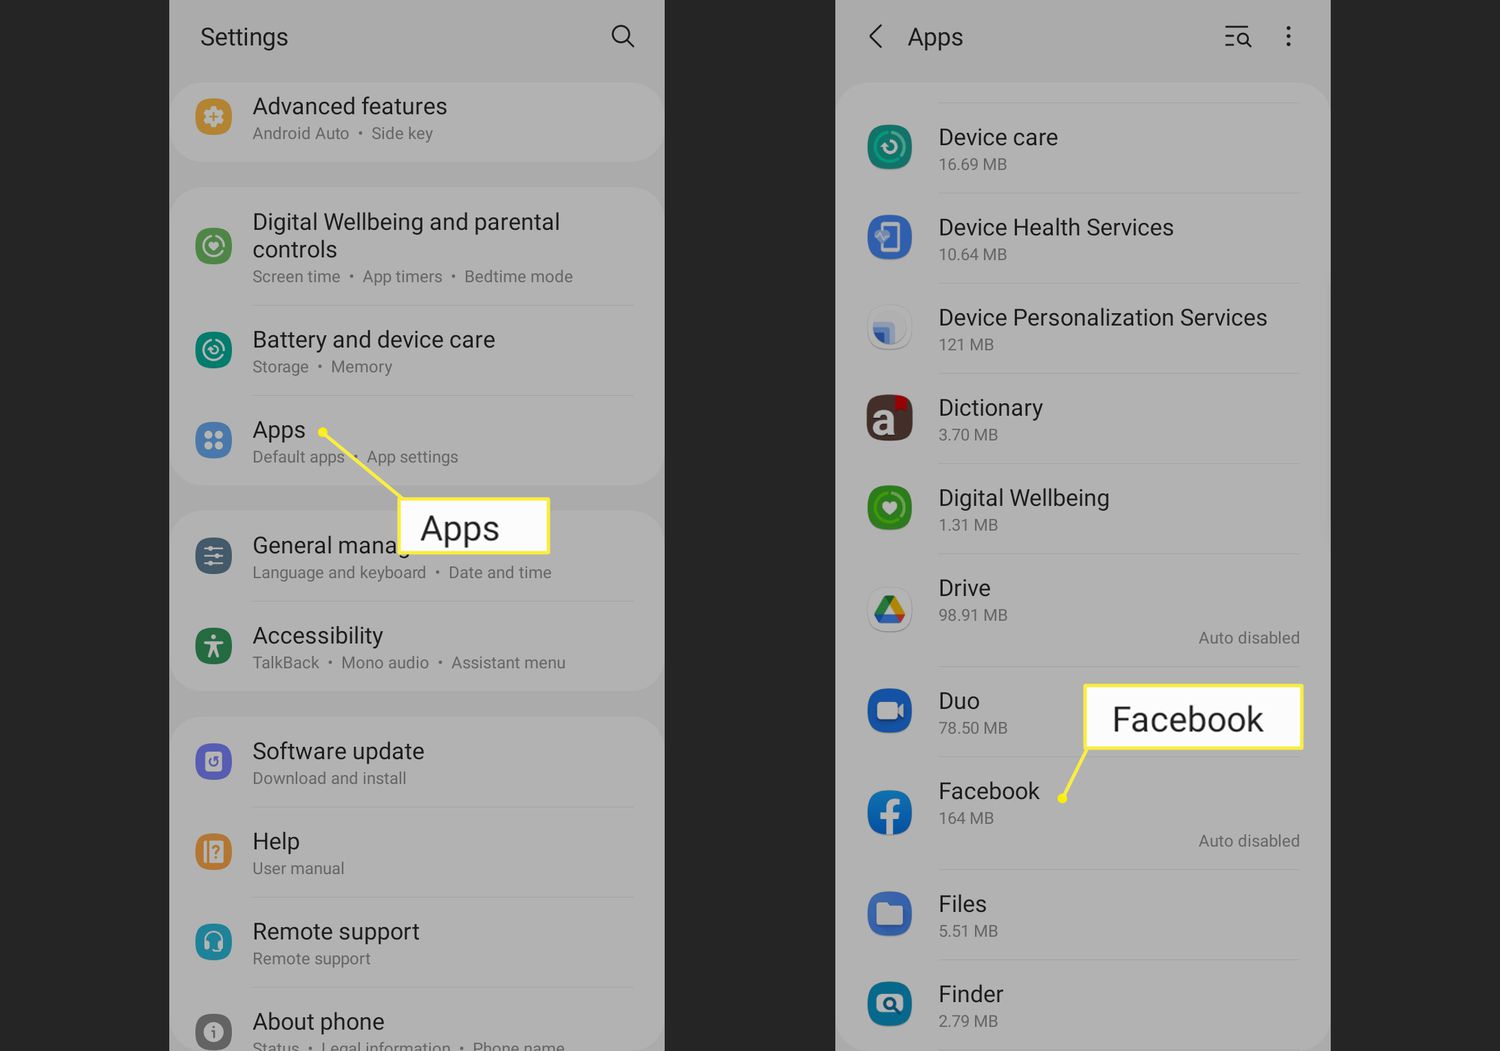
1. Go to Settings: Start by opening the Settings app on your Android device. You can usually find it in your app drawer or by swiping down from the top of the screen and tapping the gear icon.
2. Find the Apps Section: Once you are in the Settings app, scroll down and look for an option called “Apps” or “Applications”. Tap on it to proceed.
3. Choose the App: In the Apps section, you will see a list of all the installed apps on your device. Scroll through the list and find the app for which you want to clear the cache. Tap on the app to open its settings page.
4. Clear the Cache: On the app settings page, you will find various options and information about the app. Look for the option named “Storage” or “Storage & cache”. Tap on it to proceed.
5. Clear the App Cache: Within the “Storage” or “Storage & cache” section, you will find the option to clear the app cache. It may be labeled as “Clear cache” or “Clear storage”. Tap on it to clear the app cache.
6. Confirm the Action: A confirmation prompt will appear asking if you want to proceed with clearing the app cache. Tap on “OK” or “Confirm” to proceed. Be aware that clearing the cache may remove temporary data and settings for the app, but it will not delete any personal data or account information.
7. Repeat for Other Apps: If you want to clear the cache for multiple apps, repeat the above steps for each app that you want to clear the cache for.
By regularly clearing the app cache, you can help to keep your Android device running smoothly and avoid performance issues. It is recommended to clear the app cache periodically or whenever you notice a decline in your device’s performance.
Clearing System Cache
Clearing the system cache on your Android device can help improve its performance and resolve various issues. The system cache consists of temporary files and data stored by the operating system and apps that are used for faster and more efficient access. Over time, this cache can accumulate and take up valuable storage space, leading to sluggishness and other problems.
To clear the system cache, you can follow these steps:
- Turn off your Android device.
- Press and hold the volume up and power buttons simultaneously until you see the device’s logo or the recovery mode menu.
- Once in the recovery mode menu, use the volume buttons to navigate and the power button to select options.
- Select the “Wipe cache partition” option from the menu and confirm your selection.
- Wait for the process to complete, and then reboot your device.
Clearing the system cache can help remove unnecessary files and improve the overall performance of your Android device. It can also resolve issues like app crashes, freezes, and slow performance.
Note that clearing the system cache does not delete any personal data or settings on your device. It only removes temporary files and data that are no longer needed.
Using a Cleaning App
If you want a quick and hassle-free way to clean up the cache on your Android device, using a cleaning app is a great option. These apps are specifically designed to help optimize your device’s performance by clearing out unnecessary files and freeing up valuable storage space.
One popular cleaning app for Android is CCleaner. It offers a range of features, including cache cleaning, junk file removal, and app management. To use the app, simply download and install it from the Google Play Store. Once installed, open the app and navigate to the “Clean” or “Junk Files” section. Here, you’ll find options to clean your device’s cache, residual files, and other unnecessary data. The app will show you how much space can be recovered by clearing the cache, and you can choose to clean it with a single tap.
Another popular cleaning app is Clean Master. This app not only helps you clean up cache files, but also offers additional features such as app uninstallation, battery optimization, and device boosting. To use Clean Master, download and install it from the Play Store. Open the app and tap on the “Junk Files” or “Clean” option, then select “Cache Files” from the list. The app will scan your device for cache files and display the amount of space that can be freed up. Tap on the “Clean Now” button to delete the cache files and reclaim storage space.
When choosing a cleaning app, it’s important to select one from a reputable developer with positive user reviews. Be cautious of apps that make false claims or ask for excessive permissions. Additionally, be mindful of the frequency with which you use cleaning apps, as constantly clearing the cache can sometimes have a negative impact on app performance.
Clearing Browser Cache
Clearing the browser cache on your Android device can help improve the performance and loading speed of websites, as well as resolve any issues related to outdated or corrupted cached data. Here are the steps to clear the browser cache on Android:
- Open the browser app on your Android device. This can be Chrome, Firefox, or any other browser you have installed.
- Tap on the menu icon, typically represented by three dots or lines, located at the top-right corner of the browser screen.
- In the menu options, look for the “Settings” or “Preferences” option and tap on it.
- Within the settings or preferences menu, locate the “Privacy” or “Privacy & Security” section and tap on it.
- Scroll down until you find the option labeled “Clear Browsing Data” or similar.
- Tapping on this option will open a list of data types you can clear. To clear the browser cache specifically, ensure that the “Cache” option is selected.
- You may also choose to clear other browsing data such as cookies or saved passwords, but note that this will log you out of any websites and delete saved information.
- Once you have selected the desired data types to clear, tap on the “Clear” or “Clear Data” button.
- Confirm your selection in the pop-up window that appears.
- Wait for the browser to complete the clearing process. This might take a few seconds or longer, depending on the amount of cache data to be cleared.
- Once the process is complete, you can exit the settings menu and continue using the browser as usual.
Clearing the browser cache can be beneficial in resolving various issues, such as loading errors, outdated content, or website compatibility problems. It is a simple and effective method to ensure that you have a smooth browsing experience on your Android device.
Conclusion
Keeping the cache on your Android device clean is an essential part of maintaining its performance and ensuring smooth operation. By regularly clearing out unnecessary cache files, you can free up valuable storage space, improve app responsiveness, and even extend your device’s battery life.
Whether you use the built-in options provided by Android or rely on third-party apps, the process of cleaning cache on your Android device is simple and straightforward. From manually clearing app cache to using automation tools or optimizing with storage management apps, you have a range of options to choose from and find the method that works best for you.
Make it a habit to clean your cache regularly to enjoy a faster, more efficient, and clutter-free Android experience. By taking a few minutes to clean up your device’s cache, you can keep it running at its best and make the most out of your Android device.
FAQs
1. What is cache on Android?
Cache is temporary data stored by apps on your Android device to help them load faster and improve performance. This can include images, web pages, app data, and other files.
2. Why should I clean up cache on my Android?
Cleaning up cache on your Android device is beneficial in several ways. It can free up storage space, improve system performance, and resolve issues like app crashes and slow loading times.
3. How do I clean up cache on Android?
To clean up cache on your Android device, follow these steps:
– Go to the Settings app on your Android device.
– Tap on “Storage” or “Storage & USB” depending on your device.
– Find and tap on “Cached data” or “Cached files” option.
– You will be prompted to confirm the action. Tap on “OK” or “Clear cached data” to proceed.
4. Will clearing cache delete any important data?
No, clearing cache will not delete any important data like personal files or app settings. It will only remove temporary files and data stored by apps for faster loading and performance. You may need to log in again to some apps after clearing cache.
5. Do I need to clear cache regularly?
It is not necessary to clear cache on a regular basis. However, if you notice issues with app performance, slow loading times, or your device running out of storage space, it can be helpful to clean up the cache.