
In today’s digital age, our smartphones have become the central hub for our contacts, storing a plethora of phone numbers, email addresses, and more. However, there are instances where we need to declutter our contact list, whether it’s removing outdated information or eliminating duplicate entries. If you’re an Android user, deleting contacts from your device is a straightforward process that can be done in a few simple steps. In this article, we will guide you on how to delete contacts on Android, ensuring that your contact list remains organized and up to date. Whether you’re cleaning up your personal contacts or tidying your professional network, we’ve got you covered. So let’s dive in and discover the hassle-free methods to remove unwanted contacts from your Android device.
Inside This Article
- Method 1: Deleting Contacts from the Contacts App
- Method 2: Deleting Contacts from the Phone Settings
- Method 3: Using a Third-Party Contacts Manager App
- Conclusion
- FAQs
Method 1: Deleting Contacts from the Contacts App
Deleting contacts from the Contacts app is one of the easiest ways to remove unwanted or outdated contact information from your Android device. Here is a step-by-step guide on how to do it:
1. Open the Contacts app on your Android device. The app icon usually resembles a person’s silhouette or a blue or white contact card.
2. Once you have opened the Contacts app, you will see a list of all your saved contacts. Scroll through the list and find the contact you want to delete. You can also use the search bar at the top of the screen to quickly locate the specific contact.
3. Once you have found the contact you wish to remove, tap on it to open the contact details page. This page will display all the information associated with the contact, such as their name, phone number, and email address.
4. On the contact details page, look for the three-dot menu icon located at the top right corner of the screen. Tap on it to open a dropdown menu with various options.
5. From the dropdown menu, select the “Delete” or “Remove” option. A confirmation pop-up may appear asking you to confirm the deletion. Tap “OK” or “Delete” to proceed with the removal.
6. Congratulations! You have successfully deleted the contact from your Android device. The contact will no longer appear in your Contacts app or any other apps that sync with your contacts.
Repeat the above steps for any other contacts you want to remove from your device. Deleting contacts from the Contacts app is a quick and hassle-free way to keep your contact list organized and up-to-date.
Method 2: Deleting Contacts from the Phone Settings
If you prefer to delete contacts from your Android device through the phone settings, follow the steps below:
- Open the “Settings” app on your Android device. You can usually find it in the app drawer or by swiping down from the top of the screen and tapping the gear icon.
- Scroll down and tap on “Accounts” or “Accounts and Backup,” depending on your device.
- Tap on the account associated with the contacts you want to delete. For example, if your contacts are synced with your Google account, select “Google.”
- Inside the account settings, look for a section called “Sync Contacts” or something similar. Tap on it to access the sync options.
- Make sure the “Sync Contacts” toggle is turned on. This ensures that the contacts from the selected account are visible on your device.
- Scroll down to find the “Remove Account” or “Delete Account” option. Tap on it to proceed.
- A confirmation prompt will appear, warning you that all contacts associated with the account will be removed from your device. Read the details carefully and confirm the deletion.
By following these steps, you will be able to delete contacts associated with a specific account from your Android device. Keep in mind that this method only applies to contacts synced with an account. If your contacts are saved directly to the device without being linked to an account, you need to use the contacts app or a third-party contacts manager app to delete them.
Now that you know how to delete contacts from the phone settings, you have more flexibility in managing your contacts on your Android device. Whether you prefer using the contacts app or the phone settings, these methods give you control over the contacts you want to keep or remove. Choose the method that suits your needs best and maintain a clutter-free contact list.
Method 3: Using a Third-Party Contacts Manager App
If you’re looking for a more efficient and comprehensive way to manage your contacts on Android, using a third-party contacts manager app is a great option. These apps are designed to provide advanced features and functionalities beyond what the native contacts app offers. Let’s explore how you can use a third-party contacts manager app to delete contacts on your Android device.
First, you’ll need to download and install a third-party contacts manager app from the Google Play Store. There are several popular options available, such as Truecaller, Contacts+ and Drupe. Choose the one that suits your requirements and has good user reviews.
Once you’ve installed the app, open it and grant the necessary permissions to access your contacts. These permissions are required for the app to display and manage your contacts effectively.
Next, navigate to the contacts section within the app. Here, you’ll find a list of all your contacts, along with various management options.
To delete a contact, simply tap on it to open the contact details. Look for the option to delete or remove the contact, usually indicated by a trash bin or a delete icon. Tap on it, and confirm your action when prompted. The contact will be deleted from your Android device.
One of the key advantages of using a third-party contacts manager app is that it often provides additional features to enhance your contacts management experience. These features may include the ability to merge duplicate contacts, backup and restore contacts, and even sync contacts with other platforms or email accounts.
Additionally, some contacts manager apps offer a search functionality, allowing you to quickly find and delete specific contacts based on criteria like name, phone number, or email address. This can be especially useful when you have a large number of contacts and need to remove specific ones.
Remember to regularly backup your contacts before using a third-party contacts manager app to delete them. This ensures that you have a copy of your contacts in case of any accidental deletions or data loss.
Conclusion
Deleting contacts on Android is a simple and straightforward process. Whether you want to remove duplicate contacts, clear out your address book, or simply organize your contacts better, Android provides convenient options to do so. By accessing the Contacts app or using the Google Contacts website, you can easily delete individual contacts or multiple contacts at once.
Remember to exercise caution when deleting contacts, as the process is irreversible. Double-check your selections before confirming deletion to avoid unintentionally removing important contacts.
Keeping your contact list clean and organized is essential for efficient communication and seamless user experience. By regularly tidying up your contacts, you can ensure that you have the right contacts at your fingertips and make your Android device work more efficiently.
So, go ahead and start managing your contacts on Android today! Take advantage of the simple steps provided in this guide, and enjoy a clutter-free and streamlined contact list on your Android device.
FAQs
1. How do I delete contacts on Android?
To delete contacts on Android, follow these steps:
- Open the Contacts app on your Android device.
- Scroll through the list of contacts and find the one you want to delete.
- Tap on the contact to view its details.
- Tap on the options menu (usually represented by three vertical dots) located in the top-right corner of the screen.
- From the options menu, select “Delete” or “Remove” to delete the contact.
- Confirm the deletion by tapping on “OK” or “Delete” when prompted.
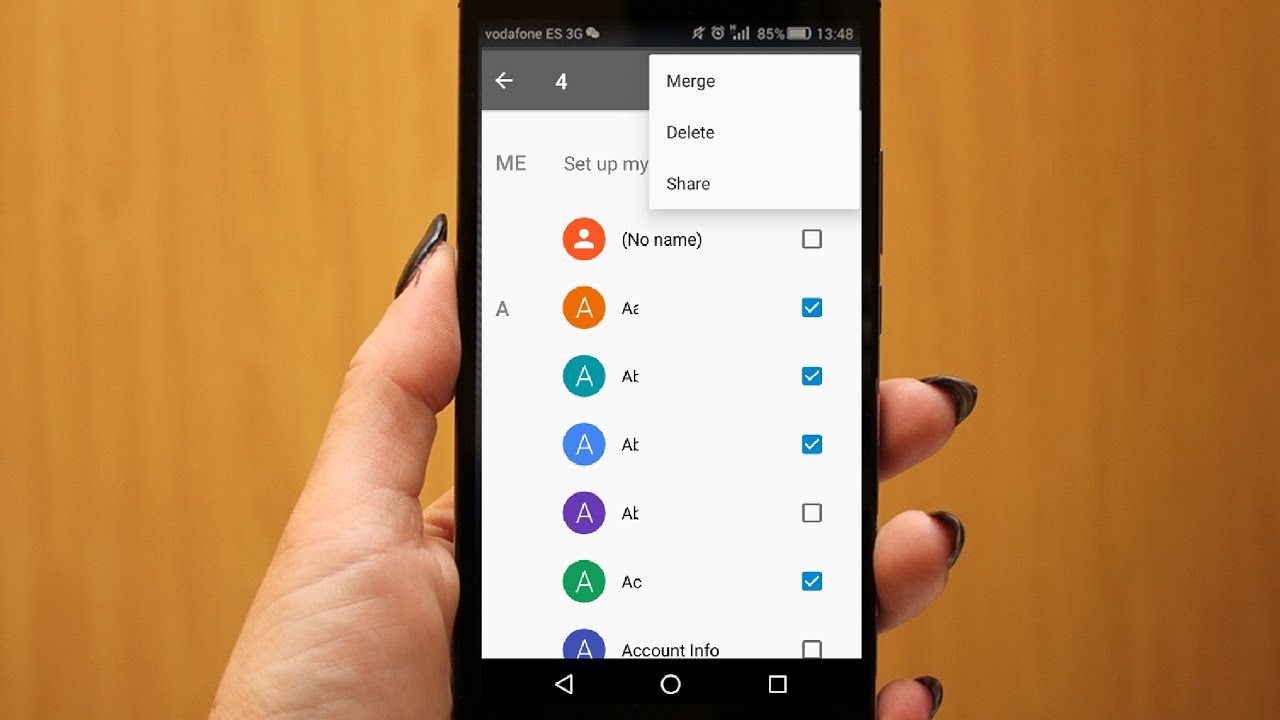
2. Can I delete multiple contacts at once on Android?
Yes, you can delete multiple contacts at once on Android by using the built-in Contacts app or a third-party contact management app. To delete multiple contacts using the Contacts app, follow these steps:
- Open the Contacts app on your Android device.
- Tap on the options menu (usually represented by three vertical dots) located at the top-right corner of the screen.
- Select “Delete” or “Remove” from the options menu.
- Now, select the contacts you want to delete by tapping on their respective checkboxes.
- Once you have selected all the contacts you wish to delete, tap on the delete button (usually represented by a trash bin icon) to remove them.
- Confirm the deletion by tapping on “OK” or “Delete” when prompted.
3. What happens when I delete a contact on Android?
When you delete a contact on Android, the contact’s information and all associated data, such as phone numbers, email addresses, and any other details you have saved for that contact, will be permanently removed from your device. This means that you will no longer be able to access or retrieve that contact’s information.
Please note that if you have synced your contacts with your Google account or any other cloud service, deleting a contact from your Android device will also remove it from your synced accounts and any other devices that are connected to the same account.
4. Can I recover a deleted contact on Android?
If you have accidentally deleted a contact on Android, there is a possibility to recover it if you have a backup of your contacts. Here are a few ways you can try to recover a deleted contact:
- Check if you have a backup of your contacts on Google Contacts or any other cloud service and restore the contact from there.
- If you have enabled the automatic backup feature on your device, you can try restoring your device to a previous backup to recover the deleted contact.
- If you have synced your contacts with a third-party contact management app, check if the app has a built-in restore feature that can help you recover deleted contacts.
However, please note that these methods may not guarantee a successful recovery, especially if you did not have a backup of your contacts. Therefore, it is always recommended to regularly backup your contacts to avoid data loss.
5. Is there a way to hide contacts instead of deleting them on Android?
Yes, you can hide contacts on Android without deleting them by using the “Hide Contacts” or “Hide Contacts Without Phone Numbers” feature. Here’s how you can do it:
- Open the Contacts app on your Android device.
- Tap on the options menu (usually represented by three vertical dots) located at the top-right corner of the screen.
- Select “Settings” from the options menu.
- Go to the “Contacts” or “Display” section in the settings.
- Look for the option to “Hide Contacts” or “Hide Contacts Without Phone Numbers.”
- Toggle the switch next to the option to hide the selected contacts.
By hiding contacts instead of deleting them, you can keep the contact information but prevent them from appearing in your regular contact list or being displayed when you search for contacts. This can be useful for organizing your contacts or keeping certain contacts private.