
Are you tired of sending individual text messages to friends and family members? Do you want to streamline your messaging process and send messages to multiple recipients at once? If you’re an Android user, you’re in luck. Android phones offer a convenient way to send group text messages, making it easier than ever to stay connected with groups of people. Whether you’re planning a get-together, organizing a team project, or simply want to send a fun message to your group of friends, group texting on Android can save you time and frustration. In this article, we’ll guide you through the steps of how to do group text on Android, so you can start enjoying the benefits of efficient mass messaging.
Inside This Article
- Enabling Group Messaging
- Creating a New Group Chat
- Adding Contacts to the Group
- Sending Messages to the Group
- Managing Group Settings
- Exiting or Deleting a Group Chat
- Enabling Group Messaging
- Creating a New Group Chat
- Adding Contacts to the Group
- Sending Messages to the Group
- Managing Group Settings
- Exiting or Deleting a Group Chat
- Conclusion
- FAQs
Group texting is a convenient way to communicate with multiple contacts at once. Whether you want to plan an outing with friends or coordinate with your colleagues, Android devices offer seamless group text capabilities. In this article, we’ll guide you through the process of creating and managing group texts on your Android device.
Enabling Group Messaging
Before diving into group texts, ensure that your device has group messaging enabled. Here’s how you can check:
- Open the Messages app on your Android device.
- Tap on the three-dot menu in the top-right corner of the screen.
- Select “Settings” from the menu.
- Scroll down and look for the option called “Group Messaging” or “Group Chat”.
- Make sure the toggle switch is turned on.
Enabling group messaging will allow you to create and participate in group texts.
Creating a New Group Chat
Now that you have group messaging enabled, let’s create a new group chat:
- Open the Messages app on your Android device.
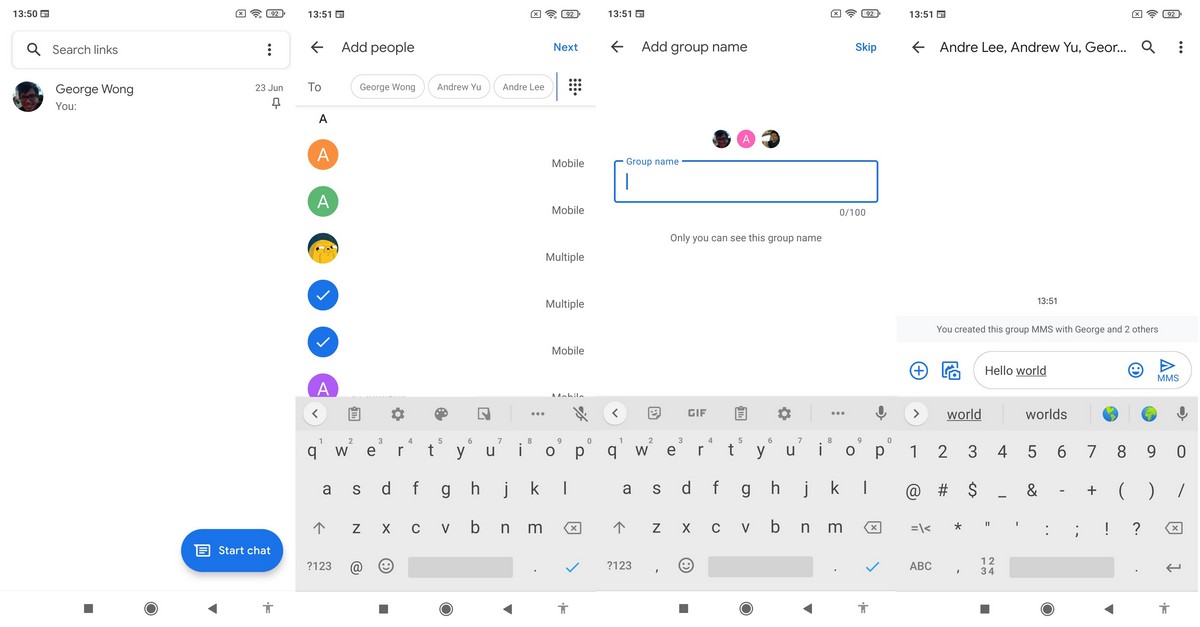
- Tap on the pencil icon or the new message icon to start a new conversation.
- In the recipient field, start typing the names or phone numbers of the contacts you want to include in the group.
- As you type, the app will suggest contacts matching your input.
- Select the contacts that you want to add to the group.
- Once you’ve added all the desired contacts, tap on the create group icon (usually a person icon with a plus sign).
- Give your group chat a name and optionally set a group photo.
- Tap on “Create” or “Done” to create the group chat.
Congratulations! You have successfully created a new group chat on your Android device.
Adding Contacts to the Group
Adding more contacts to an existing group chat is easy:
- Open the group chat in the Messages app.
- Tap on the group name or the avatar to access the group details.
- Look for the option to add more participants or contacts to the group.
- Select the contacts you want to add.
- Tap on “Add” or “Done” to add the contacts to the group.
You can continue adding contacts to the group as needed.
Sending Messages to the Group
Now that you have created a group chat and added members to it, you can start sending messages:
- Open the group chat in the Messages app.
- Tap on the text input field at the bottom of the screen to start typing your message.
- Type your message and tap on the send button.
Your message will be sent to all members of the group, and their replies will be visible in the group chat.
Managing Group Settings
Android allows you to customize certain settings for your group chats. Here are a few options you can explore:
- Muting notifications for the group chat.
- Changing the group chat’s name or photo.
- Removing members from the group chat.
- Setting the group chat as the default messaging conversation for the group.
To access these settings, open the group chat, tap on the group name or avatar, and explore the available options.
Exiting or Deleting a Group Chat
If you no longer wish to be a part of a group chat or want to remove it entirely, follow these steps:
- Open the group chat in the Messages app.
- Tap on the group name or avatar to access the group details.
- Look for the option to exit the group or delete the group.
- Select the appropriate option based on your preference.
If you choose to exit the group, you will no longer receive messages from it. If you delete the group, it will be removed from your device entirely.
Group texting on Android devices is a fantastic way to stay connected with multiple contacts simultaneously. By following these steps, you can easily create, manage, and participate in group texts. So go ahead, gather your friends, family, or colleagues, and start group texting to streamline your communication!
Enabling Group Messaging
Group messaging is a convenient feature that allows you to send messages to multiple contacts simultaneously. It is a handy option when you want to organize social events, coordinate work-related discussions, or simply have a group conversation with your friends or family. Enabling group messaging on your Android device is easy and straightforward. Let’s dive into the steps:
First, open the messaging app on your Android device. The app might have different names, such as Messages, Messenger, or Text Messages, depending on the device model and the messaging app installed.
Once you have the messaging app open, tap on the three-dot menu button located in the top-right corner of the screen. This will open a drop-down menu with various options.
From the drop-down menu, select “Settings” or “Settings and preferences,” depending on the app version. This will directly take you to the messaging settings.
In the settings menu, look for the “Advanced” or “Additional settings” option. Tap on it to reveal more options.
Scroll down until you find the “Group messaging” or “Group chat” option. By default, it is usually disabled or set to individual messaging.
To enable group messaging, simply toggle the switch beside the “Group messaging” option. Once enabled, you will be able to create and participate in group chats.
After enabling group messaging, you can exit the settings and start creating your first group chat! Remember, not all contacts may support group messaging, so make sure to add those who do.
Creating a New Group Chat
Creating a group chat on your Android device is a simple and efficient way to communicate with multiple contacts at once. Follow these steps to create a new group chat:
- Open your favorite messaging app on your Android device. Popular options include Messages, WhatsApp, or Telegram.
- In the messaging app, tap on the compose new message icon, usually represented by a pen and paper or a chat bubble with a plus sign.
- Select the option to create a new group chat. This may vary depending on the messaging app you are using, but it is usually labeled as “New Group” or “Create Group.”
- Next, you will be prompted to choose the contacts that you want to add to the group. You can either select contacts from your phone’s address book or enter their phone numbers manually.
- After selecting the contacts, tap on the “Next” or “Create” button to proceed.
- Now, you will be asked to give your group a name. Choose a descriptive name that reflects the purpose or topic of the group. For example, if you are creating a group chat for a family vacation, you can name it “Family Vacation 2021.”
- Once you have entered the group name, tap on the “Create” or “Finish” button to finalize the creation of the group chat.
- Voila! You have successfully created a new group chat on your Android device. You can now start sending messages to the group and enjoy seamless communication with all the members.
Remember to check the settings in your messaging app to customize your group chat’s notification preferences, privacy settings, and other features to suit your needs.
Creating a new group chat allows you to conveniently communicate with multiple contacts simultaneously, making it easier to plan events, coordinate activities, or simply engage in group discussions with friends, family, or colleagues. Whether you need to discuss important matters or share lighthearted banter, a group chat on your Android device ensures that everyone stays in the loop.
Adding Contacts to the Group
Once you’ve created a group chat on your Android device, the next step is to add contacts to the group. Adding contacts allows you to include multiple people in the conversation and ensures that everyone receives the messages you send.
To add contacts to a group, follow these simple steps:
- Open the messaging app on your Android device and navigate to the group chat you want to add contacts to.
- Tap on the group chat to open it.
- Look for the option to add contacts to the group. This can typically be found by tapping on the three-dot menu icon or the “+” symbol.
- Select the contacts you want to add to the group chat. You can either manually search for contacts or choose from your existing contacts list.
- Once you have selected the contacts, tap on the “Add” or “Done” button to add them to the group chat.
It’s worth noting that not all messaging apps have the same interface or layout. The steps and options may vary slightly depending on the app you are using. However, the general process of adding contacts to a group should remain similar.
Adding contacts to a group chat enables you to have interactive conversations with multiple people at once. It’s a convenient feature for organizing social events, coordinating team projects, or simply staying connected with a close group of friends or family members.
With your group chat set up and contacts added, you’re now ready to start sending messages and enjoying seamless communication with the entire group.
Sending Messages to the Group
Once you have created a group chat on your Android device, you can start sending messages to the entire group. Here’s how to do it:
- Open your preferred messaging app or the default SMS app on your Android device.
- Navigate to the group chat you want to send a message to.
- Tap on the text input field to open the keyboard and start typing your message.
- Compose your message, keeping in mind that it will be sent to multiple recipients within the group.
- Once you have finished composing your message, you can choose to add any multimedia content, such as photos, videos, or audio clips, by tapping on the attachment icon in the messaging app.
- After adding any desired media, review your message to ensure it is exactly what you want to send.
- When you are ready to send the message, simply tap on the send button.
Your message will be instantly sent to all the members of the group chat. Depending on their individual settings, each member will receive the message on their respective devices. It is important to note that all members of the group chat can see and interact with the sent message, allowing for seamless exchange of information and ideas within the group.
Managing Group Settings
When it comes to group texts on Android, managing the settings of your group chat is essential for a smooth and personalized messaging experience. Android devices offer some key features that allow you to tailor your group chat to your preferences. Here are some important aspects of managing group settings:
1. Group Name: One of the first settings you can customize is the group name. This is helpful to give your group chat a unique and recognizable identity. To change the group name, click on the group chat, tap on the three-dot menu icon at the top-right corner, and select “Group Details.” From there, you can edit the group name to your desired choice.
2. Group Icon: Another way to personalize your group chat is by setting a group icon. This visual representation can help participants identify the group easily. To change the group icon, follow the same steps as changing the group name, but instead of selecting “Group Details,” choose “Change Group Icon.” You can either select an existing image from your gallery or take a new photo to use as the group icon.
3. Group Notifications: Managing the notification settings for your group chat is essential to avoid constant interruptions or missed messages. Android devices allow you to customize the notification settings for individual conversations. To do this, open the group chat, tap on the three-dot menu icon, and select “Group Details.” From there, choose “Notification Settings” to adjust settings such as sound, vibration, and whether or not to show notifications on the lock screen.
4. Group Participants: As the creator of a group chat, you have the authority to manage the list of participants in the group. You can add or remove people as necessary to ensure only relevant individuals are part of the conversation. To manage group participants, access the group chat, tap on the three-dot menu icon, and select “Group Details.” From there, you can add new contacts to the group or remove existing ones.
5. Group Admin: In some cases, you may want to assign multiple admins for better group management. As the creator of the group, you have the power to promote other participants to admin status. Admins have additional privileges like adding or removing participants and managing group settings. To designate an admin, access the group chat, go to “Group Details,” and select “Promote to Admin” next to the desired participant.
6. Group Leave or Delete: If you want to exit or delete a group chat, Android devices offer two options. To leave a group chat without deleting it, access the chat, tap on the three-dot menu icon, and select “Group Details.” From there, choose “Leave Group.” If you are the creator of the group and want to delete it entirely, follow the same steps, but instead of selecting “Leave Group,” choose “Delete Group” to remove the chat from your device.
Managing group settings on Android ensures that you have control over various aspects of your group chat. Whether it’s customizing the name and icon, adjusting notification preferences, or managing participants and admin roles, taking advantage of these features allows you to create a personalized and efficient group messaging experience on your Android device.
Exiting or Deleting a Group Chat
So, you’ve been part of a group chat on your Android device, but now you’re looking to exit or even delete the group chat altogether. No worries, we’ve got you covered. Here’s a step-by-step guide on how to exit or delete a group chat on Android:
1. Open the messaging app on your Android device and navigate to the group chat you want to exit or delete.
2. Tap on the group chat to open it and reveal the conversation history and options.
3. Look for the settings icon, which is usually represented by three dots or lines, located in the top right corner of the screen. Tap on it to open the group chat settings.
4. In the group chat settings, you will find various options, including “Exit group” and “Delete group.” Choose the option that suits your needs.
If you choose to exit the group, you will no longer receive any messages or notifications from the group chat. However, you will still be able to see the conversation history if you decide to revisit the group chat later.
If you choose to delete the group, you will be completely removed from the group chat, and all the conversation history and media shared within the group will be permanently deleted. This action cannot be undone, so make sure you’re certain before proceeding.
5. Confirm your decision by tapping on the appropriate confirmation prompt that appears on the screen. Once confirmed, the exit or deletion process will be initiated.
That’s it! You’ve successfully exited or deleted a group chat on your Android device. Remember, exiting a group chat allows you to leave the conversation without losing the conversation history, while deleting a group chat removes you from the conversation and permanently deletes all the shared media and conversation history.
Now you’re fully equipped with the knowledge to manage and leave group chats on your Android device. Feel free to repeat these steps whenever you need to exit or delete a group chat.
In conclusion, group texting on Android devices is a convenient and efficient way to stay connected with multiple people at once. Whether you are planning an event, coordinating with colleagues, or simply catching up with friends, group texting simplifies the process by allowing you to send messages to multiple recipients simultaneously.
Through various messaging apps and built-in features, Android users can easily create and manage group chats, customize settings, and share multimedia files with ease. This functionality enhances communication, collaboration, and engagement, making it a valuable tool for personal and professional use.
By following the steps outlined in this article, you can harness the power of group texting on Android devices and unlock new possibilities for seamless communication.
FAQs
1. How do I set up group text on my Android device?
Setting up group text messaging on your Android device is easy. Simply open your text messaging app and create a new message. In the recipient field, start typing the names or phone numbers of the contacts you want to include in the group text. As you type, your Android device will suggest matching contacts. Select the contacts you want to add, and then compose your message. When you send the message, it will be delivered to all recipients in the group.
2. Can I name my group text on Android?
Yes, you can assign a name to your group text on an Android device. After creating the group text as mentioned above, tap on the three-dot menu icon in the messaging app. From the options that appear, select “Group Name” or a similar option. Enter a name for your group text and tap save. The group text will now display the chosen name, making it easier for you and others to identify the conversation.
3. How many people can I include in a group text on Android?
The number of people you can include in a group text on Android may depend on the messaging app you are using and your cellular carrier. However, most Android devices should support group texts with a large number of recipients. In general, you should be able to include several dozen people in a single group text. If the number of recipients exceeds the limit, you may need to consider using alternative methods, such as creating multiple smaller group texts or using a third-party messaging app.
4. Can I remove someone from a group text on Android?
Yes, you can remove someone from a group text on an Android device. Open the group text conversation and tap on the group name or participant list. Locate the contact you want to remove and either swipe left on their name or long-press on it. This will bring up options to remove the contact from the group. Select the appropriate option, and the contact will be removed from the group text. Please note that this action will only remove the contact from the group text and not from your contacts list.
5. Can I mute notifications for a group text on Android?
Yes, you can mute notifications for a group text on your Android device. Open the group text conversation and tap on the group name or participant list. Look for the option to mute notifications or similar settings. Depending on your messaging app, you can choose to mute the conversation for a specific duration or indefinitely. Once you enable the mute notifications option, you will no longer receive alerts or sounds for new messages in the group text.