
Are you looking to delete an email account on your Android device? Whether it’s due to switching email providers, streamlining your inbox, or simply cleaning up unwanted accounts, removing an email account from your Android phone can be done with a few simple steps. In this article, we will guide you through the process of deleting an email account on Android, ensuring that you have a smooth and hassle-free experience. With the increasing importance of email communication in our daily lives, it’s essential to know how to manage our accounts effectively. So, let’s dive into the detailed instructions and have your unwanted email account removed from your Android device in no time.
Inside This Article
- Prerequisites
- Method 1: Deleting Email Account through Settings
- Method 2: Removing Email Account through Email App
- Method 3: Clearing Email Data through the App Manager
- Conclusion
- FAQs
Prerequisites
Before you begin the process of deleting an email account on your Android device, it is important to ensure you have the following prerequisites in place:
1. Android Device: Make sure you have an Android device that allows you to access the settings and email app.
2. Email Account: You need to have the email account that you want to delete already set up on your Android device.
3. Internet Connection: Ensure that your Android device is connected to the internet so that you can access the necessary settings and perform the required steps to delete the email account.
4. Login Credentials: Make sure you have the correct login credentials for the email account you want to delete. This includes the email address and password associated with the account.
Having these prerequisites in place will help you smoothly navigate through the process of deleting an email account on your Android device.
Method 1: Deleting Email Account through Settings
If you want to delete an email account on your Android device, you can easily do so by following these steps:
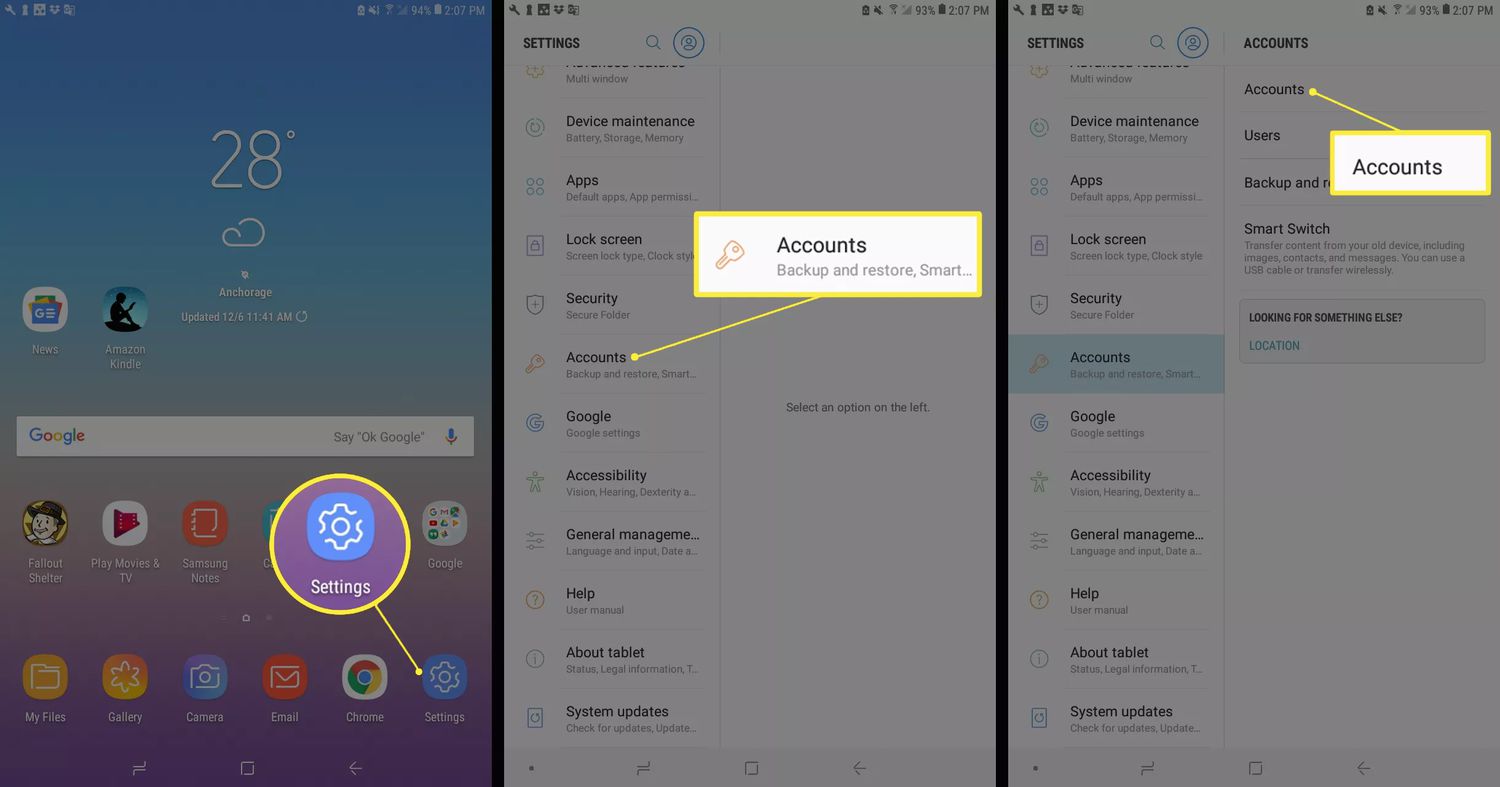
- Open the “Settings” app on your Android device. It is usually represented by a gear icon.
- Scroll down and locate the “Accounts” option. Tap on it to proceed.
- Under the “Accounts” section, you will see a list of all the accounts associated with your device. Look for the email account that you want to delete and tap on it.
- Once you tap on the email account, you will be taken to a new screen where you will find various settings related to that account.
- Look for the option that says “Remove Account” or “Delete Account.” The name may vary depending on your Android version and the email provider.
- Tap on this option and confirm your decision to delete the email account when prompted.
- After confirming, the email account will be deleted from your Android device. Any emails, contacts, or other data associated with that account will be removed.
It is important to note that deleting an email account through the settings will only remove it from your Android device. The actual email account will not be deleted from the email server, and you can still access it from other devices or email clients.
Now that you know how to delete an email account through the settings on your Android device, let’s explore other methods to remove email accounts.
Method 2: Removing Email Account through Email App
If you prefer a more direct approach to removing an email account from your Android device, you can use the email app itself to accomplish this task. Here is a step-by-step guide to help you through the process:
1. Open the Email App: Locate and open the email app on your Android device. The app may be called “Email,” “Mail,” or a specific name associated with the email service provider you are using.
2. Access Account Settings: Once you have the email app open, navigate to the settings menu. This can usually be done by tapping the three-line menu icon (often referred to as the hamburger menu) or the gear-shaped icon in the top corner of the app’s interface.
3. Manage Accounts: Look for an option within the settings menu that allows you to manage or modify your email accounts. This could be labeled as “Accounts,” “Manage Accounts,” or something similar.
4. Select the Email Account to Remove: In the account management section, you’ll see a list of all the email accounts currently associated with the app. Tap on the account that you want to delete.
5. Remove the Account: Once you’ve selected the email account you wish to remove, you should see a menu or options screen specifically for that account. Look for a button or link that says “Remove Account,” “Delete Account,” or something similar. Tap on it to proceed.
6. Confirm Removal: Depending on the app and device, you may be asked to confirm the removal of the account. Read any pop-up messages or prompts carefully and verify that you want to delete the account from your device. Confirm your selection to complete the process.
7. Account Removal Completion: After confirming the removal, the email app will delete the account from your Android device. You should no longer see the removed account listed in the app’s account management section.
By following these steps, you can easily remove an email account from your Android device using the email app itself. Whether you no longer need the account or want to switch to a different one, this method offers a quick and straightforward solution.
Method 3: Clearing Email Data through the App Manager
If you’re facing any issues while trying to remove an email account from your Android device, clearing the email data through the App Manager might solve the problem. This method allows you to reset the email app to its default settings, removing any stored data related to your email account.
To clear email data through the App Manager, follow these steps:
- Go to your device’s Settings.
- Scroll down and select “Apps” or “Applications”, depending on your device.
- Find and tap on your email app from the list of installed apps.
- In the app settings, select “Storage” or “Storage & cache”.
- Tap on “Clear data” or “Clear storage”, and confirm the action when prompted.
This process will clear all the data associated with your email app, including saved login credentials, email settings, and cached messages. It essentially restores the app to its original state, as if it was freshly installed.
Once the email app’s data is cleared, you can open the app again and set up your email account from scratch if needed. Keep in mind that this method will remove any personalized app settings and may require you to re-enter your email account information.
By clearing the email data through the App Manager, you can overcome any potential glitches or conflicts that could prevent you from deleting an email account successfully. It provides a clean slate for setting up your email account again, ensuring a fresh start.
It’s important to note that this method may vary slightly depending on the Android version and device manufacturer. The steps provided here should work for most Android devices, but if you encounter any differences, refer to the device’s user manual or online support resources for specific instructions.
Now that you have learned about clearing email data through the App Manager, you have another effective method to remove an email account from your Android device. Use this method if you encounter any difficulties with the previous methods or if you want to start fresh with your email settings.
Conclusion
Deleting an email account on your Android device is a straightforward process. Whether you want to remove an account that you no longer use or simply want to declutter your inbox, Android provides you with the necessary steps to do so. By accessing the settings menu and navigating to the accounts section, you can easily manage and delete email accounts on your device.
Remember to backup any important data from the account before deleting it, as this action will remove all associated emails, contacts, and other information. Additionally, carefully consider the consequences of deleting an email account, as it may affect your ability to access certain services or retrieve important messages in the future.
With the steps outlined in this guide, you now have the knowledge to confidently delete an email account on your Android device. So go ahead and take control of your inbox by removing any unwanted or unnecessary accounts.
FAQs
1. Can I delete an email account on my Android device?
Yes, you can easily delete an email account on your Android device. By following a few simple steps, you can remove the email account that you no longer wish to use or have set up on your device.
2. Will deleting an email account on Android delete my emails as well?
No, deleting an email account on your Android device will not delete your emails. Your emails are usually stored on the email server and not on your device. However, it is always recommended to back up important emails before deleting the account, just to be on the safe side.
3. How do I delete an email account on Android?
To delete an email account on Android, follow these steps:
- Open the Settings app on your Android device.
- Scroll down and tap on “Accounts” or “Accounts and Backup”.
- Tap on “Accounts” again.
- Select the email account you want to delete.
- Tap on the menu icon (three dots) in the top-right corner.
- Choose “Remove account” or “Delete account”.
- Confirm the action when prompted.
4. What happens to my contacts and other synced data when I delete an email account on Android?
When you delete an email account on Android, the synced data associated with that account, such as contacts, calendar events, and notes, will also be removed from your device. Make sure to back up any important data before deleting the account to avoid losing important information.
5. Can I re-add a deleted email account on Android?
Yes, you can re-add a deleted email account on your Android device. If you decide to use the same email account again, simply follow the steps to add a new account in your device’s settings and enter the necessary credentials to set it up.