
Are you facing some issues with your iPhone 13 and need to put it in recovery mode? Don’t worry, we’ve got you covered. In this article, we’ll guide you through the steps on how to put your iPhone 13 in recovery mode. Whether you need to perform a software update, restore your device, or troubleshoot any problems, recovery mode can come in handy. Recovery mode allows you to connect your iPhone to your computer and restore it with iTunes or Finder. So, if you’re ready to put your iPhone 13 in recovery mode, let’s dive right in and get your device back up and running.
Inside This Article
- Title: How To Put An iPhone 13 In Recovery Mode
- Overview
- Requirements
- Steps to Put iPhone 13 In Recovery Mode
- Conclusion
- FAQs
Title: How To Put An iPhone 13 In Recovery Mode
Have you encountered issues with your iPhone 13 and need to put it in recovery mode? Whether you are facing software glitches, system crashes, or other problems, putting your iPhone 13 in recovery mode can help resolve these issues. In this article, we will guide you through the steps to put an iPhone 13 in recovery mode to get your device up and running smoothly again.
What is Recovery Mode?
Recovery Mode is a special troubleshooting mode in iPhones that allows you to restore or update your device’s firmware. It can be helpful when your iPhone is not responding, stuck on the Apple logo, experiencing continuous crashes, or encountering other software-related issues.
Why Put an iPhone 13 in Recovery Mode?
Putting your iPhone 13 in recovery mode can be a necessary step when regular troubleshooting methods, like restarting or resetting the device, fail to resolve the issue. It allows you to perform a firmware restore or update, which can help fix software-related problems and get your iPhone 13 back to its normal functioning state.
Steps to Put an iPhone 13 in Recovery Mode:
- First, make sure you have the latest version of iTunes installed on your computer.
- Connect your iPhone 13 to your computer using a lightning cable.
- Press and quickly release the volume up button.
- Press and quickly release the volume down button.
- Now, press and hold the side button until the recovery mode screen appears.
- You will see the options to Update or Restore your iPhone. Choose the appropriate option based on your needs. Note that choosing the Restore option will erase all the data on your iPhone 13, so make sure you have a recent backup before proceeding.
- Follow the on-screen instructions in iTunes to complete the recovery process.
Troubleshooting Tips for Recovery Mode:
If you encounter any issues while putting your iPhone 13 in recovery mode, here are some troubleshooting tips:
- Ensure that the lightning cable you are using is in good condition and properly connected to both your iPhone 13 and the computer.
- If you are unable to see the recovery mode screen after following the steps, try repeating the process or using a different lightning cable or computer.
- Make sure you have a stable internet connection during the restore or update process.
- If the recovery process takes longer than expected, do not disconnect your iPhone 13 from the computer. Let the process complete.
Putting your iPhone 13 in recovery mode can be a useful troubleshooting step when you encounter software-related issues. By following the steps mentioned above, you can easily put your iPhone 13 in recovery mode and resolve any software glitches that may be hindering the performance of your device. Remember to backup your data before proceeding with the restore option to avoid any permanent data loss.
Overview
Putting an iPhone 13 in recovery mode is a useful troubleshooting technique that can help resolve various software issues. Recovery mode allows you to restore the device or update its firmware when it’s experiencing problems or isn’t responding properly. It is a powerful tool that can help you revive your iPhone and get it back to its normal functioning state.
In this article, we will guide you through the steps to put an iPhone 13 in recovery mode and provide some troubleshooting tips to ensure a successful recovery process. Whether you’re dealing with a frozen screen, a software glitch, or the need to update your iPhone’s firmware, putting it in recovery mode can be an effective solution.
By following the instructions outlined in this article, you’ll have the necessary knowledge to put your iPhone 13 in recovery mode and tackle any software-related issues with confidence. So, let’s dive in and learn how to do it step by step!
Requirements
Before putting your iPhone 13 in Recovery Mode, there are a few requirements that you need to fulfill:
1. Fully charge your iPhone 13 or ensure it has at least 50% battery life. This will prevent any interruptions during the process and ensure a successful completion.
2. Install the latest version of iTunes on your computer. You can download it from the official Apple website or update your existing iTunes to the latest version. This is necessary for a smooth connection between your iPhone and computer.
3. Use an original Apple lightning cable to connect your iPhone 13 to your computer. Using a third-party cable may lead to connection issues and hinder the recovery process.
4. Backup your iPhone data. Putting your iPhone 13 in Recovery Mode may result in data loss, so it’s essential to have a recent backup. You can backup your iPhone using iTunes or iCloud.
5. Prepare a computer with a stable internet connection. This is necessary for downloading any required software or updates during the recovery process.
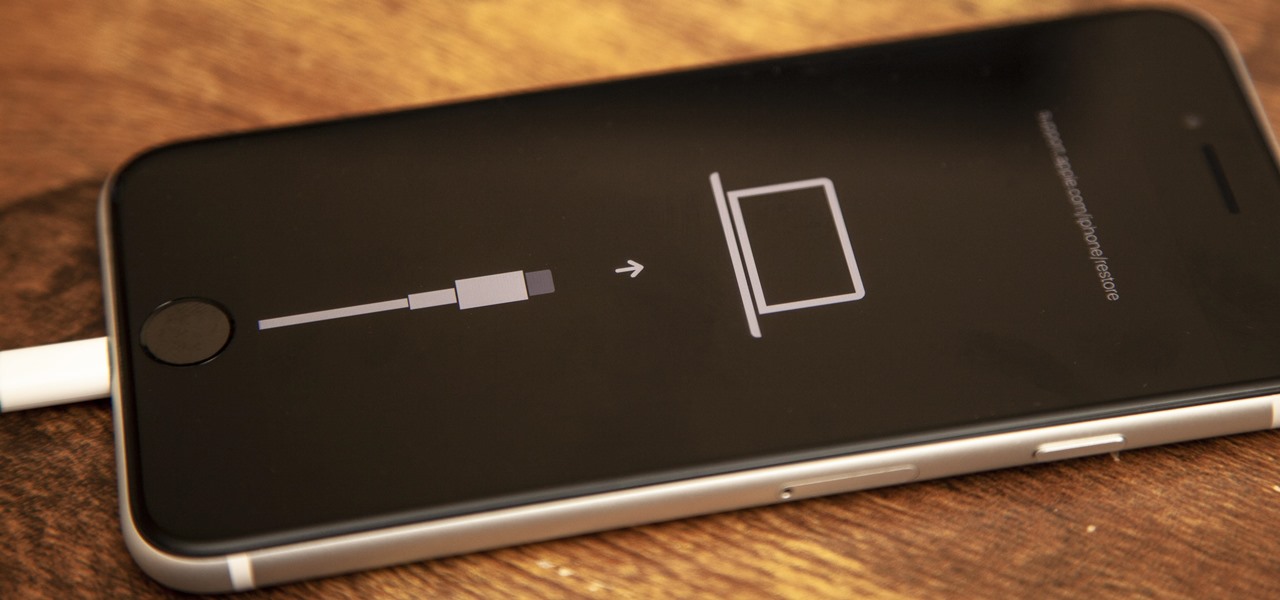
Steps to Put iPhone 13 In Recovery Mode
Putting your iPhone 13 in Recovery Mode can be a useful troubleshooting step if you are experiencing issues with your device. Whether you are trying to restore your iPhone or update its firmware, following these steps will help you put your iPhone 13 in Recovery Mode.
- Connect your iPhone to your computer: Start by connecting your iPhone 13 to your computer using a lightning cable. Make sure you have the latest version of iTunes or Finder installed on your computer.
- Put your iPhone into Recovery Mode: To put your iPhone 13 into Recovery Mode, follow these steps:
- Press and release the volume up button.
- Press and release the volume down button.
- Press and hold the side button until the recovery screen appears.
- Update or restore your iPhone: Once your iPhone 13 is in Recovery Mode, you will see the option to update or restore your device on your computer. Select the desired option based on your needs.
- Follow the on-screen instructions: After selecting the update or restore option, follow the on-screen instructions provided by iTunes or Finder. The process may take some time, so make sure your iPhone remains connected to your computer until it is complete.
- Exit Recovery Mode: If you want to exit Recovery Mode without restoring or updating your iPhone, simply disconnect your iPhone 13 from your computer. Your device will restart and exit Recovery Mode.
Putting your iPhone 13 in Recovery Mode is a straightforward process, but it’s important to remember that restoring or updating your device may erase your data. Therefore, it’s always a good idea to have a recent backup of your iPhone before performing these steps.
Conclusion
In conclusion, putting your iPhone 13 into recovery mode can be a useful troubleshooting step when you encounter software issues or need to restore your device. By following the simple steps outlined in this article, you can easily put your iPhone 13 in recovery mode and initiate the necessary actions to resolve any problems.
Remember to back up your data before attempting any kind of restore or update, as it will ensure that your important files and settings are safe. Additionally, always make sure you have the latest version of iTunes installed on your computer for a smooth recovery process.
While recovery mode may seem daunting at first, it is a powerful tool that can help you overcome software glitches and get your iPhone 13 back to optimal performance. If you’re ever unsure or need further assistance, don’t hesitate to reach out to Apple support or consult the official Apple website for more detailed instructions.
So, next time you find yourself in need of troubleshooting your iPhone 13, don’t panic. Just follow the steps mentioned in this guide, put your device in recovery mode, and regain control over its software functionality.
FAQs
Q: What is recovery mode on an iPhone?
A: Recovery mode is a troubleshooting state that allows you to fix software issues on your iPhone. It helps you restore your device to its original factory settings or update its operating system.
Q: When should I put my iPhone in recovery mode?
A: You may need to put your iPhone in recovery mode if it’s experiencing issues like being stuck on the Apple logo, not responding to touch, or not connecting to iTunes.
Q: How do I put my iPhone 13 in recovery mode?
A: To put your iPhone 13 in recovery mode, follow these steps:
- Connect your iPhone 13 to a computer using a Lightning cable.
- Press and release the volume up button quickly.
- Press and release the volume down button quickly.
- Hold down the side button until the recovery mode screen appears.
Q: Will putting my iPhone in recovery mode delete my data?
A: Yes, putting your iPhone in recovery mode will erase all data on your device. It is essential to have a backup of your iPhone before entering recovery mode.
Q: How do I exit recovery mode on my iPhone?
A: To exit recovery mode on your iPhone, follow these steps:
- Press and hold the side button until the Apple logo appears.
- Your iPhone will restart and exit recovery mode.