
When it comes to emergencies, time can be of the essence. That is why having a trusted emergency contact on your iPhone can be a crucial step in ensuring your safety and well-being. By setting up an emergency contact for Emergency SOS on your iPhone, you can quickly and easily reach out for help when needed.
In this article, we will guide you through the process of setting an emergency contact for Emergency SOS on your iPhone. Whether it’s a medical emergency, an accident, or any other urgent situation, having an emergency contact can provide you with peace of mind and expedite the response time of emergency services.
If you’re ready to take a proactive approach to your safety, continue reading to learn how to set an emergency contact for Emergency SOS on your iPhone.
Inside This Article
- Step 1: Accessing the Emergency SOS Settings
- Step 2: Setting up Emergency Contacts
- Step 3: Configuring Emergency SOS Preferences
- Step 4: Testing Emergency SOS Feature
- Conclusion
- FAQs
Step 1: Accessing the Emergency SOS Settings
Setting up an emergency contact for Emergency SOS on your iPhone is an essential step to ensure your safety. By having an emergency contact listed, you can easily reach out for help during emergencies, and they will be promptly notified about your situation.
To begin, you need to access the Emergency SOS settings on your iPhone. Follow these easy steps to get started:
- Open the “Settings” app on your iPhone. It is represented by a gear icon and can usually be found on your home screen.
- Scroll down and tap on “Emergency SOS.” You will find it in the list of options.
- In the Emergency SOS settings, you will see various options that you can customize.
Now that you have accessed the Emergency SOS settings, you are ready to move on to the next step of adding emergency contacts to your Medical ID.
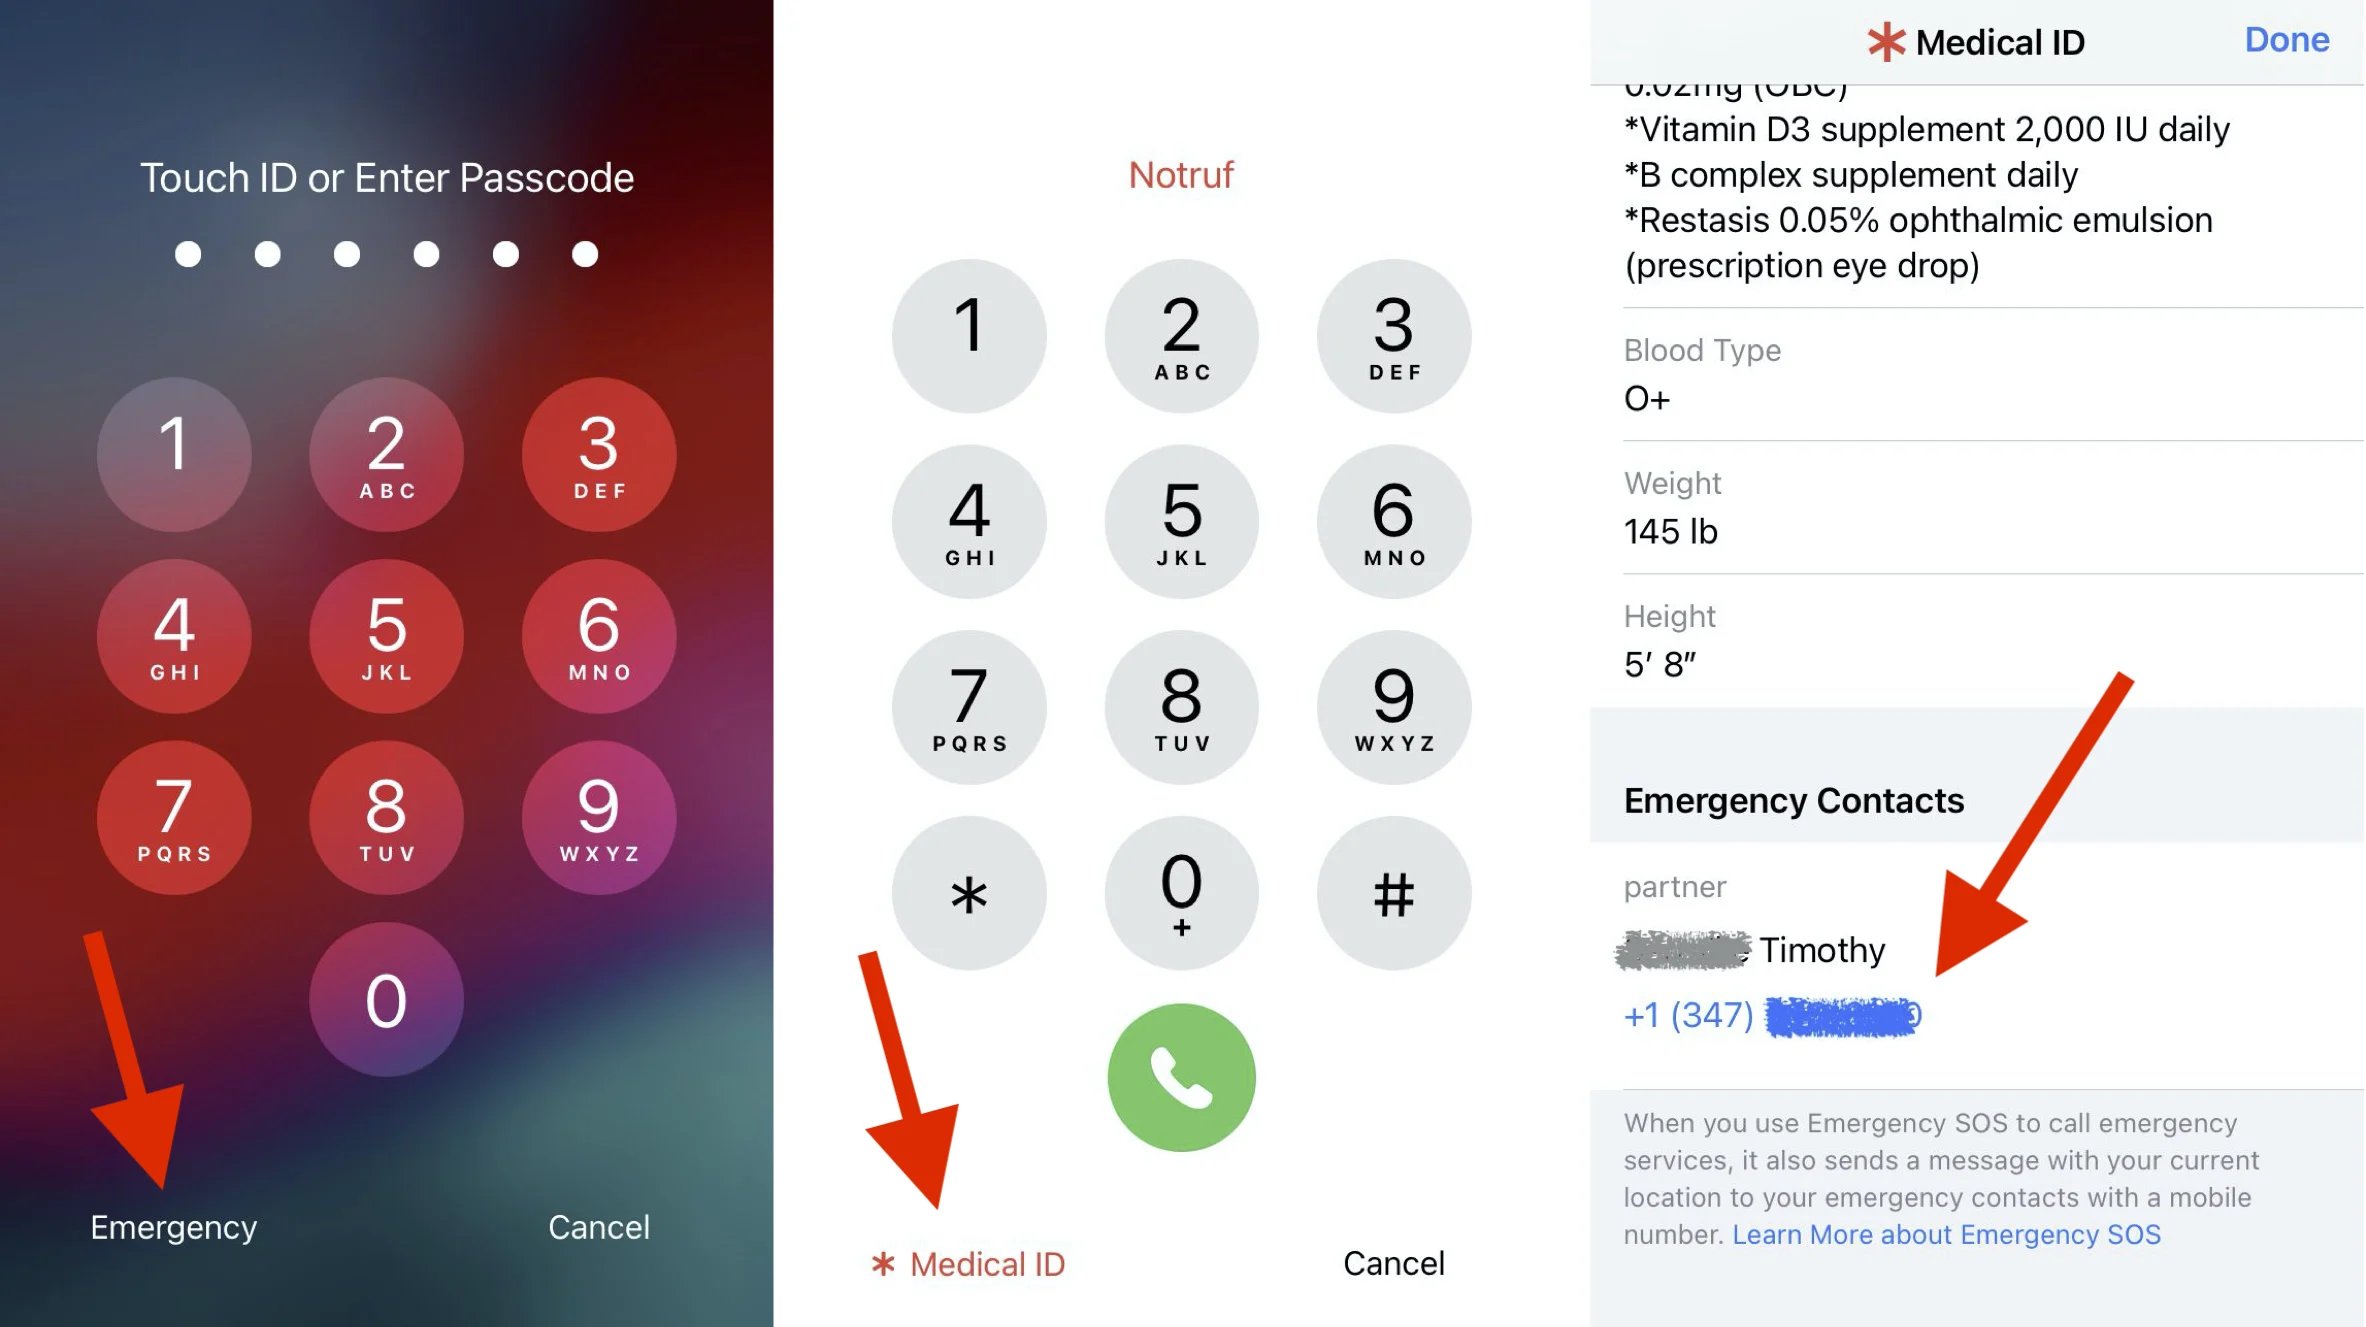
Step 2: Setting up Emergency Contacts
Once you have enabled the Emergency SOS feature on your iPhone, it’s crucial to set up your emergency contacts. These contacts will be notified automatically when you initiate an emergency call using the SOS feature. To add your emergency contacts, follow these simple steps:
1. Open the Health app on your iPhone. It’s the app with a white icon that resembles a heart on a white background.
2. Tap on the Medical ID tab at the bottom right corner of the screen. This will take you to your Medical ID profile.
3. Select the “Edit” button in the top-right corner of the screen.
4. Scroll down to the section labeled “Emergency Contacts”. Here, you will be able to add your emergency contacts.
5. Tap on the green “+” icon to add a new emergency contact. You can add multiple emergency contacts by repeating this step.
6. You will be prompted to select a contact from your iPhone’s Contacts list. Tap on the contact you want to add as your emergency contact.
7. Once you’ve selected a contact, you’ll be asked to assign a relationship type. This helps emergency services identify your relationship with that person. Choose a relationship type from the list, such as “Spouse”, “Parent”, or “Sibling”.
8. After selecting the relationship type, tap the “Done” button to save the emergency contact.
9. Repeat steps 5-8 to add additional emergency contacts if needed.
10. Once you have added all your emergency contacts, make sure to tap the “Done” button in the top-right corner of the screen to save your changes.
Now that you have successfully added your emergency contacts to your Medical ID, they will be accessible when you initiate an emergency call using the Emergency SOS feature. It’s important to regularly review and update your emergency contacts to ensure their accuracy.
Step 3: Configuring Emergency SOS Preferences
Once you have set up Emergency SOS on your iPhone and added emergency contacts to your Medical ID, you can further customize your emergency preferences to ensure that help will be easily accessible when you need it most. Follow these steps to configure your Emergency SOS preferences:
1. Open the “Settings” app on your iPhone.
2. Scroll down and tap on “Emergency SOS.”
3. Here, you will find various options to customize your emergency preferences. Let’s explore them:
A. Enable “Auto Call”
If you want your iPhone to automatically call emergency services when Emergency SOS is activated, toggle on the “Auto Call” option. This feature can be useful in urgent situations where you may not have the time or ability to manually make a call.
B. Adjust the Countdown Sound (optional)
By default, Emergency SOS plays a countdown sound before activating. If you wish to disable or change the countdown sound, tap on the “Countdown Sound” option and select your preferred option.
C. Choose to Display Emergency Contacts
If you want to display your emergency contacts on the Lock screen, toggle on the “Show When Locked” option. This way, emergency responders will be able to see your designated emergency contacts without needing to unlock your iPhone.
D. Activate “Call with Side Button”
If you have an iPhone model with a side button (such as the iPhone 8 or earlier), you can assign the side button to initiate Emergency SOS calls. Toggle on the “Call with Side Button” option to enable this feature.
E. Add Emergency Contacts Manually (optional)
In addition to the emergency contacts you added to your Medical ID, you can manually add more contacts to your emergency list. Tap on “Edit Emergency Contacts” to add or remove contacts as needed.
4. Once you have configured your preferences, exit the Settings app. Your Emergency SOS settings are now customized according to your preferences.
By configuring these Emergency SOS preferences, you can ensure that your iPhone is equipped to handle emergency situations efficiently. Remember, having the right emergency contacts and settings in place can potentially save valuable time and provide crucial assistance when it matters most.
Step 4: Testing Emergency SOS Feature
Once you have set up the Emergency SOS feature and added emergency contacts to your Medical ID, it’s crucial to test the functionality to ensure everything is working properly. The Emergency SOS feature on your iPhone allows you to quickly contact emergency services and notify your designated emergency contacts in times of crisis. Here’s how you can test the Emergency SOS feature on your device:
1. Make sure you are in a safe and controlled environment before testing the Emergency SOS feature. You don’t want to accidentally trigger an emergency response.
2. Press and hold the side button and one of the volume buttons simultaneously on your iPhone. Keep holding the buttons until the Emergency SOS slider appears on your screen.
3. Slide the Emergency SOS slider to the right. This action will immediately dial emergency services, such as 911 in the United States.
4. Wait for the emergency call to connect. Do not hang up unless you are instructed to do so by the emergency operator. Stay on the line and explain to the operator that you are testing the Emergency SOS feature on your iPhone.
5. After the call ends, your designated emergency contacts will receive a message notifying them that you have made an emergency call. This message will also include your current location information if available.
6. Contact your emergency contacts directly to confirm that they have received the notification. This will help ensure that the feature is indeed working as intended.
7. Once you have confirmed that the Emergency SOS feature and notifications are working correctly, remember to cancel the emergency call. This can be done by tapping the “Stop” or “Cancel” button on the Emergency SOS screen.
8. It’s important to note that testing the Emergency SOS feature should only be done when necessary and in controlled conditions. Unnecessary or false alarms may put a strain on emergency services and could potentially be illegal in certain jurisdictions.
By regularly testing the Emergency SOS feature, you can have peace of mind knowing that you can swiftly reach out for help and notify your emergency contacts in times of need.
Conclusion
Setting an emergency contact for Emergency SOS on your iPhone is a vital step in ensuring your safety in times of distress. By following the simple steps outlined in this guide, you can have peace of mind knowing that help is just a few taps away.
In this article, we discussed how to enable Emergency SOS on your iPhone and add an emergency contact to provide essential information to first responders. We also explored the importance of ensuring your contact details are up to date and how to customize your Emergency SOS settings to better meet your needs.
Remember, emergencies can happen at any time, and having a designated emergency contact can make a significant difference in the response time of medical professionals or first responders. Taking the time to set up Emergency SOS and add an emergency contact can potentially be a life-saving measure.
Stay safe, be prepared, and always have a trusted contact ready to assist you in times of need.
FAQs
Q: How do I set an emergency contact for Emergency SOS on iPhone?
A: To set an emergency contact for Emergency SOS on iPhone, follow these steps:
1. Open the settings app on your iPhone.
2. Scroll down and tap on “Emergency SOS”.
3. Under the “Emergency Contacts” section, tap on “Edit Emergency Contacts”.
4. Tap on the “+” button to add a new emergency contact.
5. Choose a contact from your saved contacts or manually enter a new contact.
6. Once you have selected the emergency contact, tap “Done” to save the changes.
Q: Can I add multiple emergency contacts?
A: Yes, you can add multiple emergency contacts to your iPhone’s Emergency SOS feature. Follow the same steps outlined in the previous question, and instead of tapping the “+” button once, tap it for each additional emergency contact you want to add. This way, you can have several contacts available in case of an emergency.
Q: Can I choose any contact as my emergency contact?
A: Yes, you can choose any contact from your iPhone’s saved contacts as your emergency contact. When adding an emergency contact, you will have the option to select a contact from your existing list or manually enter a new contact. It is advisable to choose someone you trust and who is likely to respond quickly in case of an emergency.
Q: How does Emergency SOS work?
A: Emergency SOS is a feature available on iPhone devices that allows users to quickly call for help in an emergency situation. When you activate Emergency SOS by pressing the power button and either volume button (or the side button on iPhone X and newer models), your iPhone will automatically call emergency services. It will also send a message with your location details to your emergency contacts, if you have set them up. This feature can be a life-saving tool in critical situations.
Q: Can I change my emergency contact later?
A: Yes, you can change your emergency contact at any time. Simply follow the steps mentioned in the first question to access the Emergency SOS settings on your iPhone. From there, you can modify your emergency contacts by tapping on “Edit Emergency Contacts” and making the necessary changes. Remember to save the changes once you have updated your emergency contact information.