
The iPhone has become an indispensable tool for managing and organizing our lives, including our personal and professional information. If you are someone who relies heavily on spreadsheets to keep track of important data, then you know how crucial it is to protect sensitive information from prying eyes. Fortunately, there is a simple and effective solution – adding password protection to an individual Numbers spreadsheet on your iPhone. By implementing this security measure, you can ensure that only authorized users have access to your confidential data. In this article, we will guide you through the step-by-step process of adding password protection to an individual Numbers spreadsheet, empowering you with the knowledge to safeguard your sensitive information on your iPhone.
Inside This Article
- Why Add Password Protection to an Individual Numbers Spreadsheet?
- Steps to Add Password Protection to an Individual Numbers Spreadsheet for iPhone
- Conclusion
- FAQs
Why Add Password Protection to an Individual Numbers Spreadsheet?
Adding password protection to an individual Numbers spreadsheet on your iPhone is a smart practice that can provide enhanced security for sensitive data. Whether you use spreadsheets for personal finance management, business records, or any other purpose, protecting the information within them is essential.
By adding password protection, you can prevent unauthorized access to your spreadsheet, ensuring that only authorized individuals can view or make changes to the data. This is particularly important when you store confidential information such as financial statements, customer data, or any other sensitive data that should be kept private.
Furthermore, password protection adds an extra layer of security in case your iPhone falls into the wrong hands. In the event of loss or theft, having password-protected spreadsheets can help safeguard your sensitive data from unauthorized access.
Whether you’re a business professional, a student, or simply an individual who values privacy and security, adding password protection to your individual Numbers spreadsheets is an important step towards securing your data.
Steps to Add Password Protection to an Individual Numbers Spreadsheet for iPhone
If you handle sensitive or confidential information on your iPhone using Numbers, it is important to ensure that your data is secure. One way to protect your data is by adding password protection to individual spreadsheets in Numbers for iPhone. With password protection, you can safeguard your information and prevent unauthorized access. Follow these easy steps to add password protection to an individual Numbers spreadsheet for iPhone:
- Launch Numbers: Open the Numbers app on your iPhone to get started. If you don’t have Numbers installed, you can download it from the App Store.
- Create or Open a Spreadsheet: Either create a new spreadsheet or open an existing one that you want to add password protection to. Tap on the spreadsheet to open it.
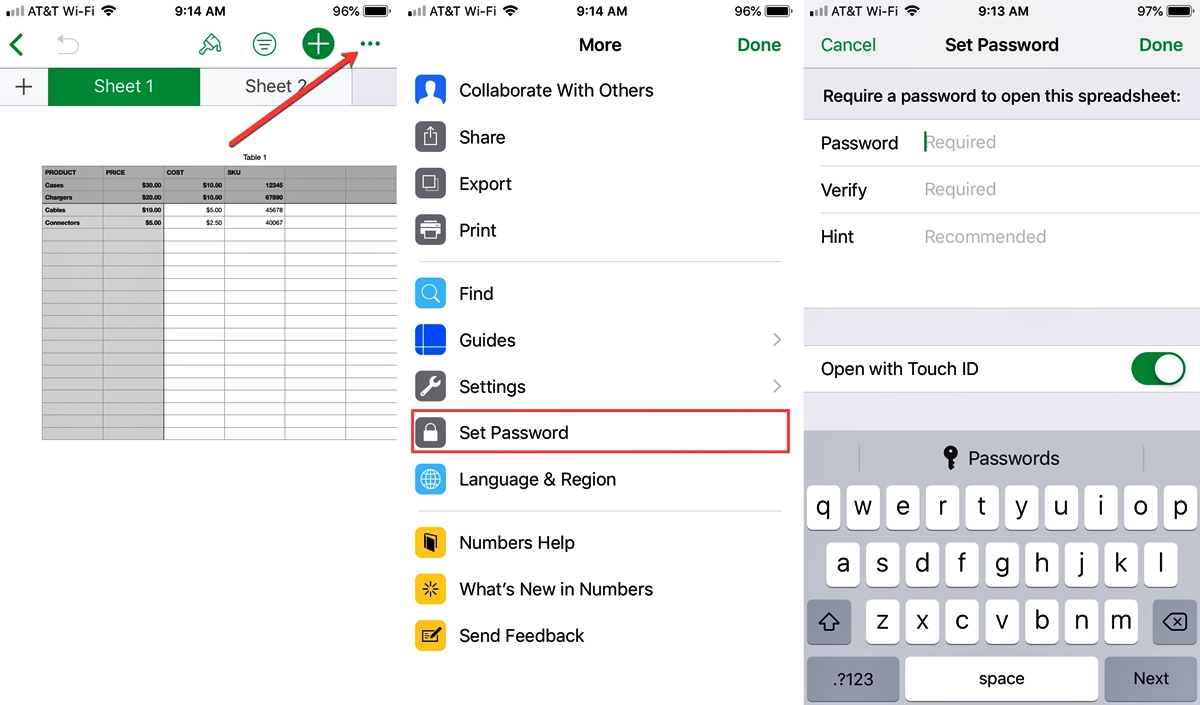
- Access Settings: Once the spreadsheet is open, tap on the three-dot menu icon located at the top-right corner of the screen. This will open a dropdown menu.
- Select “Passwords & Permissions”: From the dropdown menu, select “Passwords & Permissions” to access the password protection settings for the spreadsheet.
- Enable Password Protection: On the “Passwords & Permissions” screen, toggle the switch next to “Require Password” to enable password protection for the spreadsheet.
- Set a Password: Tap on the “Set Password” button to set a password for the spreadsheet. Enter a strong and unique password that you will remember, but others will have a hard time guessing.
- Confirm Password: Re-enter the password to confirm it. Make sure to enter it accurately to avoid any issues with accessing your spreadsheet later.
- Save your Changes: After setting and confirming the password, tap on the “Done” button to save your changes and activate the password protection for the spreadsheet.
- Password Prompt: Once the password protection is enabled, the next time you or someone else tries to open the spreadsheet in Numbers, they will be prompted to enter the password before accessing the data.
- Manage Passwords: To change or remove the password, return to the “Passwords & Permissions” screen and modify the settings as needed.
By following these simple steps, you can add an extra layer of security to your sensitive spreadsheets in Numbers for iPhone. Password protecting your individual spreadsheets in Numbers ensures that your data remains private and secure, even if your iPhone falls into the wrong hands. Protect your valuable information and have peace of mind knowing that your data is safe.
Conclusion
Adding password protection to an individual numbers spreadsheet on your iPhone is a simple yet effective way to keep your sensitive data secure. By following the steps outlined in this guide, you can easily set up a strong password for your spreadsheet and prevent unauthorized access.
With password protection enabled, you can confidently store and share important documents, financial information, or any other data that you want to keep private. This feature provides an extra layer of security and gives you peace of mind, knowing that your information is safeguarded.
Remember, it’s essential to choose a strong, unique password that is not easily guessable. Additionally, make sure to keep your password in a secure place to avoid any potential data loss.
By utilizing the password protection feature in Numbers on your iPhone, you can maintain the confidentiality and integrity of your sensitive information, ensuring that only authorized individuals can access and modify your spreadsheet. Protect your data and keep it safe with this handy feature!
FAQs
Q: How do I add password protection to an individual Numbers spreadsheet on my iPhone?
A: To add password protection to an individual Numbers spreadsheet on your iPhone, follow these steps:
- Open the Numbers app on your iPhone.
- Select the specific spreadsheet you want to protect with a password.
- Tap on the ••• (ellipsis) icon at the top-right corner of the screen.
- In the drop-down menu, tap on “Set Password.”
- Enter your desired password and confirm it.
- Optionally, you can enable Touch ID or Face ID for easier access to the spreadsheet.
- Tap “Done” to save your password.
Your Numbers spreadsheet is now password protected on your iPhone.
Q: Can I recover a forgotten password for a Numbers spreadsheet on my iPhone?
A: Unfortunately, there is no built-in way to recover a forgotten password for a Numbers spreadsheet on your iPhone. Make sure to choose a password that you can remember or store it securely in a password manager to avoid losing access to your spreadsheet.
Q: How do I remove password protection from a Numbers spreadsheet on my iPhone?
A: To remove password protection from a Numbers spreadsheet on your iPhone, follow these steps:
- Open the Numbers app on your iPhone.
- Select the password-protected spreadsheet.
- Tap on the ••• (ellipsis) icon at the top-right corner of the screen.
- In the drop-down menu, tap on “Set Password.”
- Enter your current password.
- Tap on the “Remove Password” option.
- Confirm your action by tapping “Remove” in the pop-up dialog.
The password protection will be removed from the Numbers spreadsheet.
Q: Can I password protect multiple spreadsheets in the Numbers app on my iPhone?
A: Yes, you can password protect multiple spreadsheets in the Numbers app on your iPhone. Simply follow the steps mentioned earlier for each individual spreadsheet that you want to protect.
Q: Is password protection available on all models of iPhones?
A: Yes, password protection is available on all models of iPhones that support the Numbers app. However, the availability of features like Touch ID or Face ID for easier access to password-protected spreadsheets may vary depending on the model of your iPhone.