
The iPhone has become an indispensable device in our daily lives, offering a multitude of features and capabilities. One of the key functionalities it provides is the ability to create and manage various types of files. Whether you need to save important documents, create memos, or organize photos and videos, the iPhone offers intuitive ways to do so. In this article, we will explore the step-by-step process of making a file on your iPhone. Whether you’re using the latest iPhone model or an older version, you can easily follow these instructions to create files and keep your digital life organized. So, let’s delve into the world of file creation on the iPhone and discover how you can make the most of this powerful device.
Inside This Article
- How to Make a File on iPhone
- Using the Files App
- Using iCloud Drive
- Using Third-Party Apps – Installing a File Management App – Creating a New File within the App – Syncing Files across Devices
- Using Cloud Storage Services
- Conclusion
- FAQs
How to Make a File on iPhone
If you’re looking to make a file on your iPhone, you’re in luck! The process is simple and straightforward, allowing you to create and organize your files with ease. Whether you need to create a document, spreadsheet, or presentation, your iPhone can handle it all. In this article, we’ll guide you through the steps, so let’s get started!
Step 1: Choose the App
The first step is to choose the app that you want to use to create your file. There are several apps available on the App Store that you can use for different purposes. For example, if you want to create a document, you can use apps like Pages or Google Docs. Similarly, if you want to create a spreadsheet, you can use Numbers or Google Sheets. Choose the app that best suits your needs and install it on your iPhone, if you haven’t already.
Step 2: Create a New File
Once you’ve chosen the app, open it on your iPhone. Look for the option to create a new file, which is usually located in the app’s home screen or menu. Tap on it to start creating a new file.
Step 3: Customize and Save
Now that you’ve started a new file, it’s time to customize it according to your requirements. Add text, images, tables, or any other elements that you want to include in your file. Most apps offer a variety of formatting options to make your file visually appealing. Once you’re done customizing, don’t forget to save your file. Tap on the save button or choose the save option from the app’s menu. You can give your file a name and choose a location to save it on your iPhone.
Step 4: Organize Your Files
As you create more files on your iPhone, it’s essential to keep them organized. Most apps provide options to create folders or use tags to categorize your files. Take advantage of these features to maintain a well-organized file system. You can create specific folders for different projects or use tags to group related files together. This will make it easier for you to find and access your files whenever you need them.
Step 5: Share and Collaborate
One of the great advantages of creating files on your iPhone is the ability to easily share and collaborate with others. Most apps offer options to share your files via email, messaging apps, or even through cloud storage services like iCloud or Google Drive. You can also invite others to collaborate on your files, allowing them to make edits or comments. This makes it convenient for teamwork or sharing files with clients or colleagues.
With these simple steps, you can easily make files on your iPhone and stay productive on the go. Whether you’re creating documents, spreadsheets, presentations, or any other type of file, your iPhone provides the tools you need. So, start organizing your files and take advantage of the convenience that your iPhone offers!
Using the Files App
Opening the Files App:
To make a file on your iPhone, you’ll need to use the Files app. The Files app is a built-in file management system that allows you to organize and access your files easily. To open the Files app, simply tap on its icon on your iPhone’s home screen.
Creating a New Folder:
Once you’re in the Files app, you can create a new folder to store your files. To do this, tap on the “+” button located at the top-right corner of the screen. A menu will appear with several options, including “New Folder.” Tap on “New Folder” and give it a name of your choice.
Adding Files to the Folder:
With the folder created, you can now add files to it. To add a file, navigate to the folder where you want to store it. Then, tap on the “+” button again and select the option that corresponds to the type of file you want to add. For example, if you want to add a document, tap on “New Document.” You can also select files from other apps or import them from cloud storage services like iCloud or Google Drive.
So there you have it – using the Files app on your iPhone makes it easy to create folders and add files. With this simple process, you can efficiently organize your documents, photos, videos, and more, right from the palm of your hand.
Using iCloud Drive
iCloud Drive is a cloud storage service provided by Apple that allows you to store and access files from your iPhone. By enabling iCloud Drive, you can create and organize files directly on your device, giving you the flexibility to work on your files from anywhere.
Enabling iCloud Drive
To start using iCloud Drive on your iPhone, follow these simple steps:
- Open the “Settings” app on your iPhone.
- Tap on your Apple ID at the top of the screen.
- Select “iCloud” from the menu.
- Scroll down and tap on “iCloud Drive”.
- Toggle the switch to enable iCloud Drive.
Once enabled, iCloud Drive will automatically sync your files across all your devices that are signed in to the same Apple ID.
Creating a New File on iCloud Drive
Now that iCloud Drive is enabled, you can easily create a new file directly on your iPhone. Follow these steps:
- Open the “Files” app on your iPhone (you can find it on your home screen).
- Navigate to the location where you want to create the new file (e.g., in the “Documents” folder).
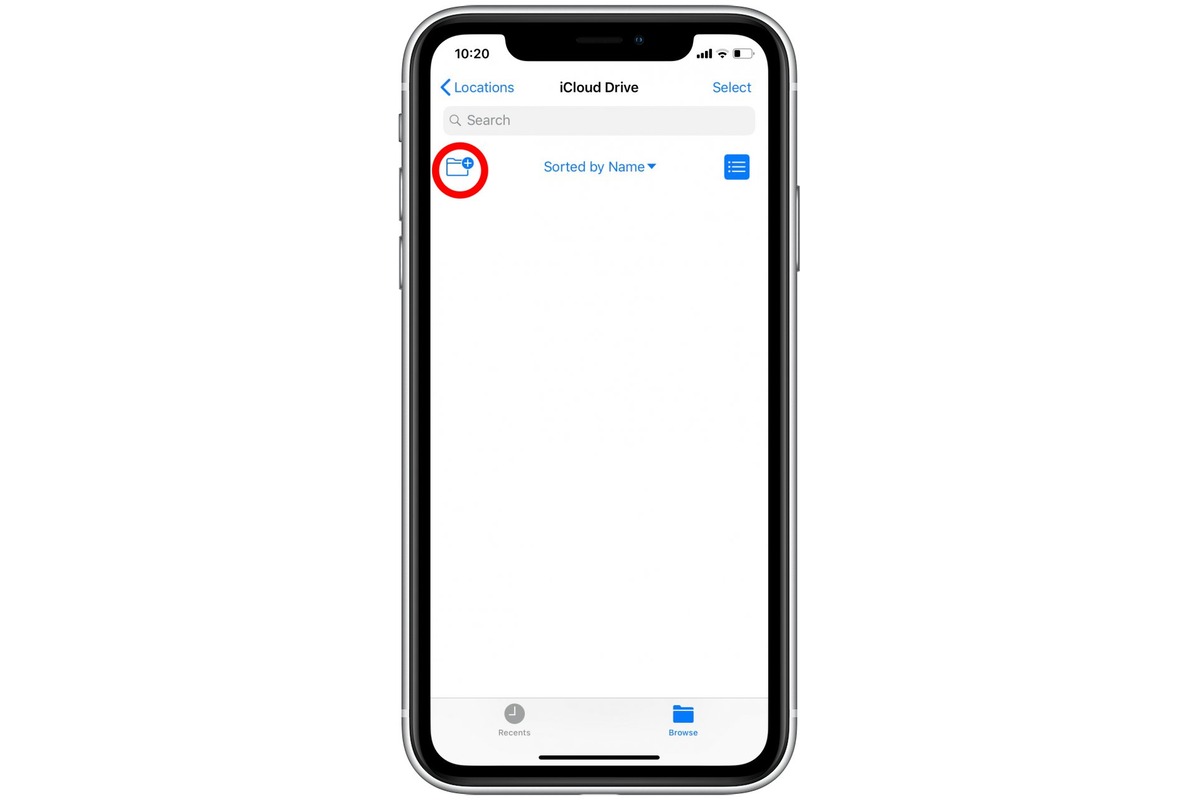
- Tap on the “+” button at the top right corner of the screen.
- Select the type of file you want to create (e.g., “Document”, “Spreadsheet”, “Presentation”, etc.).
- Edit the file and enter the desired content.
- Tap “Done” to save the file.
Your new file will now be saved to iCloud Drive and can be accessed from any device that has iCloud Drive enabled.
Organizing Files on iCloud Drive
With iCloud Drive, you can easily organize your files to keep them structured and easily accessible. Follow these tips to effectively manage your files:
- Create folders: To group related files together, you can create folders in iCloud Drive. Simply tap and hold on a blank space within the Files app, then select “New Folder”. Give it a name and move files into the folder by dragging and dropping them.
- Rename files and folders: Tap and hold on a file or folder, then select “Rename”. Enter the new name and tap “Done” to save the changes.
- Delete files and folders: Swipe left on a file or folder, then tap the “Delete” button to remove it from iCloud Drive.
- Use tags: Tags can help you organize and find files more easily. To add a tag to a file, tap and hold on it, then select “Tags” and choose the relevant tag. You can also create custom tags in the “Files” app settings.
- Search for files: Use the search bar at the top of the “Files” app to quickly search for specific files or folders by name.
By utilizing these organizational features, you can keep your iCloud Drive tidy and efficiently manage your files.
Using Third-Party Apps – Installing a File Management App – Creating a New File within the App – Syncing Files across Devices
If you want more control and flexibility over file management on your iPhone, you can turn to third-party apps. There are several file management apps available on the App Store that can help you create, organize, and sync files across multiple devices. Here’s how you can make a file using third-party apps:
1. Installing a File Management App:
Start by finding a reliable file management app in the App Store. Some popular options include Documents by Readdle, FileApp, and File Manager & Browser. Download and install the app on your iPhone.
2. Creating a New File within the App:
Once the app is installed, open it and navigate to the location where you want to create the file. This could be a specific folder or the app’s main interface. Look for the option to create a new file, which is usually represented by a “+” or a similar symbol. Tap on it to proceed.
3. Choose the File Type and Name:
After selecting the option to create a new file, you will be prompted to choose the file type. Common options include text files, documents, spreadsheets, presentations, and more. Select the appropriate file type for your needs. Then, enter a name for the file to easily identify it later.
4. Edit and Save the File:
Once the new file is created, you will be taken to the file editor within the app. Depending on the app you’re using, you will have different editing capabilities. Some file management apps offer basic text editing features, while others provide advanced tools for creating and formatting documents. Make the necessary edits and modifications to the file and tap on the “Save” or “Done” button to save your changes.
5. Syncing Files across Devices:
One of the advantages of using a third-party file management app is the ability to sync your files across multiple devices. To do this, ensure that you’re signed in to the same app account on all devices and have enabled file syncing in the app settings. Your files will be automatically synchronized, allowing you to access and modify them on any of your devices.
With the help of third-party file management apps, creating and managing files on your iPhone becomes much more intuitive and efficient. Explore the different apps available and find the one that suits your needs best.
Using Cloud Storage Services
Cloud storage services have become increasingly popular for file management due to their convenience and accessibility. With a cloud storage app installed on your iPhone, you can easily store, organize, and access your files from anywhere, at any time. Here’s how you can use cloud storage services to make a file on your iPhone:
Installing a Cloud Storage App
The first step is to install a cloud storage app on your iPhone. You can choose from a variety of popular options such as Google Drive, Dropbox, or iCloud Drive. Simply visit the App Store, search for the desired app, and tap on the “Get” or “Install” button to download and install it on your device.
Signing in to the Account
Once you have installed the cloud storage app, open it and sign in to your account. If you don’t have an account, you will need to create one by providing your email address and setting up a password. Once you are signed in, you will have access to the app’s features and functionalities.
Uploading and Organizing Files in the Cloud Storage
With your cloud storage app and account set up, you can now start uploading and organizing your files. Tap on the option to upload a file and choose the file you want to upload from your iPhone’s storage. The file will then be uploaded to your cloud storage account.
Once your file is uploaded, you can organize it into folders or tag it with relevant keywords for easy retrieval. Most cloud storage apps provide intuitive interfaces that allow you to create folders, rename files, and move or copy files between folders.
Additionally, you can also share your files with others by generating a shareable link or inviting them to collaborate on specific files or folders. This can be especially useful for collaborative projects or when you need to share large files with colleagues or clients.
By using a cloud storage service, you not only have the ability to create files on your iPhone but also ensure that your files are safely backed up and easily accessible across multiple devices. Whether you are working on documents, photos, videos, or any other type of file, using a cloud storage service can greatly simplify your file management process.
So, install a cloud storage app on your iPhone, sign in to your account, and start enjoying the benefits of easy file creation, organization, and access!
Conclusion
Creating a file on your iPhone is a straightforward process that can help you stay organized and access important documents on the go. Whether it’s a PDF, Word document, or image file, you can save and manage files with ease using the built-in Files app or third-party apps. With the ability to browse, search, and organize files in folders, you can quickly find what you need when you need it.
By following the step-by-step instructions in this article, you can start creating files on your iPhone in no time. Remember to choose the right file format, utilize cloud storage options for seamless access across devices, and consider file encryption for enhanced security. Now you’re empowered to take control of your documents and make the most of your iPhone’s capabilities. Embrace the convenience and portability that file creation on the iPhone offers, and keep your important files at your fingertips.
FAQs
1. How do I create a file on my iPhone?
Creating a file on your iPhone is a simple process. Here’s how you can do it:
– Open the Files app on your iPhone.
– Tap on the location (such as iCloud Drive) where you want to create the file.
– Tap on the “+” icon at the bottom of the screen.
– Select the “New Folder” option if you want to create a folder or select the “New Document” option if you want to create a file directly.
– Enter a name for the file and tap “Done”.
Now you have successfully created a file on your iPhone.
2. Can I create different types of files on my iPhone?
Yes, you can create different types of files on your iPhone. The Files app supports various file formats, including documents, spreadsheets, presentations, images, audio files, and more. You can create these files using compatible apps installed on your device or save files from other sources into the Files app.
3. How can I organize and manage my files on iPhone?
The Files app on your iPhone provides several ways to organize and manage your files efficiently. Here are some useful features:
– Create folders to categorize your files.
– Drag and drop files to move or copy them to different locations.
– Use the search bar to quickly find specific files.
– Tag files for easier identification and grouping.
– Use the “Recents” tab to access files you recently opened or modified.
By utilizing these features, you can keep your files organized and easily accessible.
4. How can I access my files across multiple devices?
If you have iCloud enabled on your iPhone, your files will be automatically synced across all your Apple devices. This means that any files you create or save on your iPhone will be available on your iPad, Mac, or other supported devices connected to the same iCloud account. You can access these files using the Files app on each device or through iCloud Drive on your computer.
5. Can I share files from my iPhone?
Yes, you can easily share files from your iPhone. The Files app offers various sharing options, including:
– Tap and hold on a file, then select the “Share” option to share it through AirDrop, Messages, Mail, or other compatible apps.
– Use the “Share” button within specific apps to share files directly from those apps.
– If you are using iCloud Drive, you can generate a shareable link that allows others to access the file.
By utilizing these sharing options, you can quickly and conveniently share files from your iPhone with others.