
Have you ever found yourself staring at your iPhone screen, unsure of how to answer an incoming call? Don’t worry, you’re not alone. Many people struggle with this seemingly simple task, especially if they’re new to the iPhone or just haven’t gotten the hang of it yet. In this article, we will provide you with a step-by-step guide on how to answer an iPhone, so you can confidently pick up those important calls without any hesitation. Whether you’re using the latest iPhone model or an older version, we’ve got you covered. So, let’s dive in and discover the various ways to answer an iPhone call, from the traditional method to some handy shortcuts and options.
Inside This Article
- Set Up Your iPhone
- Navigate the Home Screen
- Answering Incoming Calls
- Using the Speakerphone Feature
- Conclusion
- FAQs
Set Up Your iPhone
When you get a new iPhone, the first thing you need to do is set it up. Follow these simple steps to get your iPhone up and running in no time:
- Unbox your iPhone and remove any protective coverings.
- Turn on your iPhone by pressing and holding the power button located on the side or top of the device.
- Follow the on-screen instructions to select your language and region.
- Connect to a Wi-Fi network. This will allow your iPhone to download the latest updates and set up your Apple ID.
- If you already have an Apple ID, sign in with your credentials. If not, you can create a new Apple ID by tapping on “Create a Free Apple ID” and following the prompts.
- Set up Touch ID or Face ID for added security and convenience. This feature allows you to unlock your iPhone with your fingerprint or facial recognition.
- Choose whether to set up your iPhone as a new device or restore from a previous backup. If you’re upgrading from an old iPhone, selecting the restore option will transfer your data, apps, and settings to your new device.
- Review and agree to the terms and conditions.
- Set up Siri, your personal voice assistant, by following the on-screen prompts.
- Customize your iPhone settings according to your preferences. This includes options like display brightness, notifications, privacy settings, and more.
Once you have completed these steps, your iPhone will be set up and ready to use. Enjoy exploring all the features and capabilities of your new device!
Navigate the Home Screen
The home screen is the central hub of your iPhone, where you can access all of your apps, widgets, and settings. Navigating the home screen is easy and intuitive, allowing you to quickly find and launch the apps you need.
Here are some tips to help you navigate your iPhone’s home screen:
- Swipe left or right: To move between different pages of apps on the home screen, simply swipe left or right with your finger. This is especially useful if you have a lot of apps and need to access ones that are not immediately visible.
- Create app folders: If you have multiple apps that belong to a similar category or serve a common purpose, you can organize them into folders. To create a folder, tap and hold on an app icon until all the icons start to jiggle. Then, drag one app on top of another to create a folder. You can even rename the folder for easier identification.
- Search for apps: If you have numerous apps installed and struggle to find a specific one, you can use the search feature. On the home screen, swipe down from the middle of the screen to bring up the search bar. Type the name of the app you’re looking for, and it will be displayed in the search results.
- Use the dock: The dock is a fixed bar at the bottom of the home screen that allows you to place your most frequently used apps for easy access. By default, the dock can hold up to four apps, but you can customize it by dragging apps from the home screen onto the dock.
- Organize apps: You can rearrange the apps on your home screen to your liking. Tap and hold on an app icon until all the icons start to jiggle, then drag the app to its desired location. You can also move apps between different pages by dragging them to the left or right edge of the screen.
- Access widgets: Widgets are handy mini-apps that provide quick access to information and updates without having to open the full app. To access widgets, swipe right from the left edge of the home screen or swipe all the way to the leftmost page.
Navigating your iPhone’s home screen is a breeze once you familiarize yourself with these tips and tricks. Don’t be afraid to experiment and customize your home screen to suit your preferences and workflow.
Answering Incoming Calls
When you receive an incoming call on your iPhone, you have several options for answering it. Here’s a step-by-step guide on how to handle incoming calls with ease:
1. Ringtone Notification: When your iPhone is unlocked and not in silent mode, you’ll hear a ringtone or a vibration to alert you of an incoming call. The caller’s name or phone number will also be displayed on the screen.
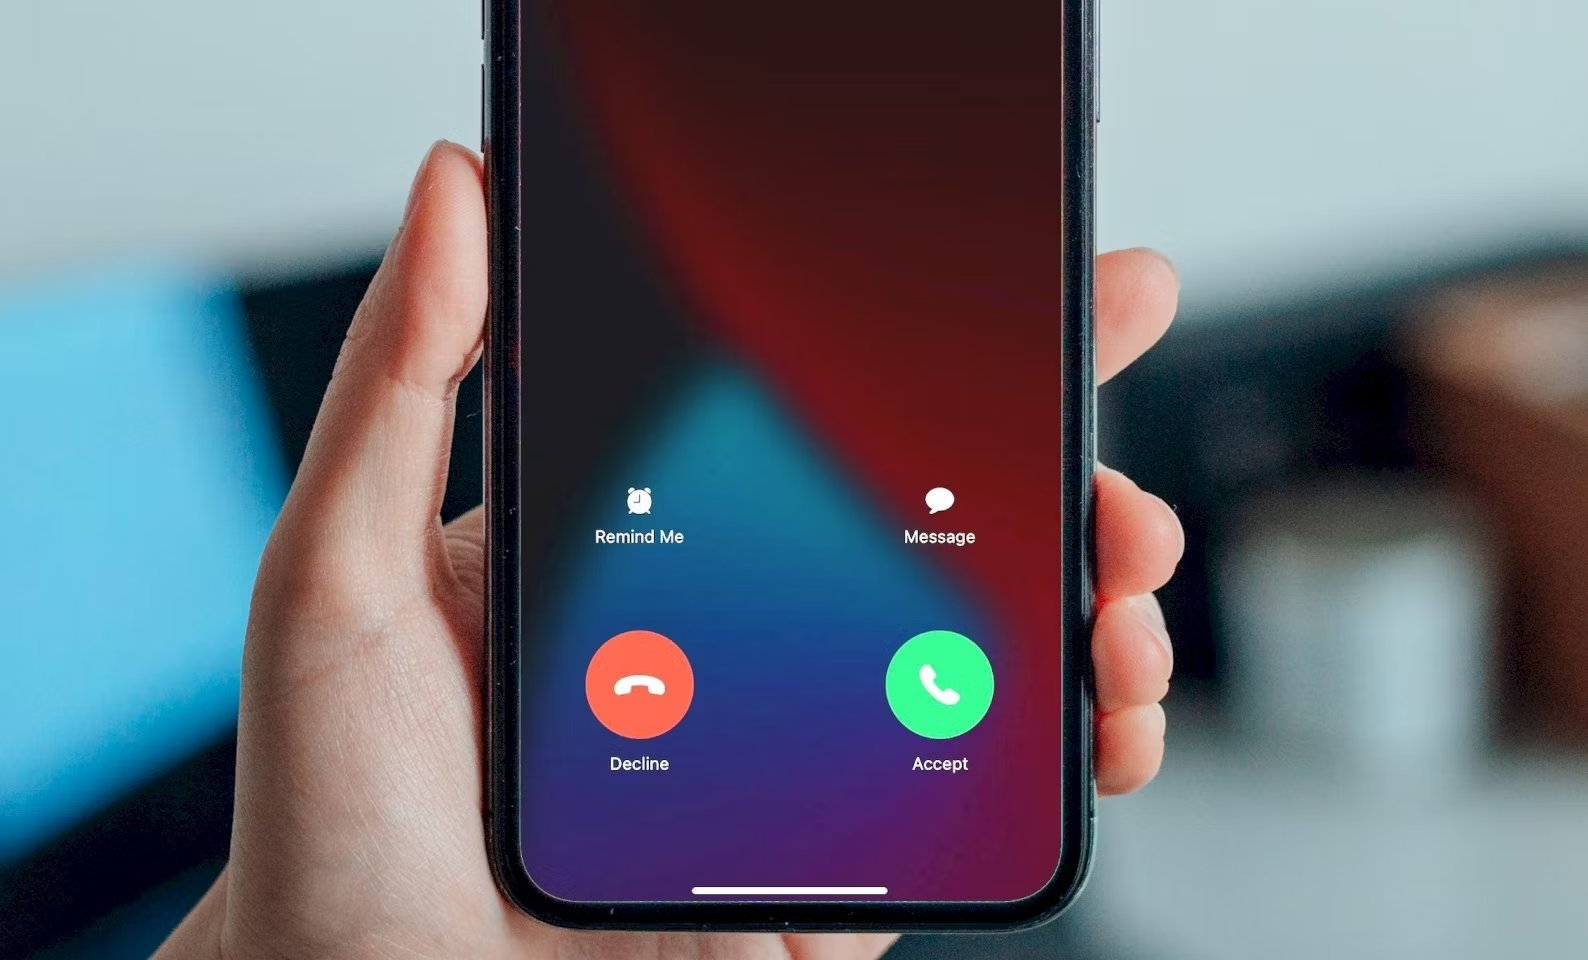
2. Slide to Answer: To answer the call, simply slide the green phone icon to the right and hold it until the call is connected. Alternatively, you can tap the “Answer” button that appears on the screen.
3. Silence the Call: If you wish to ignore the incoming call without declining it, you can quickly silence the ringing by pressing the volume buttons or the side button. This will send the call to voicemail.
4. Decline the Call: If you prefer not to answer the call at all, slide the red phone icon to the left or tap the “Decline” button. The caller will be sent to voicemail, and you can choose to send them a text message instead.
5. Answer with a Message: If you’re busy or unavailable but still want to acknowledge the caller, you can use the “Message” option. Simply tap the “Message” button, and your iPhone will provide suggested text messages for you to choose from or allow you to customize your own response.
6. Remind Me Later: In case you can’t answer the call right away but want to be reminded later, tap the “Remind Me” option. You can select a time or location-based reminder to prompt you to return the call at a more convenient time.
7. Do Not Disturb: If you’re in a meeting or need uninterrupted time, you can activate the “Do Not Disturb” feature. This will silence incoming calls and notifications while your iPhone is locked, sending them straight to voicemail or allowing them to ring silently.
By following these steps, you’ll be able to confidently handle incoming calls on your iPhone and choose how to respond to them based on your preferences and circumstances.
Using the Speakerphone Feature
When you receive a call on your iPhone, you have the option to use the speakerphone feature. This convenient feature allows you to have a hands-free conversation and even share the call with others around you. Here’s how you can use the speakerphone feature on your iPhone:
1. Answer the call: When you receive an incoming call, tap the “Accept” button to answer the call as you normally would.
2. Activate the speakerphone: Once the call is connected, you’ll see a button with an icon of a speaker at the bottom of the screen. Tap on this button to activate the speakerphone.
3. Adjust the volume: You can adjust the volume of the speakerphone by using the volume buttons on the side of your iPhone. Press the volume up button to increase the volume and the volume down button to decrease the volume.
4. Position your iPhone: Place your iPhone on a stable surface or use a phone stand to position it upright, ensuring that the bottom speaker is not obstructed. This will help to optimize the sound quality from the speakerphone.
5. End the call: To end the call, tap the “End” button as usual, or simply lift the handset to your ear if you wish to switch from speakerphone mode to regular mode.
Using the speakerphone feature on your iPhone can be extremely useful in various situations. Whether you’re participating in a conference call, sharing a conversation with a group of people, or simply multitasking while on a call, the speakerphone feature provides convenience and flexibility.
Note that although the speakerphone allows for hands-free usage, it’s still important to be mindful of your surroundings and use it in appropriate situations. Avoid talking on speakerphone in public places where privacy is required or if it may disturb others around you.
Now that you know how to use the speakerphone feature on your iPhone, you can enjoy the convenience and freedom it provides during your calls.
Conclusion
Answering an iPhone is a fundamental skill that can greatly enhance your mobile phone experience. By understanding the various methods available – including using the physical buttons, voice commands, and accessing the screen – you are equipped to handle incoming calls with ease.
Remember to personalize your iPhone’s settings to suit your needs, such as activating Do Not Disturb mode or setting up custom ringtones. Additionally, explore the features of the iPhone’s built-in virtual assistant, Siri, to enhance your hands-free phone interactions.
Whether you prefer a quick tap on the screen, a convenient voice command, or utilizing the physical buttons, the iPhone offers a range of intuitive options for answering calls. Mastering these techniques will allow you to stay connected and in control, ensuring a seamless and enjoyable mobile phone experience.
So next time your iPhone rings, confidently answer the call, knowing that you have the knowledge and skills to navigate this essential function of your device.
FAQs
1. How do I answer an iPhone?
Answering an iPhone is simple and straightforward. When a call comes in, you will see a ringing notification on the screen with options to answer or decline the call. To answer the call, swipe the green phone icon towards the right. If you’re using AirPods or other Bluetooth devices, you can simply tap the answer button on your accessory to answer the call.
2. Can I customize how I answer calls on my iPhone?
Yes, you can customize how you answer calls on your iPhone. Simply go to the “Settings” app, then tap on “Phone” and select “Call Audio Routing.” Here, you can choose if you want the call audio to automatically switch to speakerphone, Bluetooth devices, or your iPhone earpiece when you answer a call.
3. How do I answer a call when my iPhone is locked?
If you receive a call when your iPhone is locked, you will see the incoming call notification on the lock screen. To answer the call, you can swipe right on the notification and follow the same steps as when your iPhone is unlocked.
4. Can I answer calls on my iPhone without swiping?
Yes, you can answer calls on your iPhone without swiping. Simply enable the “Auto Answer Calls” feature in the “Accessibility” settings. With this feature enabled, calls will be automatically answered after a specified duration, allowing you to answer calls hands-free.
5. How do I decline a call on my iPhone?
If you want to decline an incoming call on your iPhone, you can simply swipe the red phone icon towards the left when the call notification appears on your screen. You can also press the power/lock button or either volume button twice to silence the call and send it to voicemail.