
Are you tired of your iPhone automatically answering calls without your permission? The automatic answer feature can be convenient at times, but it can also be frustrating when it interrupts your activities or you need to screen your calls. Fortunately, there is a simple solution – you can turn off the automatic answer feature on your iPhone. In this article, we will guide you through the steps to disable automatic answer on iPhone, allowing you to regain control over your incoming calls. Whether you want to prevent accidental answers or simply have more control over your phone calls, we have got you covered. So, let’s dive in and learn how to turn off automatic answer on your iPhone!
Inside This Article
- Disabling Automatic Answer Calls on iPhone
- Turning off Auto-Answer Calls from the Settings
- Turning off Auto-Answer Calls from the Phone App
- Turning off Auto-Answer Calls with Siri
- Conclusion
- FAQs
Disabling Automatic Answer Calls on iPhone
One of the features that users appreciate in their iPhones is the ability to answer calls automatically. However, there can be situations where this feature becomes an annoyance, such as when you’re busy or in a meeting. In such cases, it’s important to know how to turn off automatic answer on your iPhone.
You have several options to disable the automatic answer calls feature on your iPhone. You can either do it through the Settings app, the Phone app, or simply by using Siri. Let’s explore each method in detail.
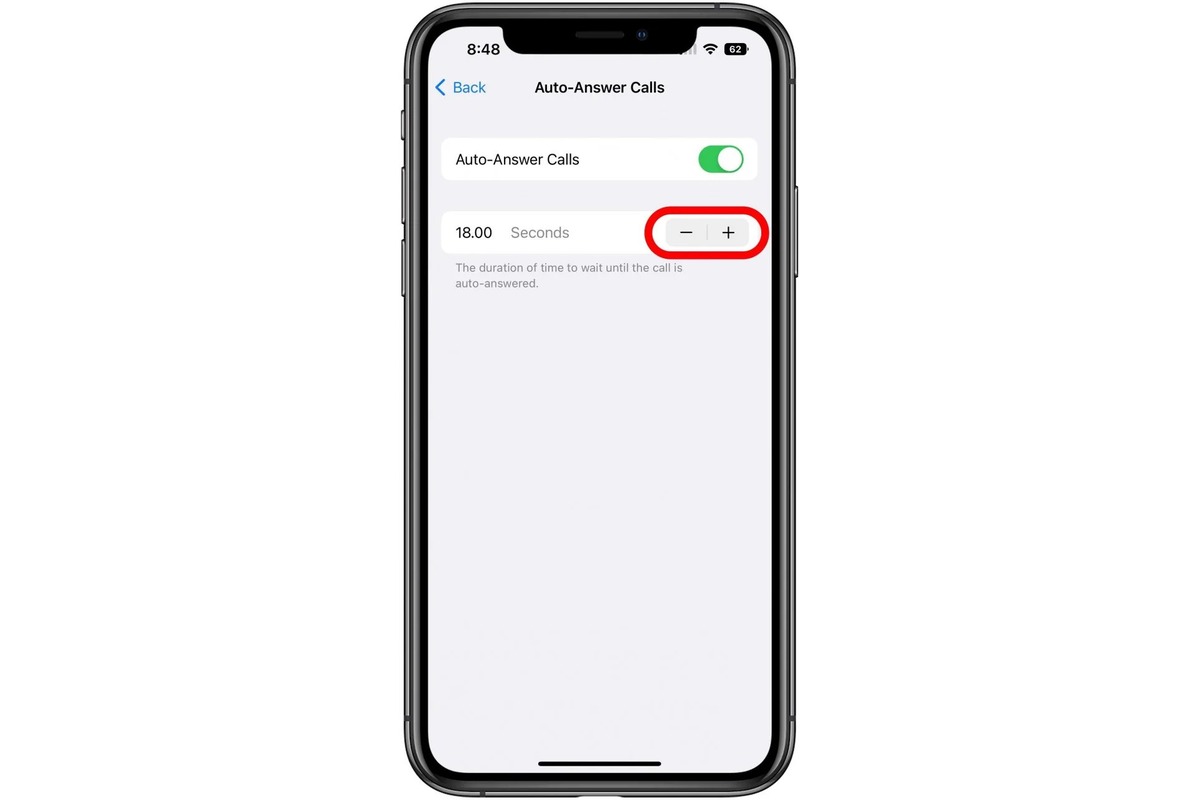
Turning off Auto-Answer Calls from the Settings
The first method involves making changes to the settings of your iPhone. Here’s how you can do it:
- Open the Settings app on your iPhone.
- Scroll down and tap on “Accessibility”.
- Next, select “Touch”.
- Under the Physical and Motor section, tap on “Call Audio Routing”.
- Finally, toggle off the “Auto-Answer Calls” option.
By following these steps, you can easily disable the automatic answer calls feature on your iPhone.
Turning off Auto-Answer Calls from the Phone App
If you prefer a more direct method, you can disable the feature directly from the Phone app:
- Open the Phone app on your iPhone.
- Tap on the “Contacts” tab at the bottom of the screen.
- Scroll down and select your own contact card.
- Tap on the “Edit” button in the top-right corner of the screen.
- Scroll down until you find the “Ringtone” section.
- Toggle off the “Auto-Answer” option.
Once you have completed these steps, the automatic answer calls feature will be disabled for incoming calls on your iPhone.
Turning off Auto-Answer Calls with Siri
If you’re a fan of using Siri to control your iPhone, you can also disable the auto-answer calls feature using voice commands. Here’s how:
- Activate Siri by pressing and holding the home button or side button, depending on your iPhone model.
- Say “Turn off Auto-Answer Calls”.
- Siri will confirm the action and disable the feature for you.
With these simple steps, you can easily turn off the automatic answer calls feature on your iPhone using Siri.
Turning off Auto-Answer Calls from the Settings
If you find yourself frustrated with incoming calls being automatically answered on your iPhone, there is a simple solution. By adjusting a few settings, you can disable the auto-answer feature and regain control over your phone. Here’s how to turn off auto-answer calls from the settings:
1. Open the “Settings” app on your iPhone. You can find the app icon on your home screen, generally represented by a gray gear icon.
2. Scroll down and tap on “Accessibility”. This option is typically located in the third group of settings, following “Siri & Search”.
3. In the Accessibility menu, select “Touch”. This will take you to the settings related to touch gestures and interactions on your iPhone.
4. Scroll down until you find the “Call Audio Routing” option. Tap on it to open the settings related to call audio.
5. Here, you will see the “Auto-Answer Calls” toggle switch. By default, it is set to “Off”. If the toggle switch is already turned on, simply tap on it to turn it off. The switch will no longer be green, indicating that automatic call answering is disabled.
6. Once you have disabled the auto-answer calls feature, you can exit the settings and return to your normal phone usage. Incoming calls will no longer be automatically answered on your iPhone.
By following these steps, you can easily turn off the auto-answer calls feature from the settings menu on your iPhone. Whether you prefer to manually answer calls or just want more control over your phone, this setting adjustment provides a simple solution.
Turning off Auto-Answer Calls from the Phone App
If you prefer to disable the auto-answer calls feature directly from the Phone app on your iPhone, follow these steps:
- Launch the Phone app from your iPhone’s home screen.
- Tap on the “Keypad” tab at the bottom of the screen.
- Enter *#61# and press the call button.
- A screen will appear displaying the current status of your auto-answer calls setting.
- If the auto-answer calls feature is enabled, you will see “Enabled” listed under the “Status” section.
- To turn off the auto-answer calls feature, enter ##61# and press the call button.
- This will deactivate the auto-answer calls feature on your iPhone.
- You will be taken back to the keypad screen, and a confirmation message will appear, indicating that the setting has been changed.
By following these steps, you can easily disable the auto-answer calls feature from the Phone app on your iPhone. This will prevent incoming calls from being automatically answered without your intervention.
Turning off Auto-Answer Calls with Siri
One of the convenient features on iPhone is the ability to use Siri to control various functions of the device, including managing incoming calls. If you want to turn off the auto-answer feature using Siri, follow these steps:
- Wake up Siri by saying “Hey Siri” or pressing and holding the side button or Home button, depending on your iPhone model.
- Once Siri is activated, simply say “Turn off auto-answer calls” or “Disable auto-answer calls.”
- Siri will confirm that the auto-answer feature has been turned off. You can also check the settings in the Phone app to verify the changes.
By using Siri to disable auto-answer calls, you can conveniently turn off the feature without navigating through the settings manually. It’s a quick and efficient way to regain control over when and how you answer incoming calls on your iPhone.
Conclusion
In conclusion, being able to turn off the automatic answering feature on your iPhone can be beneficial in various situations. Whether you’re in an important meeting, enjoying some personal time, or simply want to screen your calls, disabling the automatic answer function gives you more control over how and when you respond to incoming calls. By following the steps outlined in this article, you can easily turn off automatic answering and customize your iPhone’s call settings to suit your preferences.
Remember, it’s important to stay updated with the latest iOS updates and iPhone models, as the steps may vary slightly. If you encounter any issues or have further questions, it’s always a good idea to consult the official Apple support website or reach out to their customer support for assistance.
With this newfound knowledge, you can confidently navigate your iPhone’s settings and optimize it according to your needs. Enjoy the freedom of choosing when to answer calls and make the most out of your iPhone’s capabilities.
FAQs
Q: How do I turn off automatic answer on my iPhone?
A: To disable the automatic answer feature on your iPhone, follow these steps:
1. Open the “Settings” app on your iPhone.
2. Scroll down and tap on “Accessibility”.
3. Under the “Physical and Motor” section, tap on “Touch”.
4. Scroll down to the “Call Audio Routing” option and tap on it.
5. In the “Call Audio Routing” menu, select “Speaker” instead of “Automatic”.
6. Close the Settings app, and the automatic answer feature will now be turned off.
Q: Why would I want to turn off automatic answer on my iPhone?
A: Turning off automatic answer on your iPhone can be beneficial in various situations. For example:
– Taking control of when to answer a call instead of it being automatically answered.
– Preventing accidental calls from being answered if your iPhone is in your pocket or bag.
– Avoiding disruption in meetings or important events by manually answering calls.
– Personal preference for having full control over incoming calls on your iPhone.
Q: Can I set a specific ringtone for incoming calls on my iPhone?
A: Yes, you can set a specific ringtone for incoming calls on your iPhone. Here’s how:
1. Open the “Settings” app on your iPhone.
2. Scroll down and tap on “Sounds & Haptics”.
3. Under the “Sounds and Vibration Patterns” section, tap on “Ringtone”.
4. You will see a list of available ringtones. Tap on the one you want to set as your default ringtone.
5. Close the Settings app, and the selected ringtone will now be used for incoming calls.
Q: How can I customize my iPhone’s vibration settings?
A: To customize your iPhone’s vibration settings, follow these steps:
1. Open the “Settings” app on your iPhone.
2. Scroll down and tap on “Sounds & Haptics”.
3. Under the “Sounds and Vibration Patterns” section, tap on “Ringtone”.
4. Below the list of available ringtones, you will see the “Vibration” section. Tap on it.
5. You can select pre-set vibration patterns or create your own custom vibration pattern by tapping on “Create New Vibration”.
6. Follow the on-screen instructions to customize the vibration pattern.
7. Close the Settings app, and the customized vibration pattern will now be applied to incoming calls.
Q: Can I change my iPhone’s ringtone to a song from my music library?
A: Yes, you can change your iPhone’s ringtone to a song from your music library, but the process is a bit different. Follow these steps:
1. Open the “iTunes” app on your computer.
2. Connect your iPhone to your computer using a USB cable.
3. Select your iPhone from the device menu in iTunes.
4. Click on the “Tones” tab from the left sidebar.
5. Drag and drop the song from your music library onto the iTunes window.
6. The song will appear in the “Tones” tab. Right-click on it and select “Create AAC Version”.
7. Right-click on the newly created AAC version and select “Show in Finder” (Mac) or “Show in Explorer” (Windows).
8. Rename the file extension from “.m4a” to “.m4r.
9. Double-click on the renamed file, and it will be added to the “Tones” section of iTunes.
10. Sync your iPhone with iTunes, and the song will be available as a ringtone in your iPhone’s settings.
Ensuring that your iPhone is customized to meet your preferences is essential for a seamless and personalized experience. Whether it’s turning off automatic answer, setting a specific ringtone, or customizing vibration settings, you now have the knowledge to make your iPhone truly your own.