
Are you looking for a way to block certain websites on your iPhone? Whether you want to restrict access to inappropriate content or prevent distractions during work or study, knowing how to block sites on your iPhone can be a valuable skill. Fortunately, Apple provides built-in features that allow you to set up parental controls and restrict access to specific websites.
In this article, we will guide you through the steps to block websites on your iPhone, ensuring a secure and focused browsing experience. We will explore both manual methods and using third-party apps to give you a comprehensive understanding of the options available. With these techniques, you can take control of your browsing habits and create a safer environment for you and your family.
Inside This Article
- Introduction
- Method 1: Using Screen Time settings
- Method 2: Using a Content Blocker app
- Method 3: Using Parental Controls
- Method 4: Using Router settings
- Conclusion:
- Conclusion
- FAQs
Introduction
With the rise of digital content and the constant accessibility of the internet, it is essential to have control over the websites and online content you and your family are exposed to, especially when it comes to mobile phone usage. The iPhone, being one of the most popular smartphones in the world, offers various tools and options to help you block and restrict access to certain sites.
In this article, we will guide you through the process of blocking sites on your iPhone, providing you with different methods and options to suit your needs. Whether you want to restrict certain websites for yourself or for your children, these steps will help you gain control over your browsing experience.
Before diving into the details, it’s important to note that blocking websites can be a valuable tool for various reasons. Some people use it to limit distractions and increase productivity, while others use it to create a safe environment for their children online. Whatever your motivation may be, let’s explore the different methods you can use to block sites on your iPhone.
Now, let’s jump into the first method – enabling content restrictions on your iPhone.
Method 1: Using Screen Time settings
If you want to block certain websites on your iPhone, one of the easiest ways to do so is by utilizing the Screen Time settings. Screen Time is a built-in feature in iOS that allows you to set restrictions on various aspects of your device, including internet browsing. Follow these steps to block sites using Screen Time:
- Open the Settings app: Launch the Settings app on your iPhone. It is represented by a gear icon and can typically be found on your home screen.
- Navigate to Screen Time: Scroll down and look for the “Screen Time” option. Tap on it to open the Screen Time settings.
- Enable Screen Time: If you haven’t set up Screen Time before, you will need to turn it on. Tap “Turn On Screen Time” and follow the prompts to create a passcode.
- Tap on “Content & Privacy Restrictions”: Within the Screen Time settings, tap on “Content & Privacy Restrictions” to access additional options.
- Toggle Content & Privacy Restrictions: In the Content & Privacy Restrictions section, toggle the switch to turn it on. You may be prompted to enter your Screen Time passcode.
- Select “Content Restrictions”: Once Content & Privacy Restrictions are enabled, tap on “Content Restrictions” to customize the settings.
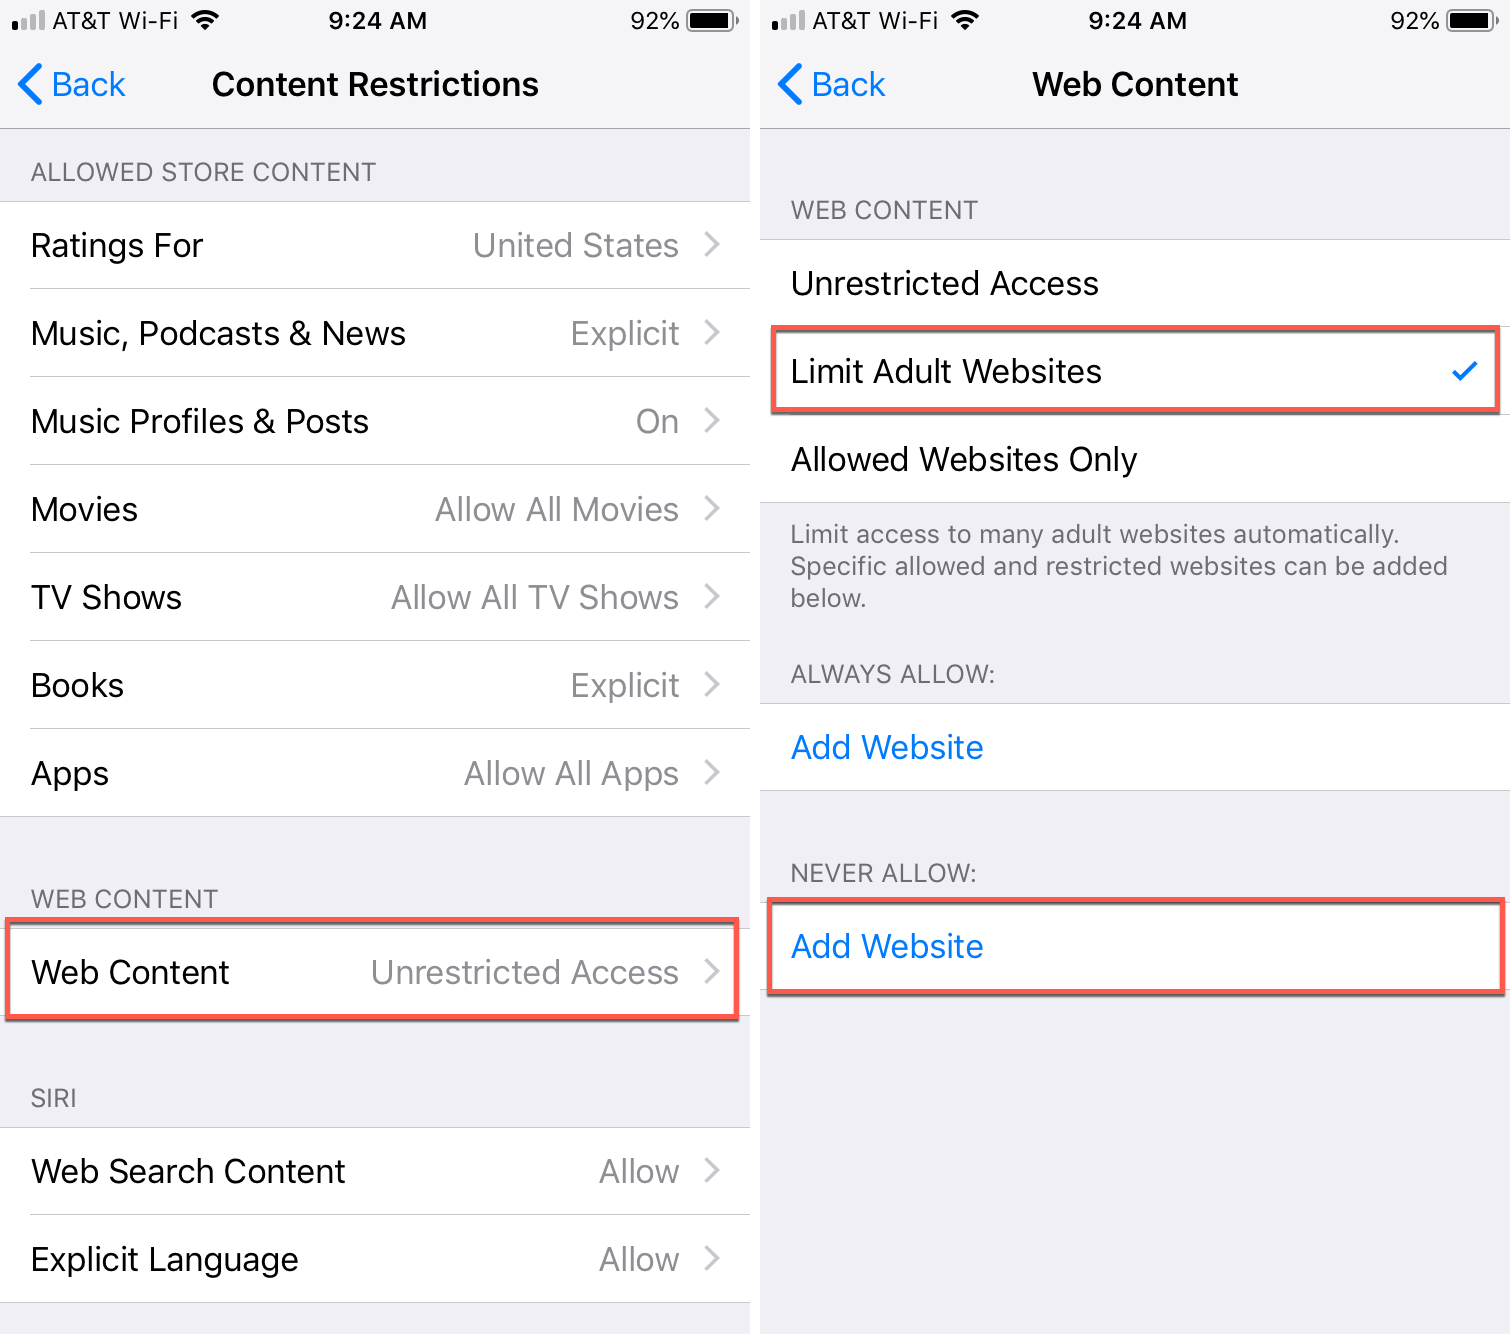
- Choose “Web Content”: Under the Content Restrictions settings, tap on “Web Content” to configure website restrictions.
- Select “Limit Adult Websites”: In the Web Content settings, choose “Limit Adult Websites”. This will automatically block most adult-oriented websites.
- Add websites to the “Never Allow” list: If there are specific websites you want to block, scroll down and locate the “Never Allow” section. Tap on “Add Website” and enter the URL of the site you want to block.
- Repeat step 9 to add more websites: If you want to block additional sites, simply repeat step 9 and enter the URLs of the desired websites.
- Save the changes: After adding the websites to the “Never Allow” list, tap on “Done” to save the changes and exit the settings.
Once you have configured the Screen Time settings to block certain websites, those sites will be inaccessible on your iPhone. Whenever you or someone else tries to access a blocked site, a message will be displayed indicating that the site is blocked due to content restrictions.
The method described above is a simple and effective way to block sites on an iPhone using the built-in Screen Time settings. However, keep in mind that this method only applies to the Safari browser and may not block sites within third-party apps or alternative browsers.
Method 2: Using a Content Blocker app
If you’re looking for more advanced options to block specific websites on your iPhone, using a Content Blocker app can give you the flexibility and customization you need. Content Blocker apps are specifically designed to block unwanted content, including websites, ads, and trackers. Here’s how you can use a content blocker app to block sites on your iPhone:
Step 1: Install a Content Blocker app
The first step is to find and install a content blocker app from the App Store. There are several options available, such as “1Blocker”, “AdGuard”, and “Block Site”. Choose the one that suits your needs and preferences, and download it to your iPhone.
Step 2: Open the Content Blocker Settings
Once you have installed the content blocker app, go to the Settings app on your iPhone and scroll down until you find the option for “Safari”. Tap on it to access the Safari settings.
Step 3: Enable the Content Blocker
In the Safari settings, you will see an option for “Content Blockers”. Tap on it to open the Content Blocker settings. Here, you will find a list of all the installed content blocker apps on your iPhone. Enable the toggle switch next to the content blocker app that you installed in Step 1.
Step 4: Customize the Block List
Once you have enabled the content blocker app, you can customize the block list to specify which websites you want to block. Open the content blocker app on your iPhone and navigate to the settings or preferences section. Look for an option to add websites or manually input URLs.
Enter the URLs of the sites you want to block and save your settings. The content blocker app will now block those websites whenever you try to access them through Safari or other apps that use the Safari engine.
Please note that using a content blocker app may have an impact on the performance and speed of your iPhone, especially if you have multiple content blockers enabled. It’s important to find a balance between blocking unwanted sites and maintaining smooth browsing experience.
Keep in mind that while content blocker apps can effectively block websites, they may not be as comprehensive as the built-in Screen Time settings. If you want to have more control over website access and usage, using the Screen Time method mentioned earlier might be a better option.
With the help of a content blocker app, you can have more control over the websites you and others can access on your iPhone. Whether you want to block certain websites for yourself or for someone else, using a content blocker app offers a flexible and customizable solution.
Method 3: Using Parental Controls
Another effective method to block sites on your iPhone is by utilizing the built-in Parental Controls feature. This feature allows you to restrict access to certain websites based on content restrictions and can be highly useful for controlling the browsing experience of children or limiting access to specific sites for personal reasons.
Step 1: Accessing Screen Time
To begin, open the Settings app on your iPhone and tap on “Screen Time”. If you haven’t set up Screen Time before, you will need to create a Screen Time passcode to proceed.
Step 2: Setting up Content & Privacy Restrictions
Once inside the Screen Time settings, tap on “Content & Privacy Restrictions” and enter your passcode when prompted. Ensure that the toggle switch for Content & Privacy Restrictions is turned on.
Step 3: Configuring Allowed Websites
Under the “Content & Privacy” section, tap on “Content Restrictions”. From here, you can select “Web Content” and choose from various options such as “Allowed Websites Only”, “Limit Adult Websites”, or “Specific Websites Only”.
Step 4: Adding Websites to Block List
To block specific websites, select the “Specific Websites Only” option. Tap on “Add Website” and enter the URL of the site you wish to block. Repeat this step for each additional site you want to block. Once done, tap on “Done” to save the changes.
Step 5: Testing the Restrictions
Now, when you or your child tries to access a blocked website on Safari, a message will be displayed indicating that the site has been restricted. Please note that these restrictions only apply to Safari and may not extend to other browsers or apps.
Using the Parental Controls feature provides a comprehensive way to manage site access on your iPhone. It ensures that you have more control over what websites can be accessed and provides a safer browsing experience for yourself or your family members.
Method 4: Using Router settings
In addition to the previous methods, you can also use the settings on your Wi-Fi router to block specific websites on all devices connected to the network. This method is especially useful if you want to restrict access to certain sites for all devices in your home or office.
To block sites using router settings, you need to access your router’s configuration page. The procedure for accessing the configuration page may vary depending on the make and model of your router, but typically, you can follow these general steps:
- Open a web browser on a device connected to the router’s network.
- Type in the default IP address for your router in the browser’s address bar. Common default IP addresses include 192.168.1.1 or 192.168.0.1.
- Enter the username and password for the router. If you haven’t changed these, consult the router’s manual or check the manufacturer’s website for the default login credentials.
- Once you’re logged in, navigate to the settings or security section of the router’s configuration page.
- Look for an option related to website blocking or URL filtering. The location and name of this option may vary depending on your router’s firmware.
- Enter the URLs or domain names of the websites you want to block. Some routers may allow you to specify specific devices or time restrictions as well.
- Save the settings and restart the router.
After completing these steps, the router will block access to the specified websites for all devices connected to the network. Keep in mind that this method will only block the websites when connected to the specific Wi-Fi network, and devices using mobile data or other Wi-Fi networks will not be affected.
It’s important to note that adjusting router settings can be quite technical, and making incorrect changes could affect the overall network performance or block unintended websites. If you’re not confident in your ability to configure the router settings, it’s best to consult the router’s manual or seek assistance from an IT professional.
By using the router settings to block websites, you can effectively restrict access to specific sites on all devices within your network, providing an extra layer of control and security.
Conclusion:
Blocking websites on your iPhone can be a valuable tool to enhance productivity, protect your privacy, or manage your child’s online activities. By following the methods outlined in this article, you can effectively block specific websites and create a safer digital environment.
Method 1, using Screen Time settings, provides a built-in solution that allows you to enable content restrictions and customize the website block list. This method is ideal for individuals who want a simple and straightforward way to block websites without the need for any additional apps or software.
Method 2, using a content blocker app, offers more flexibility and control over website blocking. You can choose from a variety of third-party apps that provide robust blocking capabilities and additional features to enhance your browsing experience. These apps can be a great option for those who want more advanced settings and the ability to block websites across multiple devices.
Method 3, using parental controls, is specifically designed for parents who want to manage their child’s online activities. By setting up parental controls, you can block websites, set time limits, and monitor your child’s web usage. This method is an excellent way to keep your child safe and ensure they have a positive online experience.
Finally, method 4, using router settings, allows you to block websites at the network level. By accessing your router’s settings, you can set up website filters that apply to all devices connected to your home network. This method is particularly useful if you want to enforce website restrictions for all users in your household or organization.
Remember, while blocking websites can be beneficial, it’s essential to use this feature responsibly and in line with your individual needs. Consider your goals and the specific websites you want to block to determine the most suitable method for you.
With the methods outlined in this article, you can take control of your browsing experience, protect your privacy, and create a safer digital environment on your iPhone. Start implementing these methods today and enjoy a more productive and enjoyable online experience.
Conclusion
In conclusion, blocking sites on your iPhone is a simple yet effective way to control your online experience. Whether you want to restrict access for yourself or for someone else, there are several methods available to achieve this. By using built-in features like Screen Time or the Restrictions settings, you can easily block specific websites and prevent them from being accessed on your device. Additionally, using third-party apps or VPNs can offer more advanced filtering and blocking options.
Remember, blocking sites can help you maintain a safer and more focused browsing experience. Whether you want to limit distractions, protect your privacy, or create a child-friendly device, the ability to block sites on your iPhone gives you greater control over your online activities. Explore the different methods mentioned in this article and choose the one that best suits your needs. Stay in control and enjoy a more tailored online experience on your iPhone.
FAQs
1. Can I block specific websites on my iPhone?
Yes, you can block specific websites on your iPhone by utilizing the built-in restrictions feature. This allows you to add individual websites to a block list, preventing them from being accessed on your device.
2. How do I block sites on my iPhone?
To block sites on your iPhone, go to the Settings app, tap on Screen Time, and select Content & Privacy Restrictions. From there, enable the Restrictions feature and choose the Websites option. You can then choose to either allow only specific websites or block specific websites by adding them to the Restricted Websites list.
3. Can I block adult content on my iPhone?
Absolutely! With the Content & Privacy Restrictions feature on your iPhone, you can easily block adult or inappropriate content. By enabling the restrictions and selecting the Limit Adult Websites option, your device will automatically block access to websites that contain adult content.
4. Do blocked websites still appear in search results?
When you block a website on your iPhone, it will not appear in search results within the Safari browser. This means that even if a blocked website is brought up in a search query, it will not be accessible when clicked on.
5. Can I unblock a website on my iPhone?
Yes, if you decide to unblock a website that was previously blocked on your iPhone, you can easily do so. By going back to the Content & Privacy Restrictions settings, you can remove the website from the Restricted Websites list, allowing access to it once again.