
In this age of social media and online image sharing, it’s essential to have the ability to control the privacy of your photos. Whether you want to protect sensitive information or simply blur out a distracting background, knowing how to blur a picture or a specific part of a picture on your iPhone can be incredibly useful. With the advancements in technology, blurring an image has become a hassle-free process that can be done right from the palm of your hand. In this article, we will guide you through the steps on how to blur a picture or a specific area using the built-in editing tools on your iPhone. Whether you’re an iPhone photography enthusiast or just looking to enhance your privacy, let’s dive in and uncover the secrets of blurring images on your iPhone.
Inside This Article
- How to Blur a Picture or Part of a Picture on iPhone
- # 1. Using the built-in Photos app
- # 2. Using a third-party app
- # 3. Using the Markup feature in the Photos app
- # 4. Using third-party editing apps
- Conclusion
- FAQs
How to Blur a Picture or Part of a Picture on iPhone
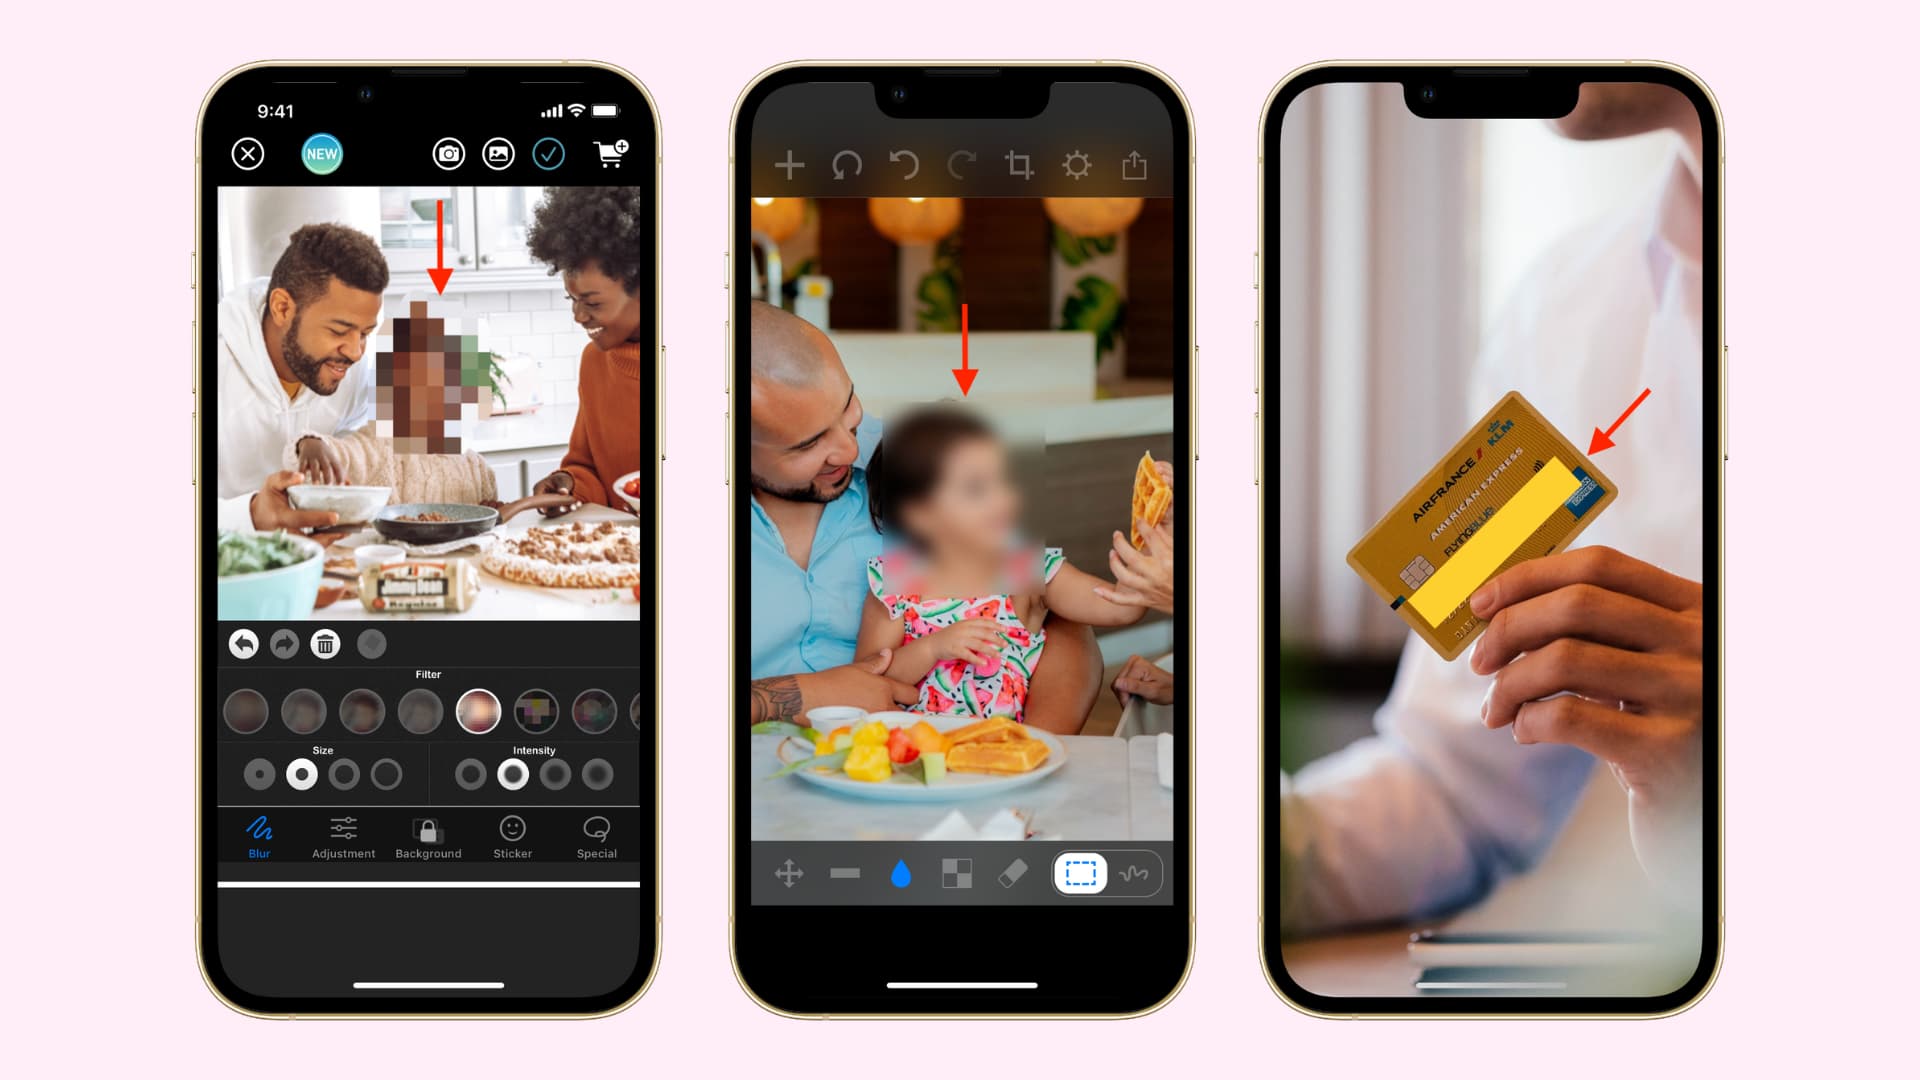
Blurring a picture or a specific part of a picture on your iPhone is a useful editing technique that can help you achieve a unique and artistic look. Whether you want to add some privacy to a sensitive detail or create a dreamy effect, blurring can effortlessly transform your photos. In this article, we will explore four different methods to blur pictures or parts of pictures on your iPhone.
1. Using the built-in Photos app
The easiest and most convenient way to blur a picture on your iPhone is by using the built-in Photos app. Here’s how:
- Open the Photos app and select the picture you want to blur.
- Tap on the Edit option at the top right corner of the screen.
- Tap on the three horizontal dots (more options) and choose the Markup option.
- Select the Blur tool from the toolbar at the bottom of the screen.
- Adjust the size of the brush using the slider at the bottom.
- Start brushing over the area you want to blur, and the app will automatically blur it.
- Tap Done to save your changes.
2. Using a third-party app
If you want more advanced blurring options, you can explore various third-party apps available on the App Store. These apps offer a wide range of features, including different blur effects and intensity adjustments. Simply search for “blur” or “photo editing” in the App Store, read reviews, and choose an app that suits your needs.
3. Using the Markup feature in the Photos app
If you only need to blur a specific part of a picture, you can utilize the Markup feature within the Photos app. Follow these steps:
- Open the Photos app and select the picture you want to edit.
- Tap on the Edit option at the top right corner of the screen.
- Tap on the three horizontal dots (more options) and choose the Markup option.
- Select the Plus icon (+) and then tap on the Magnifying Glass tool.
- Adjust the size of the magnifying glass by dragging the blue dot.
- Move the magnifying glass over the area you want to blur.
- Tap on the three horizontal dots again and select the Blur option.
- Tap Done to save your changes.
4. Using third-party editing apps
For more advanced blurring options, you can explore third-party editing apps like Photoshop Express, Snapseed, or AfterFocus. These apps offer a wide range of editing tools, including precise blur adjustments and selective blurring. Simply download the app of your choice from the App Store, open the picture you want to blur, and follow the instructions provided within the app.
Now that you have learned different methods to blur pictures or parts of pictures on your iPhone, you can unleash your creativity and elevate your photo editing skills. Experiment with different blurring techniques and transform your ordinary photos into stunning works of art.
# 1. Using the built-in Photos app
One of the easiest and most convenient ways to blur a picture or part of a picture on an iPhone is by using the built-in Photos app. Here is a step-by-step guide on how to do it:
1. Open the Photos app on your iPhone and select the picture you want to blur.
2. Tap on the “Edit” button at the top right corner of the screen.
3. At the bottom menu, you will see several editing tools. Tap on the “…” button to access more editing options.
4. Scroll through the options until you find the “Markup” tool and tap on it.
5. Now, you will see a selection of editing tools at the bottom of the screen. Tap on the “Blur” option.
6. You can choose between two types of blur effects: “Circle” blur or “Rectangle” blur. Select the one that suits your needs.
7. Using your finger, drag the blur effect over the area of the picture you want to blur. You can adjust the size of the blur effect by pinching or expanding with two fingers.
8. Once you are satisfied with the amount of blur, tap on the “Done” button at the top right corner of the screen.
9. Finally, tap on “Save” to apply the blur effect to your picture.
That’s it! You have successfully blurred a picture or part of a picture using the built-in Photos app on your iPhone. It’s a simple and straightforward method that can come in handy when you need to protect sensitive information or add some creative effects to your photos.
Note: The Photos app on different iPhone models may have slightly different interface and options, but the basic steps for blurring a picture remain the same.
# 2. Using a third-party app
If the built-in Photos app on your iPhone doesn’t offer the level of blurring you desire, don’t worry! There are numerous third-party apps available that can help you achieve the desired effect. These apps offer a range of advanced features and customization options to enhance your photo editing experience. Here’s how you can use a third-party app to blur a picture or part of a picture on your iPhone.
1. Start by visiting the App Store on your iPhone and search for photo editing apps that specialize in blurring. Some popular options include “Blur Photo Editor,” “Mosaic Photo Creator,” and “Blur Background.” Choose the app that best suits your needs and download it onto your device.
2. After the app has finished installing, open it on your iPhone. Most third-party apps have a straightforward and user-friendly interface, making it easy for you to navigate through the various editing options.
3. Once you’ve opened the app, select the photo from your iPhone’s gallery that you want to blur. The app will typically provide an option to import photos from your device’s library.
4. After selecting the photo, you will usually have access to various editing tools. Look for a blur or blur brush tool in the app’s toolbar. This tool allows you to manually apply the blurring effect to specific areas of the photo.
5. Using your finger or a stylus, start painting over the areas that you want to blur. Most apps offer the ability to adjust the size and intensity of the blur brush, allowing you to have complete control over the blurring effect.
6. If you want to blur the entire picture, some apps may provide a quick one-tap option to apply a global blur effect. This can be useful for creating a soft, dreamy look for your photo.
7. Once you’ve finished applying the blurring effect, make sure to save the edited photo to your iPhone’s library. This will allow you to easily access and share the blurred photo with others.
Remember to explore the various features and settings offered by the third-party app. Some apps may offer additional editing options such as adjusting the intensity and type of blur, adding filters, or applying other creative effects to make your photos truly stand out.
Using a third-party app for blurring gives you more control and customization over the final result. It allows you to blur specific areas precisely and experiment with different blurring effects to achieve the desired look for your photo.
Now that you know how to use a third-party app to blur a picture or part of a picture on your iPhone, go ahead and unleash your creativity! Transform your ordinary photos into stunning works of art by adding beautiful and mesmerizing blur effects.
# 3. Using the Markup feature in the Photos app
If you’re looking for a quick and easy way to blur a picture or part of a picture on your iPhone, you’ll be happy to know that the built-in Photos app has a Markup feature that can help you achieve this. With Markup, you can easily draw and apply various effects, including blurring, to your photos without the need for any third-party apps.
To use the Markup feature, follow these simple steps:
- Open the Photos app on your iPhone and select the photo you want to blur.
- Tap the Edit button located at the top right corner of the screen.
- Tap the three dots (…) button.
- Select Markup from the list of editing options.
- You will now see a range of tools at the bottom of the screen. Tap the blue “+” button.
- Select the Blur tool from the list of options.
- Adjust the size of the brush by dragging the slider at the bottom.
- Tap and drag your finger over the area of the photo you want to blur.
- Once you’re satisfied with the blur effect, tap Done.
- Tap Save to save the edited photo to your Camera Roll.
The Markup feature in the Photos app is not only great for blurring parts of photos, but it can also be used for adding text, shapes, and other effects to your images. It’s a versatile tool that allows you to get creative with your photos right from your iPhone.
However, it’s important to note that the Markup feature in the Photos app is relatively basic compared to some third-party editing apps. If you’re looking for more advanced features or greater control over the blurring effect, you may want to consider using a dedicated photo editing app from the App Store.
Overall, the Markup feature in the Photos app is a convenient and straightforward option for blurring a picture or part of a picture on your iPhone. Give it a try and see how it can enhance your photos!
# 4. Using third-party editing apps
If you’re looking for more advanced options to blur a picture or part of a picture on your iPhone, you can turn to third-party editing apps. These apps offer a wide range of features and tools that allow you to have more control over your photo editing process.
One popular choice is the “Blur Photo Editor” app, which is available for download from the App Store. With this app, you can easily blur specific areas of your photos to create a desired effect. Simply import the photo into the app, select the blur tool, and then use your finger to draw over the areas you want to blur. You can adjust the intensity of the blur and even choose different blur types like Gaussian or motion blur.
Another great option is the “TouchRetouch” app, widely known for its powerful editing capabilities. Apart from just blurring, this app allows you to remove unwanted objects or blemishes from your photos. It uses smart algorithms to identify the object and seamlessly fills in the background to create a clean, professional look. So if you want to blur something and remove it altogether, this app is a fantastic choice.
For those seeking more artistic options, the “Snapseed” app is worth mentioning. Developed by Google, Snapseed offers a plethora of creative tools, including a blur feature. This app stands out for its user-friendly interface and the ability to apply blur selectively with precision. You can choose between linear, radial, or even spot blur, and adjust the size and intensity of the effect as you desire.
It’s important to note that while these third-party editing apps offer powerful features, some of them may require a one-time purchase or offer in-app purchases for certain features or advanced functions. Ensure that you read the app descriptions and reviews before making a selection to find the best fit for your needs and budget.
Once you have downloaded and installed the third-party editing app of your choice, you can follow the app’s instructions to import your photo and start blurring the desired areas. Remember to save the edited photo before sharing or using it elsewhere.
Using third-party editing apps can give you more flexibility and control over the blurring process, allowing you to achieve the exact look you desire for your photos. Explore the various options available and unleash your creativity!
In conclusion, blurring a picture or a specific part of a picture on an iPhone is a simple process that can be accomplished using various methods. Whether you choose to utilize the built-in editing tools in the Photos app, or prefer to download a specialized app from the App Store, there are plenty of options available to achieve the desired effect. By following the step-by-step instructions and tips provided in this article, you can easily blur your photos and add a professional touch to your images.
FAQs
Q: Can I blur a picture on my iPhone?
A: Yes, you can easily blur a picture on your iPhone with the built-in photo editing tools.
Q: Do I need to download a separate app to blur a picture on my iPhone?
A: No, there is no need to download a separate app as the iPhone’s native Photos app provides editing features, including the ability to blur a picture.
Q: How can I blur a picture on my iPhone using the Photos app?
A: To blur a picture on your iPhone using the Photos app, simply follow these steps:
1. Open the Photos app and select the picture you want to edit.
2. Tap “Edit” in the upper-right corner of the screen.
3. Tap the three dots (…) icon at the bottom of the screen.
4. Select “Markup” from the pop-up menu.
5. Tap the (+) icon at the bottom-right corner of the screen.
6. Choose “Blur” from the options that appear.
7. Adjust the size and intensity of the blur by dragging the slider.
8. Tap “Done” to save the changes.
Q: What if I want to blur only a specific part of a picture on my iPhone?
A: If you want to blur only a specific part of a picture on your iPhone, follow these steps:
1. Open the Photos app and select the picture you want to edit.
2. Tap “Edit” in the upper-right corner of the screen.
3. Tap the three dots (…) icon at the bottom of the screen.
4. Select “Markup” from the pop-up menu.
5. Tap the (+) icon at the bottom-right corner of the screen.
6. Choose “Blur” from the options that appear.
7. Use your finger to draw a circle or a freehand shape over the area you want to blur.
8. Adjust the size and intensity of the blur by dragging the slider.
9. Tap “Done” to save the changes.
Q: Can I undo the blur effect on a picture after saving it on my iPhone?
A: Unfortunately, once you save the changes, you cannot undo the blur effect on a picture in the native Photos app. It is advisable to create a duplicate of the original picture before applying any edits.