
Are you looking to add a touch of creativity or enhance the privacy of a photo you took on your iPhone? Blurring a photo can be a great way to achieve both. Whether you want to blur out a background or blur a specific portion of an image, your iPhone can help you do it easily and conveniently.
In this guide, we will show you how to blur a photo on your iPhone using the built-in editing tools. With the latest advancements in Apple’s iOS operating system, blurring a photo has become even more straightforward and accessible to users. So, whether you’re a photography enthusiast, a social media influencer, or simply someone who wants to protect the privacy of certain details in your pictures, keep reading to discover how to blur a photo on your iPhone in 2023.
Inside This Article
- Method 2: Using a third-party app
- Method 3: Using built-in editing tools- Opening the Photos app and selecting the photo to be blurred- Accessing the editing tools within the Photos app- Finding and using the Blur tool- Adjusting the blur intensity and area- Saving the edited photo
- Conclusion
- FAQs
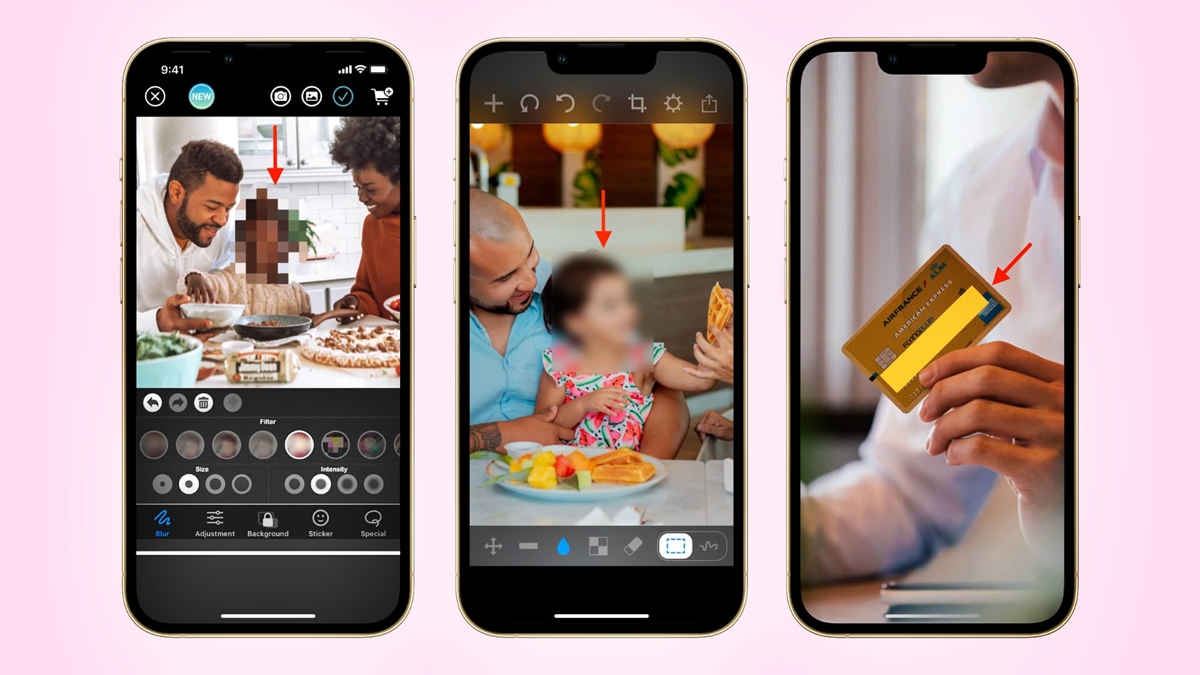
Method 2: Using a third-party app
When it comes to blurring photos on your iPhone, you have the option to use a variety of third-party apps that offer advanced features and powerful editing tools. These apps can provide you with more control over the blur effect and allow you to achieve professional-looking results. Let’s take a look at an overview of popular third-party apps for blurring photos, along with the steps on how to use them.
Downloading and installing a suitable third-party app from the App Store is the first step. There are numerous apps available, each with its own unique features and functionalities. Some popular options for blurring photos on iPhone include “Blur Photo Editor,” “Snapseed,” and “Adobe Photoshop Express.” Simply search for the app of your choice in the App Store, download and install it on your device.
Once you have the app installed on your iPhone, the next step is to import the photo you want to blur into the selected app. Most apps will have a dedicated import or gallery feature that allows you to select the desired photo from your device’s camera roll or albums. Simply follow the prompts or instructions within the app to import your photo easily.
With your photo imported into the app, you can now start applying the desired blur effect using the available tools. The specific process may vary depending on the app you are using. However, most apps will provide you with options to manually brush or select the areas you want to blur, adjust the intensity of the blur, and even add additional effects or filters if desired. Take your time to explore the app’s features and experiment with different settings until you achieve the desired outcome.
After you have applied the blur effect to your photo and are satisfied with the result, you can save it to your device’s camera roll or gallery. Most apps will have a dedicated save button or option that allows you to easily save the edited photo. Additionally, many apps also provide options to share the blurred photo directly from within the app. You can share it on social media platforms, send it via messaging apps, or even email it to friends and family.
Using a third-party app to blur photos on your iPhone gives you more flexibility and control over the editing process. These apps offer a wide range of features and tools that can help you achieve stunning visual effects. Whether you’re a seasoned photographer or just someone who wants to enhance their photos, utilizing a third-party app can take your photo editing skills to the next level.
Method 3: Using built-in editing tools- Opening the Photos app and selecting the photo to be blurred- Accessing the editing tools within the Photos app- Finding and using the Blur tool- Adjusting the blur intensity and area- Saving the edited photo
If you want to blur a photo on your iPhone without using any third-party apps, you can take advantage of the built-in editing tools available within the Photos app. This method allows you to easily apply a blur effect to your desired photo and customize the intensity and area of the blur. Here’s a step-by-step guide on how to achieve this:
1. Start by opening the Photos app on your iPhone and navigate to the photo you want to blur. You can choose either a photo from your Camera Roll or from any specific album.
2. Once you’ve selected the photo, tap on the Edit option located at the top right corner of the screen.
3. You will now be presented with various editing tools at the bottom of the screen. Scroll through these options and look for the Blur tool. It is usually represented by a circular icon with a droplet inside.
4. Tap on the Blur tool to activate it. You can now apply the blur effect to the photo by simply tapping and dragging your finger across the areas you want to blur. You have the flexibility to choose the size and shape of the blur area according to your preferences.
5. If you need to adjust the intensity of the blur, use the Intensity slider that appears at the bottom of the screen. Slide it towards the left to decrease the blur effect and towards the right to increase it. This allows you to find the perfect balance between blurring and preserving the details in the photo.
6. Once you are satisfied with the applied blur effect, tap on the Done button located at the bottom right corner of the screen to save your edited photo.
7. The edited photo will now be saved in your Camera Roll or the album from which you originally selected it. You can easily access it whenever you want to view or share it.
By following these simple steps, you can quickly and easily blur a photo on your iPhone using the built-in editing tools within the Photos app. It provides a convenient and user-friendly solution without the need for any third-party apps.
Conclusion
The ability to blur a photo on the iPhone has become an essential tool for enhancing and adding a touch of creativity to your images. Whether you want to create a stunning portrait with a shallow depth of field or blur the background to bring your subject into focus, the iPhone offers a variety of options to achieve this effect.
In this guide, we have explored different methods on how to blur a photo on iPhone in 2023. From utilizing the built-in camera features, such as Portrait mode and Depth Control, to using third-party apps like Snapseed and Adobe Photoshop Express, you now have a range of powerful tools at your disposal.
By following the step-by-step instructions and experimenting with different techniques, you can unleash your creativity and take your iPhone photography skills to the next level. So go ahead, give it a try, and blur your way to stunning and captivating photos.
FAQs
1. Can I blur a photo on my iPhone without using any additional apps?
Yes, you can blur a photo on your iPhone using the built-in editing features. The Photos app on newer iPhones has a dedicated “Depth” editing tool that allows you to adjust the amount of background blur in a photo.
2. How do I blur the background of a photo on my iPhone?
To blur the background of a photo on your iPhone, open the Photos app, select the photo you want to edit, tap on “Edit” at the top right corner, and then tap on the “Depth” editing tool. From there, you can adjust the intensity of the background blur with a slider.
3. Can I blur specific parts of a photo on my iPhone?
Yes, you can blur specific parts of a photo on your iPhone by using third-party photo editing apps like Snapseed or Adobe Photoshop Express. These apps provide more advanced editing tools, including selective blurring, that allow you to blur specific areas of a photo.
4. Are there any recommended third-party apps for blurring photos on an iPhone?
There are several highly-rated third-party apps for blurring photos on an iPhone. Some popular options include Snapseed, Adobe Photoshop Express, and TouchRetouch. These apps offer a wide range of editing features, including advanced blurring options.
5. Can I undo or revert the blur effect on a photo after editing it on my iPhone?
Yes, you can undo or revert the blur effect on a photo after editing it on your iPhone. If you used the built-in editing features in the Photos app, simply tap on “Edit” again and then tap on the “Revert” option. If you used a third-party app, you may need to access the app’s editing history or undo feature to revert the blur effect.