
Have you ever taken a photo on your iPhone, only to realize later that sensitive or confidential information is visible in the text? Whether it’s personal information, private messages, or any other kind of text you want to protect, blurring text in a picture can be an effective solution. Fortunately, doing so on an iPhone is easier than you might think. In this article, we’ll guide you through the process of blurring text in a picture on your iPhone, ensuring that your sensitive information remains hidden while still preserving the overall quality of your photo. So, if you’re ready to learn how to safeguard your text and maintain your privacy, read on to discover how you can easily blur text in a picture on your iPhone.
Inside This Article
- Using Markup Tools in Photos App
- Using Third-Party Apps
- Utilizing Photo Editing Apps
- Utilizing Privacy Settings in Messaging Apps
- Conclusion
- FAQs
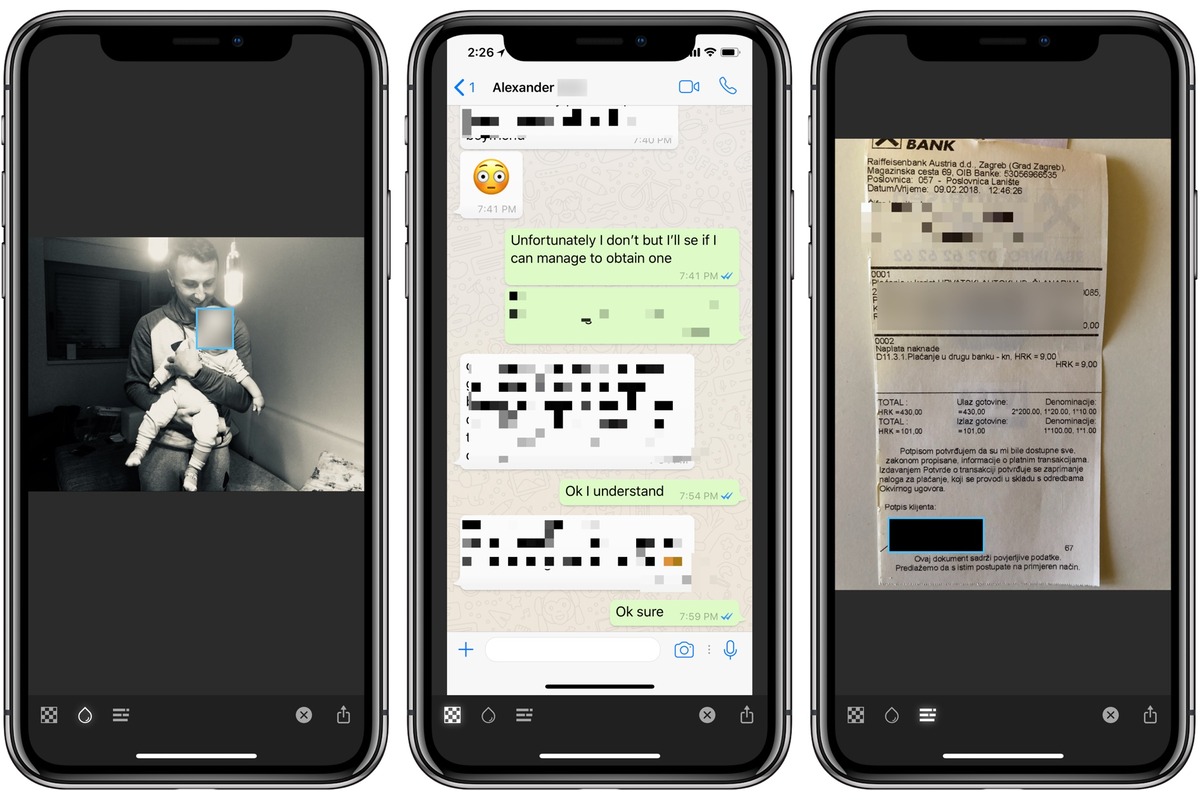
Using Markup Tools in Photos App
If you need to blur text in a picture on your iPhone, one convenient way to do so is by using the Markup tools in the Photos app. This built-in feature allows you to easily annotate and edit your photos, including the ability to blur or highlight specific areas.
To get started, follow these steps:
- Open the Photos app on your iPhone and select the photo you want to edit.
- Tap the “Edit” button in the upper right corner of the screen.
- On the toolbar at the bottom of the screen, tap the three-dot icon.
- From the menu that appears, select “Markup”.
- In the Markup editor, tap the “+” icon at the bottom right corner of the screen.
- Choose the “Blur” option from the menu.
- Using your finger or Apple Pencil, draw over the text you want to blur.
- Adjust the size and intensity of the blur by using the sliders located at the bottom of the screen.
- Once you are satisfied with the blur effect, tap “Done” in the upper right corner.
- Finally, tap “Done” again to save your edited photo.
Voila! You have successfully blurred text in a picture using the Markup tools in the Photos app on your iPhone. This method is quick, easy, and doesn’t require any additional apps or tools.
Remember, the Markup tools in the Photos app offer more than just blurring text. You can also use them to add text, draw shapes, highlight areas, and much more. So, go ahead and explore the different options and unleash your creativity!
Using Third-Party Apps
If you’re looking for more advanced blurring options or additional features, using a third-party app is a great alternative. There are several apps available on the App Store that can help you blur text in pictures on your iPhone with ease.
One popular option is the “Blur Photo Editor” app. This app offers a user-friendly interface and powerful tools to help you blur text and other elements in your pictures. Simply download and install the app from the App Store, then follow these steps:
- Launch the “Blur Photo Editor” app on your iPhone.
- Select the option to import the picture you want to edit from your iPhone’s photo library.
- Once the picture is loaded, navigate to the text you want to blur.
- Use the app’s blur tool to apply a blur effect to the selected text.
- Adjust the intensity and size of the blur effect to achieve the desired result.
- Save the edited picture to your iPhone’s photo library or share it directly from the app.
Another popular choice is the “Snapseed” app, which offers a wide range of editing tools including the ability to blur text in pictures. Here’s how you can use the Snapseed app to blur text:
- Download and install the “Snapseed” app from the App Store.
- Open the app and select the option to import the picture you want to edit.
- Tap on the “Tools” icon at the bottom of the screen, then choose the “Selective” tool.
- Tap on the image where the text you want to blur is located.
- Adjust the size of the selection area to encompass the text.
- Tap on the “Brush” icon at the bottom of the screen and select the “Blur” option.
- Adjust the intensity of the blur effect using the slider.
- Tap on the checkmark icon to apply the blur effect.
- Save the edited picture to your iPhone or share it directly from the app.
These are just a few examples of the many third-party apps available for blurring text in pictures on your iPhone. Explore the App Store to find the one that best suits your needs and preferences.
Remember to always read the app’s reviews and ratings before downloading to ensure its reliability and performance. Additionally, make sure to follow the app’s instructions and guidelines for optimal results.
Using third-party apps can provide you with more flexibility and options when it comes to blurring text in pictures on your iPhone. Give them a try and take your photo editing skills to the next level!
Utilizing Photo Editing Apps
If you’re looking for more advanced and customizable options to blur text in a picture on your iPhone, you can turn to various photo editing apps available on the App Store. These apps provide a wide range of editing tools and features, including the ability to blur text with precision and control.
One popular choice is the Adobe Photoshop Express app, which offers a comprehensive suite of editing tools. To blur text in a picture using this app, simply open the image and select the “Blur” option from the editing toolbar. From there, choose the brush tool and use it to paint over the text you want to blur. Adjust the brush size and intensity to achieve the desired effect.
Another highly recommended app is the PicsArt Photo Editor. This app allows you to apply various blur effects, including the ability to blur specific areas or objects in an image. To blur text, open the image in PicsArt and tap on the “Effects” option. Choose the “Blur” category and select the desired effect. Then, use the brush tool to apply the blur effect to the text.
For those looking for a more user-friendly and intuitive app, the Snapseed app is a great option. Developed by Google, Snapseed offers powerful editing tools with a user-friendly interface. To blur text using Snapseed, open the image, tap on the “Tools” option, and choose the “Selective” tool. Use the brush tool to select the text you want to blur and adjust the blur intensity. You can also fine-tune the blur effect by adjusting parameters like structure and brightness.
These are just a few examples of the many photo editing apps available for iPhone users. Each app has its own unique features and capabilities, so feel free to explore different options and find the one that best suits your needs. Whether you’re a professional photographer or a casual user, these apps will provide you with the tools you need to blur text in a picture on your iPhone.
The beauty of these apps is that they not only allow you to blur text, but also provide a wide range of other editing options, such as filters, cropping, and adjustments to enhance your images. So, don’t limit yourself to just blurring text – unleash your creativity and explore the full potential of these photo editing apps.
Utilizing Privacy Settings in Messaging Apps
In today’s digital world, messaging apps have become an essential part of our communication. Whether we use them for personal or professional purposes, it’s crucial to be aware of the privacy settings offered by these apps. With the increasing concern about data security and privacy, understanding how to protect our conversations and personal information has never been more important. In this section, we will explore some key privacy settings that you can utilize in messaging apps to safeguard your privacy.
1. End-to-End Encryption: One of the most critical privacy features in messaging apps is end-to-end encryption. This ensures that your messages are encrypted before they leave your device and can only be decrypted by the intended recipient. It prevents any unauthorized individuals, including service providers and hackers, from accessing the content of your messages.
2. Two-Factor Authentication: Enabling two-factor authentication (2FA) adds an extra layer of security to your messaging app. It requires you to provide a second form of verification, such as a unique code sent to your phone, in addition to your password. By enabling 2FA, you significantly reduce the risk of unauthorized access to your messages.
3. Disappearing Messages: Some messaging apps offer the option to send disappearing messages. This means that the messages you send will automatically disappear from the recipient’s device after a specified period of time. It can be a useful setting to ensure that sensitive or confidential information is not stored indefinitely on someone else’s device.
4. Privacy Controls: Many messaging apps provide privacy controls that allow you to customize who can see your profile information, such as your profile picture, status, and last seen timestamp. You can choose to share this information with everyone, only your contacts, or certain selected individuals. It gives you more control over your personal information and who can access it.
5. Blocking and Reporting: Most messaging apps have features that allow you to block and report unwanted or harassing messages. If you encounter someone who is sending you inappropriate content or behaving in a harmful manner, you can block them from contacting you and report their account to the app’s support team.
6. Secure File Sharing: When it comes to sharing files through messaging apps, it’s important to ensure that the files are being transferred securely. Look for apps that offer end-to-end encryption for file transfers to protect your sensitive documents, photos, or videos.
7. App Permissions: Pay attention to the permissions that messaging apps request when you install them. Be cautious about granting permissions that seem excessive or unnecessary. Review and adjust app permissions to limit the access these apps have to your contacts, media, and other sensitive information on your device.
By familiarizing yourself with these privacy settings and taking the necessary steps to secure your messaging apps, you can have peace of mind knowing that your conversations and personal information are protected. Remember to regularly update your messaging apps to ensure that you benefit from the latest privacy features and enhancements.
Conclusion
In conclusion, being able to blur text in a picture on your iPhone can be a useful skill to have, whether you want to protect sensitive information or simply add a creative touch to your photos. With the help of various apps and tools available on the App Store, you can easily achieve this effect and enhance your images.
Apps like Photoshop Express, Snapseed, and Afterlight offer intuitive and user-friendly interfaces that allow you to blur text with just a few simple steps. Additionally, the built-in Markup feature in the Photos app provides a quick and convenient option for adding blur to text directly on your iPhone.
Remember, the process may vary slightly depending on the app or tool you choose, so it’s a good idea to explore different options and find the one that suits your preferences and needs the best.
Now that you have learned how to blur text in a picture on your iPhone, you can unleash your creativity and transform your photos with this cool and versatile technique!
FAQs
1. Can I blur text in a picture using the built-in editing features on my iPhone?
No, the native editing features on an iPhone do not have the ability to selectively blur text in a picture. However, there are several third-party apps available on the App Store that allow you to easily blur text in your photos.
2. Which app should I use to blur text in a picture on my iPhone?
There are numerous apps available on the App Store that can help you blur text in your pictures. Some popular options include “Blur Photo Editor,” “Snapseed,” and “TouchRetouch.” These apps offer intuitive and user-friendly interfaces, allowing you to blur text with just a few taps.
3. Is blurring text in a picture legal?
Blurring text in a picture might be necessary to protect sensitive or private information. However, it is important to note that blurring text in a picture does not automatically make it legally acceptable to use or share the photo. Consider the context and any applicable laws or regulations before using or distributing a picture with blurred text.
4. Can I selectively blur specific parts of the text in a picture?
Yes, with the help of the apps mentioned earlier, you can selectively blur specific parts of the text in a picture. These apps provide tools and features that allow you to adjust the size, intensity, and placement of the blur, giving you precise control over which areas of the text you want to blur.
5. Are there any alternative methods to blur text in a picture on the iPhone?
Yes, if you prefer not to use third-party apps, you can transfer the photo to your computer and use image editing software, like Adobe Photoshop or GIMP, to blur the text. While this method offers more advanced editing capabilities, it requires additional steps and knowledge of image editing software.