
In today’s digital age, our smartphones have become our primary photo albums, storing cherished memories captured right at our fingertips. However, limited storage space on our iPhones can be a constant battle, leaving us with a dilemma – how do we preserve our precious photos while freeing up space on our devices? The solution lies in the power of cloud storage, and one of the most popular and convenient options available is iCloud storage.
By transferring your photos from your iPhone to iCloud storage, you can securely store and access your photos from any device with ease. Whether you want to create more space on your iPhone for new memories or simply want the peace of mind that comes with having a backup of your cherished photos, this article will guide you through the process of moving your photos from your iPhone to iCloud storage.
Inside This Article
- Enabling iCloud Photos on your iPhone
- Uploading photos to iCloud storage – 2.1 Using the Photos app to upload photos – 2.2 Uploading photos manually
- Managing iCloud storage – 3.1 Checking your iCloud storage availability – 3.2 Managing iCloud storage efficiently
- Conclusion
- FAQs
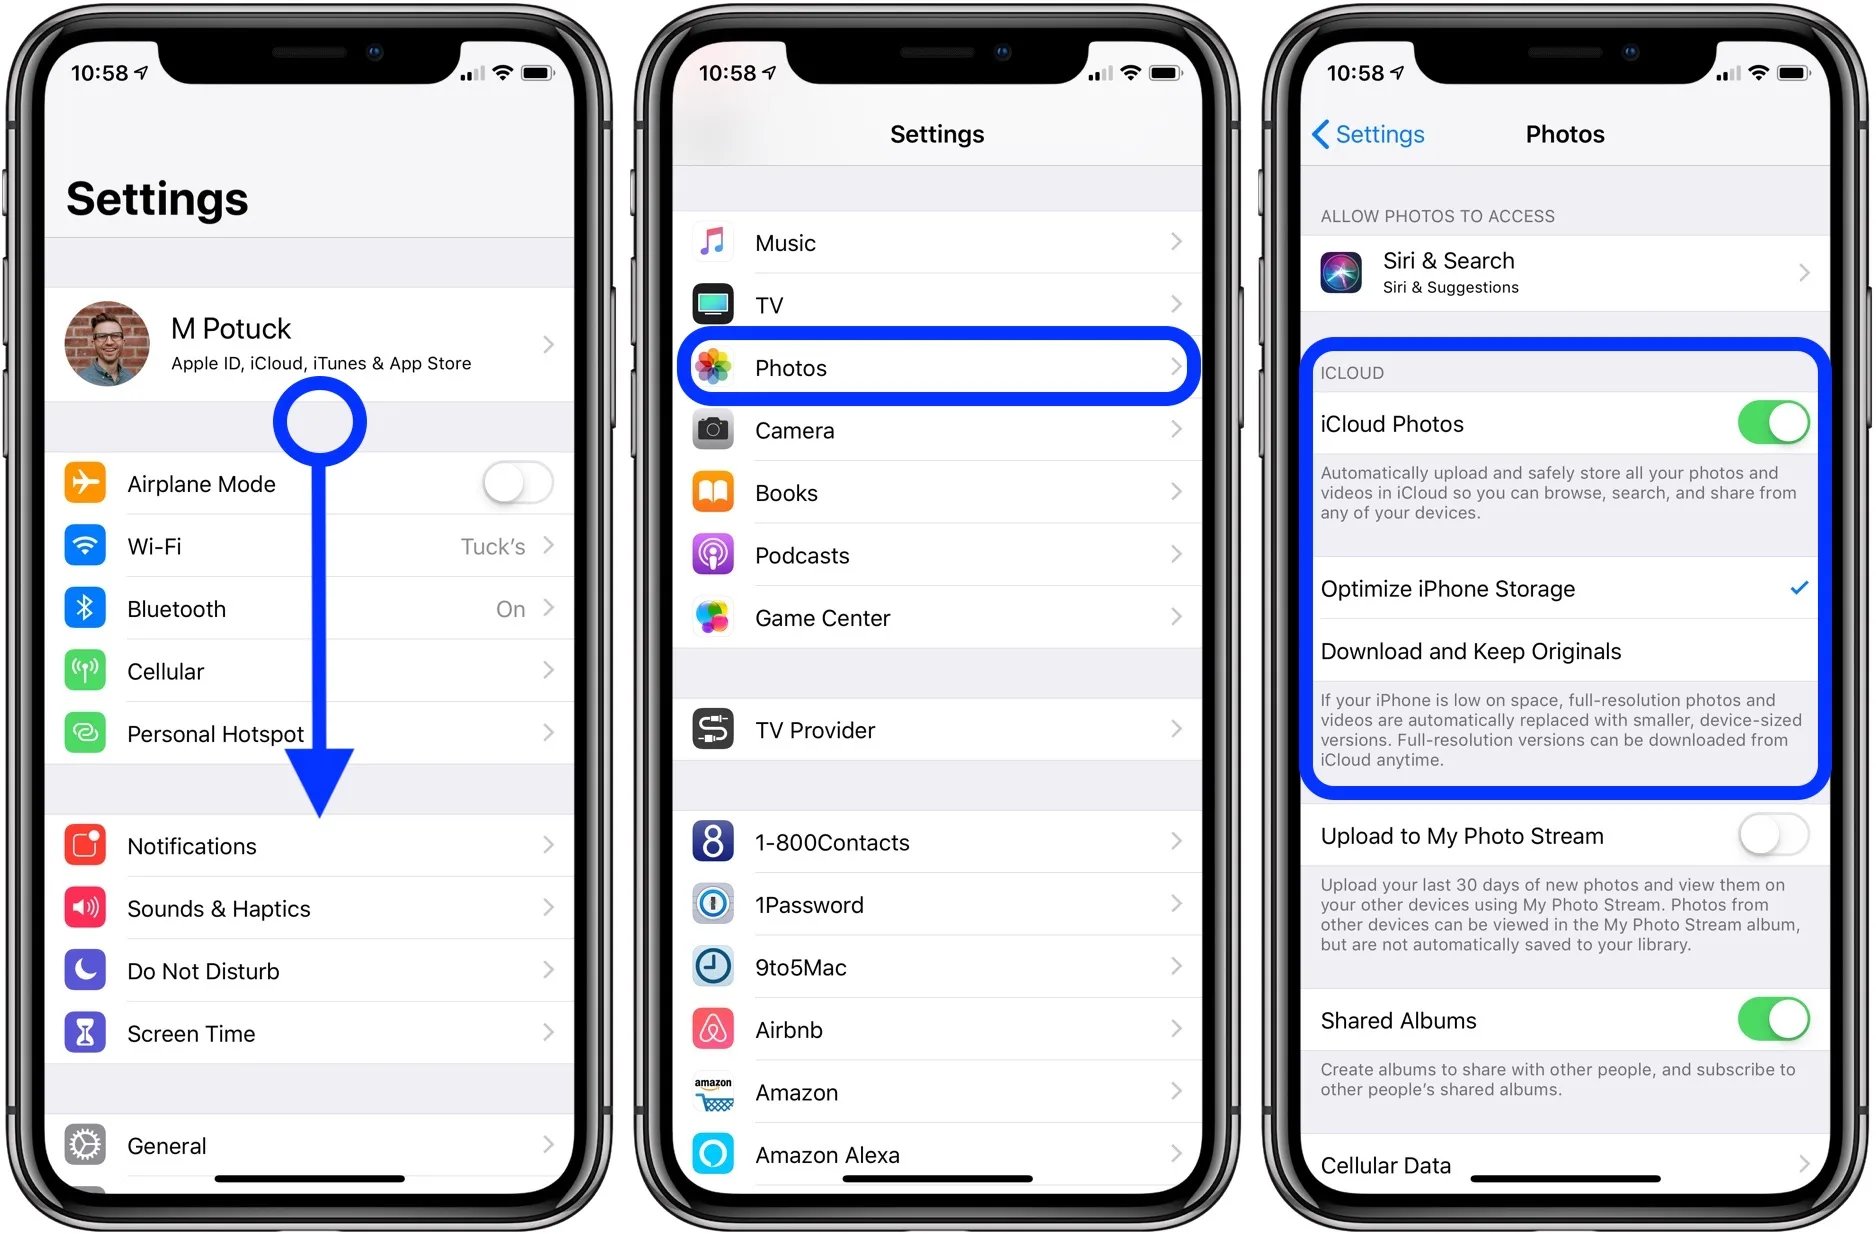
Enabling iCloud Photos on your iPhone
1.1 Getting started with iCloud Photos:
Before you can start uploading and storing your photos on iCloud, you need to set up iCloud Photos on your iPhone. iCloud Photos is a feature that allows you to store and access your photos from any device connected to your iCloud account. Here’s how you can get started:
- Open the Settings app on your iPhone.
- Tap on your name at the top of the Settings menu.
- Select “iCloud” from the list of options.
- Scroll down and tap on “Photos.”
- Toggle the switch next to “iCloud Photos” to enable it.
- If prompted, choose whether you want to optimize iPhone storage or download and keep originals. Optimize iPhone storage will save space on your device by storing smaller versions of your photos in iCloud while keeping the full-resolution versions available for download.
Once you’ve completed these steps, iCloud Photos will be enabled on your iPhone, and you can start uploading your photos to the iCloud storage.
1.2 Enabling iCloud Photos on your iPhone:
If you’ve already set up iCloud on your iPhone but haven’t enabled iCloud Photos, follow these simple steps to turn it on:
- Open the Settings app on your iPhone.
- Tap on your name at the top of the Settings menu.
- Select “iCloud” from the list of options.
- Scroll down and tap on “Photos.”
- Toggle the switch next to “iCloud Photos” to enable it.
- Choose your preference for optimizing iPhone storage or downloading and keeping originals, if prompted.
With iCloud Photos enabled, you’ll be able to access and manage your photos across devices seamlessly. Your photos will be automatically synced to your iCloud storage, ensuring that you have a backup of your cherished memories.
Uploading photos to iCloud storage – 2.1 Using the Photos app to upload photos – 2.2 Uploading photos manually
Uploading photos to your iCloud storage is a great way to free up space on your iPhone and ensure that your precious memories are securely stored. There are two main methods you can use to upload photos to iCloud: using the Photos app on your iPhone or manually uploading them. Let’s explore these methods in more detail.
2.1 Using the Photos app to upload photos
The Photos app on your iPhone makes it incredibly easy to upload your photos directly to your iCloud storage. Follow these steps to get started:
- Open the Photos app on your iPhone.
- Select the photos or albums you want to upload.
- Tap on the Share button (the square with an arrow pointing upwards).
- From the options, choose “Add to iCloud Drive”.
- The selected photos will now be uploaded to your iCloud storage.
Using the Photos app is convenient because it allows you to select multiple photos or even entire albums at once. This makes it easy to upload large quantities of photos in one go.
2.2 Uploading photos manually
If you prefer more control over the upload process, you can choose to manually upload photos to your iCloud storage. Here’s how:
- Go to the iCloud website (www.icloud.com) on your computer or open the Files app on your iPhone.
- Sign in with your Apple ID and password.
- Click on “Photos” or “iCloud Drive”, depending on where you want to store your photos.
- Drag and drop the photos you want to upload into the browser window or the Files app.
- The photos will be uploaded to your iCloud storage and synced across all your devices.
Manually uploading photos gives you more flexibility, as you can organize your photos into specific folders and have better control over the uploading process. It’s a great option if you prefer a more hands-on approach.
Regardless of the method you choose, uploading your photos to iCloud storage ensures that they are backed up and easily accessible from any device. It’s a reliable way to safeguard your memories and create space on your iPhone for new ones.
Managing iCloud storage – 3.1 Checking your iCloud storage availability – 3.2 Managing iCloud storage efficiently
When it comes to managing your iCloud storage, it’s important to keep track of the available space and ensure you’re using it efficiently. Let’s explore two key aspects of managing your iCloud storage: checking its availability and optimizing its usage.
3.1 Checking your iCloud storage availability
Before you start managing your iCloud storage, it’s crucial to understand how much space you have available. Fortunately, checking your iCloud storage availability is a quick and straightforward process. Here’s how:
- On your iPhone, go to the “Settings” app.
- Tap on your name at the top of the screen, then select “iCloud.”
- Scroll down and tap on “Manage Storage.”
- You will see a breakdown of your iCloud storage usage, including the amount of space currently available.
By regularly checking your iCloud storage availability, you can stay informed about how much space you have left and take necessary actions to manage it efficiently.
3.2 Managing iCloud storage efficiently
Once you’re aware of your iCloud storage availability, it’s time to optimize its usage. Here are some tips to help you manage your iCloud storage efficiently:
- Review and delete unnecessary data: Take some time to go through your iCloud storage and delete any files, photos, or videos that are no longer needed. This will free up valuable space for more important data.
- Optimize photo storage: iCloud offers a feature called “Optimize iPhone Storage” that automatically manages the size of your photo library. It keeps full-resolution photos in the cloud while keeping smaller versions on your device to save space. Enable this feature through the “Settings” app under “Photos.”
- Backup important data selectively: Instead of backing up your entire device, choose which apps and data to include in your iCloud backups. This allows you to prioritize backing up essential data while excluding unnecessary files.
- Utilize iCloud Drive: Take advantage of iCloud Drive to store and access files across multiple devices. This reduces the need for storing files locally on your iPhone, saving valuable iCloud storage space.
- Consider upgrading your storage plan: If you find yourself consistently running out of iCloud storage, consider upgrading to a larger storage plan. This will provide you with more space to store your data without worrying about running out of room.
By implementing these strategies, you can effectively manage your iCloud storage and ensure optimal usage of available space.
Managing your iCloud storage doesn’t have to be a daunting task. By regularly checking its availability and implementing efficient management techniques, you’ll have peace of mind knowing that your important data is well-organized and secured in the cloud.
Conclusion
In conclusion, moving photos from iPhone to iCloud storage is a simple and effective way to backup and access your precious memories on multiple devices. By following the steps outlined in this article, you can ensure that your photos are safely stored in the cloud and easily accessible whenever you need them.
iCloud provides a seamless and convenient solution for managing your photo library, allowing you to free up valuable storage space on your iPhone without losing any of your cherished moments. Whether you want to transfer your entire photo library or selectively move specific albums, iCloud offers the flexibility to meet your needs.
With the ability to automatically sync new photos across all your devices and share albums with friends and family, iCloud storage provides a reliable and convenient platform for storing and managing your photos. So why risk losing your precious memories when you can easily back them up and access them anytime, anywhere with iCloud?
So, take the time to set up iCloud photo storage on your iPhone and start enjoying the peace of mind that comes with knowing your photos are securely stored and easily accessible whenever you need them.
FAQs
1. How can I move photos from my iPhone to iCloud storage?
To move photos from your iPhone to iCloud storage, follow these steps:
- Ensure that you are connected to a Wi-Fi network.
- Open the Settings app on your iPhone.
- Tap on your Apple ID at the top of the screen.
- Select “iCloud” from the menu.
- Tap on “Photos.”
- Toggle on the “iCloud Photos” option.
- Your iPhone will prompt you to “Download and Keep Originals” or “Optimize iPhone Storage.” Choose the option that suits your preference.
- All your photos will now be uploaded to iCloud storage.
2. What happens to my iPhone photos once they are moved to iCloud storage?
When you move your photos from your iPhone to iCloud storage, they are automatically backed up and synced across all your devices that are connected to the same Apple ID. This means that you can access your photos from your iPhone, iPad, Mac, and even on the iCloud website.
3. How secure is iCloud storage for my photos?
iCloud storage is designed with strong security measures to protect your photos. Your photos are encrypted both in transit and at rest, ensuring that they cannot be accessed by unauthorized users. Additionally, Apple has implemented multi-factor authentication to add an extra layer of security to your iCloud account.
4. Can I access my iCloud photos offline?
Yes, you can access your iCloud photos offline on your iPhone. By enabling the “Optimize iPhone Storage” option in the iCloud Photos settings, your iPhone will automatically store optimized versions of your photos locally. This allows you to view, edit, and share your photos even when you don’t have an internet connection.
5. How much iCloud storage do I need for my photos?
The amount of iCloud storage you need for your photos depends on the number of photos and videos you have. Apple offers different storage plans ranging from 5GB to 2TB. If you take a lot of high-resolution photos and videos, it is recommended to opt for a higher storage plan. You can check your current iCloud storage usage and upgrade your plan by going to the “Settings” app, tapping on your Apple ID, selecting “iCloud,” and then “Manage Storage.”