
Are you tired of watching videos on your iPhone with low resolution? Well, you’re in luck because I’m here to show you how to change the video resolution on your iPhone! With the increasing popularity of high-definition videos, it’s important to have the flexibility to adjust the video resolution to suit your preferences and device capabilities. Whether you want to conserve storage space or enjoy crystal-clear visuals, learning how to change the video resolution on your iPhone will empower you to have full control over your multimedia experience. In this comprehensive guide, we will explore different methods to change the video resolution on your iPhone, step-by-step instructions, and provide answers to common questions. So, get ready to take your video-watching experience to the next level on your iPhone!
Inside This Article
- Overview
- Method 1: Changing Video Resolution via Camera Settings
- Method 2: Adjusting Video Resolution in Settings
- Method 3: Using Third-Party Video Editing Apps
- Method 4: Changing Video Resolution during Playback
- Conclusion
- FAQs
Overview
Your iPhone is not only a powerful communication tool, but it can also capture stunning videos. With its advanced camera capabilities, you have the ability to record videos in different resolutions, depending on your needs and preferences. Whether you want to save storage space or capture high-quality footage, knowing how to change the video resolution on your iPhone can be incredibly useful.
In this article, we will explore various methods to change the video resolution on your iPhone. We will walk you through the step-by-step process so that you can adjust the video resolution effortlessly and achieve the desired results. By learning these techniques, you will have more flexibility in capturing and managing videos on your iPhone.
Before we dive into the methods, it’s important to note that the options for changing video resolution may vary slightly depending on the model of your iPhone and the version of iOS it is running. However, the underlying principles remain the same, and the following methods should work for most recent iPhone models.
So, let’s get started and explore how you can change the video resolution on your iPhone!
Method 1: Changing Video Resolution via Camera Settings
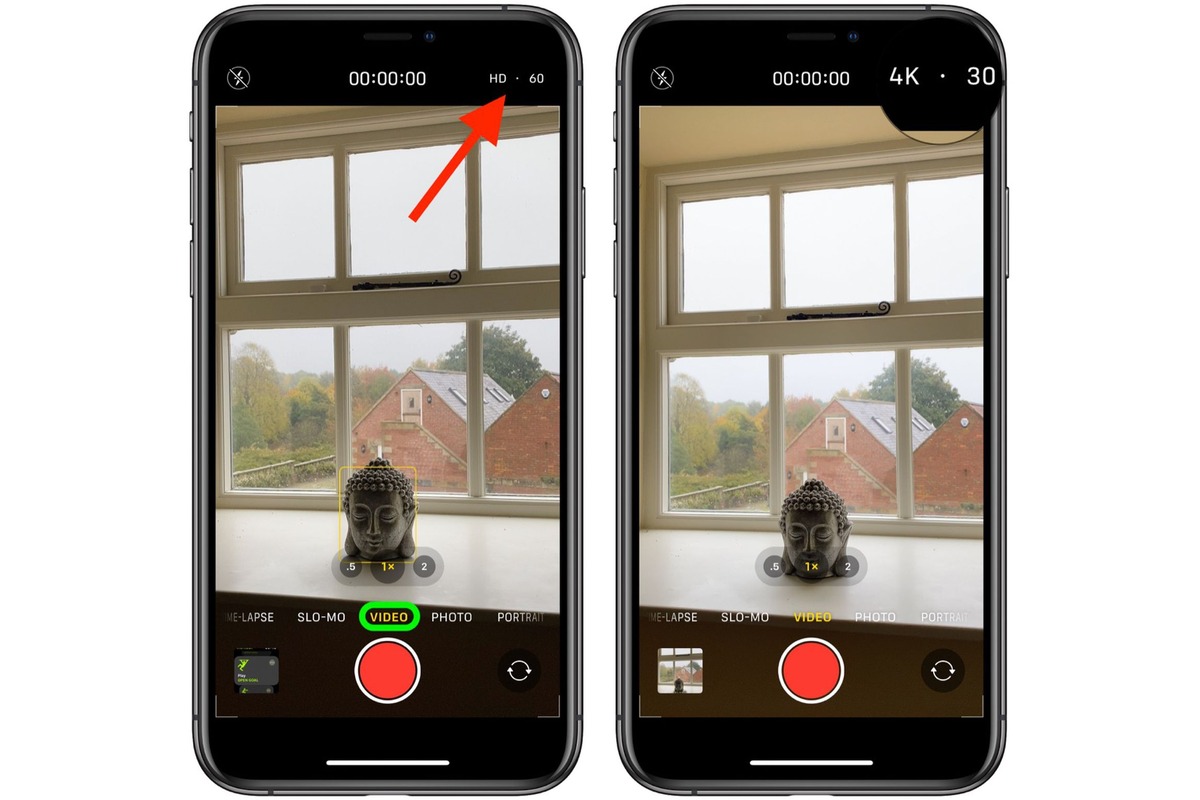
One of the easiest ways to change the video resolution on your iPhone is through the camera settings. By adjusting the resolution before you start recording, you can ensure that your video will be captured in the desired quality.
To change the video resolution, follow these steps:
- Open the Camera app on your iPhone.
- Select the desired camera mode (i.e., Photo, Video, Slo-Mo, etc.).
- Tap on the “Settings” icon, usually located at the top or bottom of the screen.
- Scroll down and find the “Video Settings” or “Record Video” option. Tap on it.
- You will be presented with a list of available video resolutions. Choose the resolution that suits your needs.
It’s important to note that higher resolutions (e.g., 4K) result in larger file sizes, so make sure your device has sufficient storage space.
Once you’ve selected the desired video resolution, exit the camera settings, and you’re ready to start recording videos in the new resolution.
Keep in mind that the camera settings may differ slightly depending on the iPhone model and iOS version you are using. However, the general steps should remain similar across most devices.
This method allows you to have complete control over the video resolution and ensures that you capture your videos in the desired quality on your iPhone.
Method 2: Adjusting Video Resolution in Settings
If you want to change the video resolution on your iPhone, you can do so by adjusting the settings directly. This method allows you to select the desired video resolution before you start recording.
To adjust the video resolution in Settings, follow these simple steps:
- Open the Settings app on your iPhone.
- Scroll down and tap on “Camera” or “Photos & Camera”, depending on your iOS version.
- Under the “Camera” section, tap on “Record Video” or “Record Settings”.
- You will see a list of available video resolution options such as 720p HD at 30 fps, 1080p HD at 30 fps, and more. Tap on the resolution you prefer.
- Exit the settings, and now your iPhone will record videos in the chosen resolution.
It’s important to note that selecting a higher resolution will result in larger file sizes, which may take up more storage on your iPhone. Conversely, choosing a lower resolution can help save storage space but may sacrifice video quality.
Keep in mind that not all iPhone models offer the same range of video resolution options. Older devices may have limited choices compared to newer ones.
By adjusting the video resolution in your iPhone’s settings, you have the flexibility to capture videos in your preferred quality, striking a balance between file size and video clarity.
Method 3: Using Third-Party Video Editing Apps
If you’re looking for more advanced options and features to change the video resolution on your iPhone, you can turn to third-party video editing apps. These apps provide you with greater control over your videos and allow you to customize various aspects, including resolution, aspect ratio, and quality.
There are plenty of video editing apps available for iPhone in the App Store, each with its own set of features and capabilities. Some popular options include iMovie, Adobe Premiere Rush, FilmoraGo, and Kinemaster.
Here are the steps to change the video resolution using a third-party video editing app:
- First, download and install the video editing app of your choice from the App Store.
- Open the app and import the video you want to edit from your iPhone’s camera roll or any other storage location.
- Navigate to the video editing section of the app, where you can find various tools and options to adjust the video’s resolution.
- Look for the option to change the video resolution. It might be labeled as “Resolution,” “Size,” or “Quality.”
- Select the desired resolution from the available options. Most video editing apps offer a range of resolutions to choose from, including standard definition (SD), high definition (HD), and 4K.
- Make any other desired edits or enhancements to the video, such as adding filters, cropping, or adjusting the colors.
- Once you’re satisfied with the changes, save the edited video to your iPhone’s camera roll or export it to a cloud storage service or social media platform directly from the app.
Using third-party video editing apps gives you the flexibility to change the video resolution according to your specific requirements. Whether you want to keep the file size small for easy sharing or capture the highest possible quality, these apps have you covered.
Remember, the steps to change the video resolution may vary slightly depending on the video editing app you choose. It’s always a good idea to explore the app’s features and refer to the app’s help or documentation for more specific instructions.
Method 4: Changing Video Resolution during Playback
Changing the video resolution during playback is a convenient way to adjust the quality of your videos on the iPhone. Whether you want to save storage space or enhance the viewing experience, you can easily change the video resolution using the built-in video player.
To change the video resolution during playback, follow these steps:
- Open the video player on your iPhone by tapping on the video you want to watch.
- While the video is playing, tap on the video screen to bring up the playback controls.
- Look for the settings icon or an option that resembles a gear icon. This is typically located in the bottom right corner of the screen.
- Once you tap on the settings icon, a menu will appear with various options. Look for the “Resolution” or “Quality” option.
- Tap on the “Resolution” or “Quality” option to access the available video resolution settings.
- You will typically see a list of available video resolutions, such as 720p, 1080p, or even higher resolutions like 4K if your device supports it.
- Select the video resolution you desire by tapping on it.
- The video player will adjust the resolution accordingly, and you can now enjoy your video in the selected resolution.
It’s important to note that changing the video resolution during playback does not affect the original video file. The resolution adjustment only applies to the playback settings and does not permanently alter the video file on your device.
This method is especially handy if you have limited storage space on your iPhone and want to conserve it by opting for lower video resolutions. Additionally, if you’re experiencing buffering or playback issues with higher resolution videos, changing to a lower resolution might help improve the playback smoothness.
Remember, the availability of different video resolutions during playback may vary depending on the video format and the video player you are using. Some third-party video players may offer additional customization options, allowing you to tweak other playback settings for an optimal viewing experience.
So, the next time you want to change the video resolution while watching a video on your iPhone, follow these simple steps to adjust the resolution and enjoy your videos in the desired quality.
In conclusion, being able to change the video resolution on your iPhone is a valuable skill that can greatly enhance your video viewing experience. Whether you want to conserve storage space, improve streaming quality, or capture high-resolution videos, knowing how to adjust the video resolution gives you more control over your device’s performance.
By following the simple steps outlined in this article, you can easily change the video resolution on your iPhone and customize it to meet your specific needs. Remember to consider factors such as available storage space, internet connection, and the desired video quality when making adjustments.
With the ability to change video resolution, you can enjoy a seamless video playback experience, have better control over your device’s resources, and capture stunning high-definition videos right from your iPhone.
So, go ahead and start exploring the different video resolution options on your iPhone to unlock a whole new level of video viewing!
FAQs
Q: How can I change the video resolution on my iPhone?
A: To change the video resolution on your iPhone, follow these steps:
- Open the Settings app on your device.
- Scroll down and tap on Camera.
- Under the Record Video section, you will see a list of available video resolutions.
- Select the desired resolution for your videos.
Q: Can I change the video resolution while recording on my iPhone?
A: No, you cannot change the video resolution while recording on your iPhone. You can only select the desired video resolution before you start recording.
Q: What is the recommended video resolution for capturing high-quality videos on iPhone?
A: For capturing high-quality videos on iPhone, it’s recommended to use the highest available video resolution. On newer iPhone models, this is typically 4K at 60 frames per second (fps). However, keep in mind that higher resolutions will result in larger file sizes and may require more storage space.
Q: How can I check the video resolution of a recorded video on my iPhone?
A: To check the video resolution of a recorded video on your iPhone, follow these steps:
- Open the Photos app on your device.
- Find and open the video you want to check.
- Tap on the Options icon (three vertical dots).
- Select Info from the options menu.
- Scroll down to find the video resolution in the Details section.
Q: Can I change the video resolution for specific apps on my iPhone?
A: No, you cannot change the video resolution for specific apps on your iPhone. The video resolution selected in the Camera settings will apply to all video recordings made on your device, regardless of the app used.