
When it comes to watching TV shows and movies on your iPhone, you want to ensure the best viewing experience possible. One important aspect of this is the playback quality. By adjusting the playback quality, you can optimize the streaming or downloaded content to match your network speed or available storage space.
In this article, we will guide you through the process of changing the playback quality for a TV app on your iPhone. Whether you’re using popular streaming services like Netflix, Hulu, or Amazon Prime Video, or watching content from your cable provider’s app, these steps will help you customize your viewing experience to meet your preferences and requirements.
Inside This Article
- Why Change Playback Quality?
- Steps to Change Playback Quality for TV App on iPhone
- Additional Tips and Considerations
- Conclusion
- FAQs
Why Change Playback Quality?
When it comes to streaming TV shows and movies on your iPhone, the playback quality can significantly impact your viewing experience. The playback quality refers to the resolution and overall visual and audio performance of the content you are watching. While higher quality can offer a more immersive experience, it also requires a stronger internet connection. Therefore, there are several reasons why you might want to change the playback quality for the TV app on your iPhone.
The first reason is to optimize the streaming experience based on your internet connection. If you have a slower internet connection, streaming in high-quality may result in buffering or interrupted playback. By lowering the playback quality, you can ensure a smoother and uninterrupted viewing experience.
Another reason to change the playback quality is to conserve your mobile data. Streaming high-quality content consumes more data compared to streaming at lower resolutions. If you have a limited mobile data plan or are concerned about exceeding your data limit, switching to a lower playback quality can help you manage and save your data usage.
Additionally, changing the playback quality can also be beneficial if you are experiencing frequent buffering or lag while streaming. Sometimes, network congestion or other factors can affect the streaming performance. By adjusting the playback quality to a lower setting, you can reduce the strain on your internet connection and potentially alleviate buffering issues.
Lastly, changing the playback quality allows you to prioritize other factors, such as battery life. Streaming high-quality content often requires more processing power and can drain your iPhone’s battery faster. If you are on the go or want to conserve battery life, opting for a lower playback quality can help extend the duration of your device’s battery.
Overall, changing the playback quality for the TV app on your iPhone gives you more control over your streaming experience. Whether it’s to improve the performance, save data, reduce buffering, or preserve battery life, adjusting the playback quality can help you tailor your viewing experience to your specific needs and preferences.
Steps to Change Playback Quality for TV App on iPhone
Are you tired of poor video quality on your TV app while streaming content on your iPhone? Fear not, as we have got you covered! In this guide, we will walk you through the steps to change the playback quality for the TV app on your iPhone.
The TV app on iPhone allows you to access a wide range of movies and TV shows. However, sometimes the default playback quality may not meet your preferences or the available network conditions. By changing the playback quality, you can enjoy a smoother streaming experience and better video quality.
So, without further ado, let’s dive into the steps to change playback quality for the TV app on your iPhone:
- Open the TV app on your iPhone by tapping on the app icon.
- Navigate to the “Settings” section within the TV app. You can usually find this option in the bottom right corner of the screen.
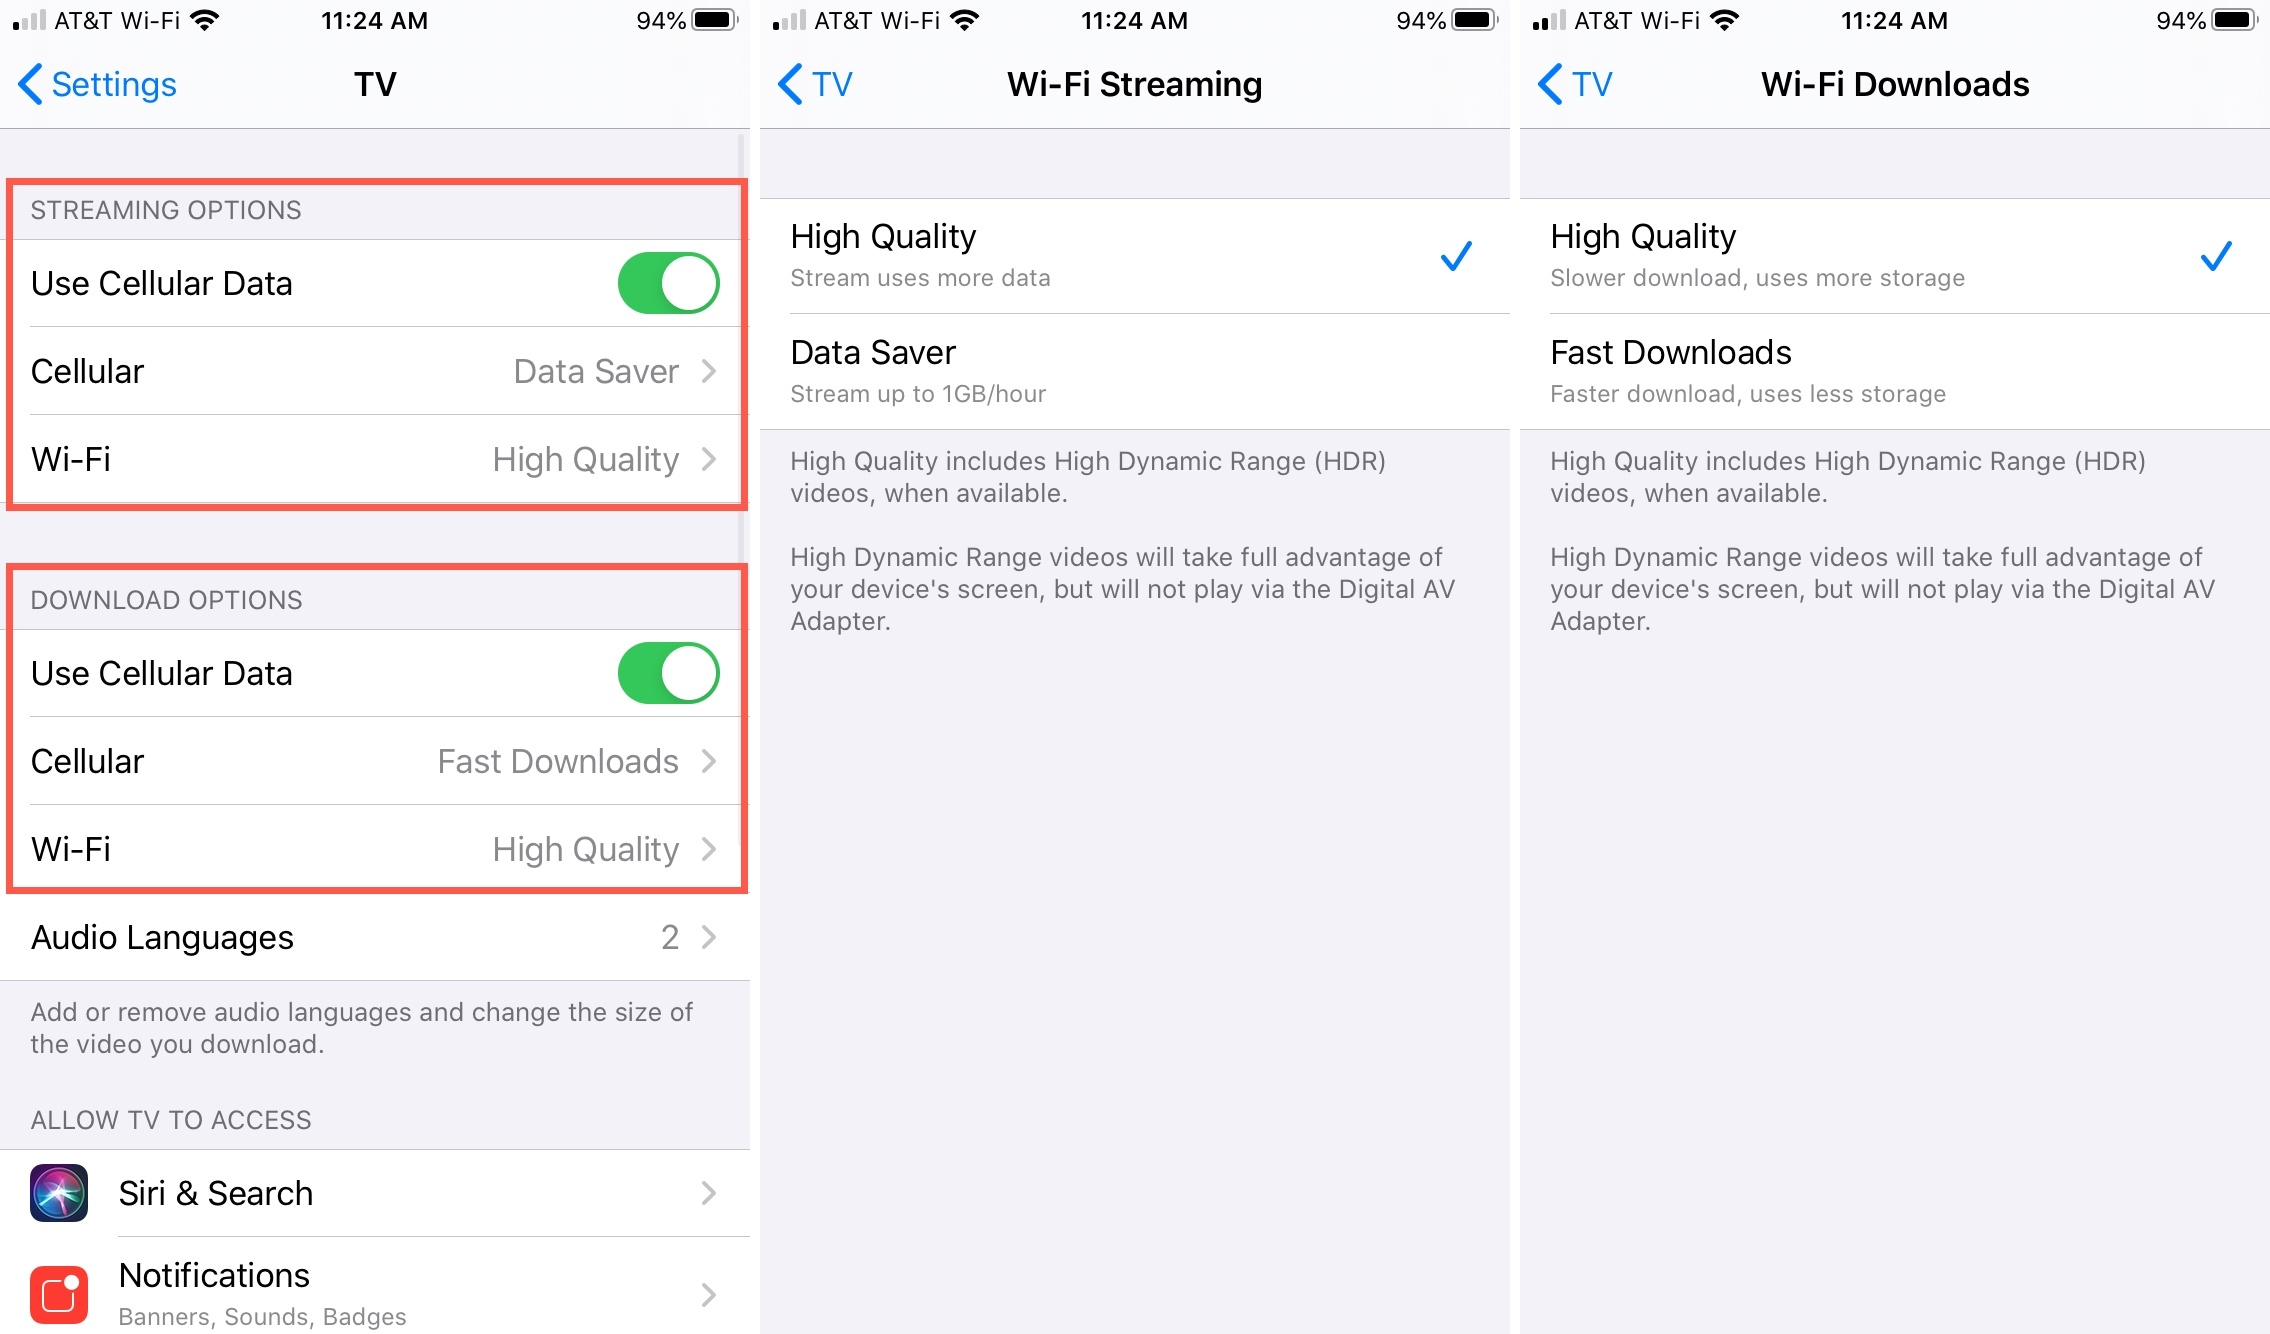
- Once you are in the “Settings” section, scroll down until you find the “Playback Quality” option.
- Tap on “Playback Quality” to access the available options for changing the playback quality.
- Choose the desired playback quality option from the available choices. The options may include “Auto”, “Standard”, “High”, or “Best Available”. Select the option that suits your preferences.
- After selecting the playback quality, exit the settings and start streaming your favorite content on the TV app. The playback quality will now be adjusted according to your selection.
Congratulations! You have successfully changed the playback quality for the TV app on your iPhone. Enjoy a better streaming experience with improved video quality.
It is worth noting that changing the playback quality may affect the amount of data consumed while streaming. Higher quality settings usually result in increased data usage. Therefore, it’s important to consider your data plan and network conditions before selecting the playback quality.
In addition, if you experience any issues with the playback quality, you can always revisit the “Playback Quality” settings option and make further adjustments as needed.
Now that you know how to change the playback quality for the TV app on your iPhone, you can easily enhance your streaming experience and enjoy your favorite movies and TV shows in the best possible quality.
Additional Tips and Considerations
When changing the playback quality for the TV app on your iPhone, there are a few additional tips and considerations to keep in mind. These tips will help you optimize your viewing experience and ensure smooth playback of your favorite TV shows and movies.
1. Check your internet connection: Before changing the playback quality, make sure you have a stable and fast internet connection. Streaming high-quality video requires a strong internet connection to avoid buffering and interruptions.
2. Consider your data usage: Streaming videos in high quality can consume a significant amount of data. If you have a limited data plan or are using cellular data, it’s recommended to choose a lower playback quality to conserve data.
3. Adjust based on device capabilities: Different iPhone models have varying screen resolutions and display capabilities. Consider the screen size and resolution of your iPhone when selecting the playback quality. Higher-resolution screens will benefit from higher quality settings, while older or smaller devices may not show a noticeable difference.
4. Monitor battery usage: Playing videos at higher quality can drain your iPhone’s battery faster. If you’re streaming for a long period of time or need to conserve battery life, choosing a lower playback quality can help extend the battery life of your device.
5. Test different quality settings: Experiment with different playback quality settings to find the right balance between video quality and data usage. Start with a lower quality and gradually increase until you find a setting that suits your preferences and provides an enjoyable viewing experience.
6. Consider external factors: Keep in mind that the playback quality may also be affected by external factors such as network congestion or server performance. If you experience buffering or playback issues, it may not be related to the playback quality setting on your iPhone.
By considering these additional tips and taking them into account, you can optimize your TV app playback experience on your iPhone and enjoy your favorite shows and movies without interruptions or data constraints.
Conclusion
Adjusting playback quality on the TV app for iPhone is a simple yet useful feature that allows you to optimize your viewing experience. By following the steps outlined in this guide, you can easily change the playback quality to better suit your preferences and network conditions. Whether you’re on a slow connection and want to conserve data or looking to enjoy high-definition content on a stable network, the TV app gives you the flexibility to customize your streaming experience.
Remember to regularly check and adjust the playback quality settings based on your current needs. By finding the right balance between video quality and network performance, you can ensure smooth streaming and minimize buffering issues. So, go ahead and take control of your TV app by adjusting the playback quality to enhance your entertainment journey on your iPhone!
FAQs
1. How do I change the playback quality for a TV app on my iPhone?
To change the playback quality for a TV app on your iPhone, follow these steps:
– Open the TV app on your iPhone.
– Navigate to the video you want to watch.
– Tap on the screen to bring up the control options.
– Look for the playback settings icon, usually represented by a gear or three vertical dots.
– Tap on the playback settings icon to access the playback quality options.
– Select the desired playback quality option, such as “Auto,” “Standard,” or “High.”
– The app will adjust the playback quality based on your selection.
2. Can I change the playback quality for online streaming services?
Yes, most online streaming services allow you to change the playback quality on their respective apps. You can usually find the playback quality settings within the app’s settings or during the playback itself. Keep in mind that streaming services may have different terminology for the available quality options, such as “low,” “medium,” or “high” instead of specific resolution values like 720p or 1080p.
3. Does changing the playback quality affect my data usage?
Yes, changing the playback quality can affect your data usage. Higher quality settings consume more data compared to lower quality settings. If you are concerned about data usage, you can choose a lower quality option or set the app to “Auto” to allow it to adjust the quality based on your internet connection speed.
4. How can I ensure smooth playback on my iPhone?
To ensure smooth playback on your iPhone, you can try the following:
– Close any unnecessary background apps that may be using resources.
– Connect to a stable and reliable Wi-Fi network.
– Check for any available app updates and install them.
– Restart your iPhone to clear any temporary glitches.
– Ensure that your iPhone has enough available storage space for caching and buffering the video content.
5. Why is the playback quality automatically adjusting on its own?
The playback quality may automatically adjust based on your internet connection speed. If your connection becomes slower or experiences fluctuations, the app may adjust the quality to prevent buffering or playback interruptions. Additionally, some apps may have adaptive streaming technology that continuously adjusts the quality to optimize the viewing experience.