
In today’s technological era, the ability to connect our devices seamlessly has become a necessity. Whether it’s for work or personal use, the convenience of connecting our iPhone to our Epson printer cannot be overstated. However, this task may seem daunting to some, especially for those who are not tech-savvy.
In this comprehensive guide, we will walk you through the step-by-step process of connecting your Epson printer to your iPhone. From downloading the necessary apps to configuring the settings, we will cover everything you need to know to ensure a smooth and successful connection. So, if you’re ready to unlock the full potential of your Epson printer and enjoy the convenience of printing directly from your iPhone, let’s dive in!
Inside This Article
- Prerequisites for Connecting Epson Printer to iPhone
- Step 1: Install Epson iPrint App on your iPhone
- Step 2: Connect Epson Printer to Same Wi-Fi Network as the iPhone
- Step 3: Launch the Epson iPrint App and Select Printer
- Step 4: Adjust Printer Settings and Start Printing
- Troubleshooting Tips for Epson Printer Connection Issues
- Conclusion
- FAQs
Prerequisites for Connecting Epson Printer to iPhone
Before you can connect your Epson printer to your iPhone, there are a few prerequisites that must be met. Ensuring that these requirements are fulfilled will help to ensure a smooth and successful connection process.
1. Epson iPrint App: To connect your Epson printer to your iPhone, you will need to have the Epson iPrint app installed on your device. The Epson iPrint app allows you to easily print documents, photos, and emails directly from your iPhone to your Epson printer.
2. Compatible Epson Printer: It is essential to have a compatible Epson printer that supports wireless connectivity. Ensure that your printer model is compatible with the Epson iPrint app and can connect to a Wi-Fi network.
3. Wi-Fi Network: Both your iPhone and your Epson printer need to be connected to the same Wi-Fi network. This is crucial for establishing a connection between the two devices and enabling seamless printing.
4. Internet Connection: Make sure that your iPhone is connected to the internet, as the Epson iPrint app requires an active internet connection to communicate with the printer and send print commands.
5. Updated iPhone Software: Ensure that your iPhone is running on the latest version of iOS. Updating to the latest software version can help fix any compatibility issues and ensure optimal performance when connecting to your Epson printer.
By meeting these prerequisites, you will be well-prepared to connect your Epson printer to your iPhone and enjoy the convenience of wireless printing. Let’s move on to the next steps to connect your devices seamlessly.
Step 1: Install Epson iPrint App on your iPhone
Installing the Epson iPrint app on your iPhone is the first step towards connecting your Epson printer. This app allows you to easily print, scan, and share documents or photos directly from your iPhone. Follow the instructions below to install the app:
1. Launch the App Store on your iPhone and tap on the Search tab at the bottom of the screen.
2. In the search bar, type Epson iPrint and tap on the Search button on the keyboard. The search results will display various apps, but make sure to select the official Epson iPrint app.
3. Tap on the Get button located next to the Epson iPrint app. This will initiate the download and installation process.
4. You may be prompted to enter your Apple ID and password to proceed with the installation. If required, enter the necessary information and tap on Sign In.
5. Once the app has finished downloading, the Get button will change to an Open button. Tap on Open to launch the Epson iPrint app.
6. The Epson iPrint app will require certain permissions to function properly. Grant access to features such as your photos, camera, and location if prompted.
7. Congratulations! You have successfully installed the Epson iPrint app on your iPhone. Now, you can move on to the next step to connect your iPhone to your Epson printer.
Step 2: Connect Epson Printer to Same Wi-Fi Network as the iPhone
Connecting your Epson Printer to the same Wi-Fi network as your iPhone is a crucial step in ensuring seamless and hassle-free printing. By connecting both devices to the same network, you enable them to communicate and share data efficiently. Here’s how you can do it:
1. First, make sure your Epson Printer is turned on and ready to connect. Check that it is connected to a power source and that there are no error messages displayed on the printer’s screen.
2. Next, locate the control panel or display screen on your Epson Printer. Depending on the model, this may be a touch screen or physical buttons. Navigate to the “Settings” or “Network” menu on the printer.
3. Once you’re in the network settings menu, look for the “Wi-Fi Setup” or “Wireless LAN Setup” option. Select it to access the wireless network configuration settings.
4. In the wireless network settings, you will see a list of available Wi-Fi networks. Locate your home or office Wi-Fi network from the list and select it. If your network has a password, you may be prompted to enter it. Use the printer’s control panel or physical buttons to enter the password and confirm your selection.
5. After entering the Wi-Fi network password, the printer will attempt to connect to the network. It may take a few moments for the connection to establish. Once connected, you should see an indication on the printer’s screen confirming the successful connection.
6. Now that your Epson Printer is connected to the Wi-Fi network, it’s time to establish a connection with your iPhone. Unlock your iPhone and go to the home screen.
7. Tap on the “Settings” icon to access the iPhone’s settings menu. Scroll down and select “Wi-Fi” from the list of options.
8. In the Wi-Fi settings, you will see a list of available Wi-Fi networks. Locate and select the same Wi-Fi network that your Epson Printer is connected to. If you don’t see the network, try refreshing the list by turning Wi-Fi off and on again.
9. Once you’ve selected the network, wait for your iPhone to establish a connection. You may see a spinning wheel next to the network name while the connection is being made.
10. Once the iPhone is successfully connected to the Wi-Fi network, you’re all set. Your Epson Printer and iPhone are now on the same network, enabling seamless communication and printing.
By following these steps, you can easily connect your Epson Printer to the same Wi-Fi network as your iPhone. This will allow you to print documents and photos directly from your iPhone without the need for cables or additional software. Enjoy the convenience and versatility of wireless printing with Epson!
Step 3: Launch the Epson iPrint App and Select Printer
Once you have successfully installed the Epson iPrint app on your iPhone and ensured that your Epson printer and iPhone are connected to the same Wi-Fi network, it’s time to move on to the next step.
To begin, locate the Epson iPrint app on your iPhone and tap to open it. The app will launch, presenting you with a user-friendly interface that allows you to print documents, photos, and more directly from your iPhone.
Once the app is open, you will see various options and features available on the screen. These options may include printing, scanning, and accessing cloud services, depending on the capabilities of your specific Epson printer.
Next, tap on the “Print” option within the app. This will prompt the app to detect any available Epson printers on your network. Give the app a few moments to search for printers, and it will display a list of available devices.
Scroll through the list of printers until you find your Epson printer. The app should display the printer’s name and model number for easy identification. Once you have located your printer, tap on its name to select it.
After selecting your Epson printer, you may be prompted to set certain printing preferences, such as paper size, print quality, and color options. Adjust these settings according to your preferences and the type of document or photo you want to print.
Once you have made the necessary adjustments, tap on the “Print” button within the app to begin the printing process. The app will send the print job to your Epson printer, which will start printing your document or photo.
Congratulations! You have successfully launched the Epson iPrint app on your iPhone and selected your Epson printer. Now, you can enjoy the convenience of wireless printing directly from your mobile device.
Remember, if you encounter any issues during this step, refer to the troubleshooting tips provided in the next section to help resolve common connection problems.
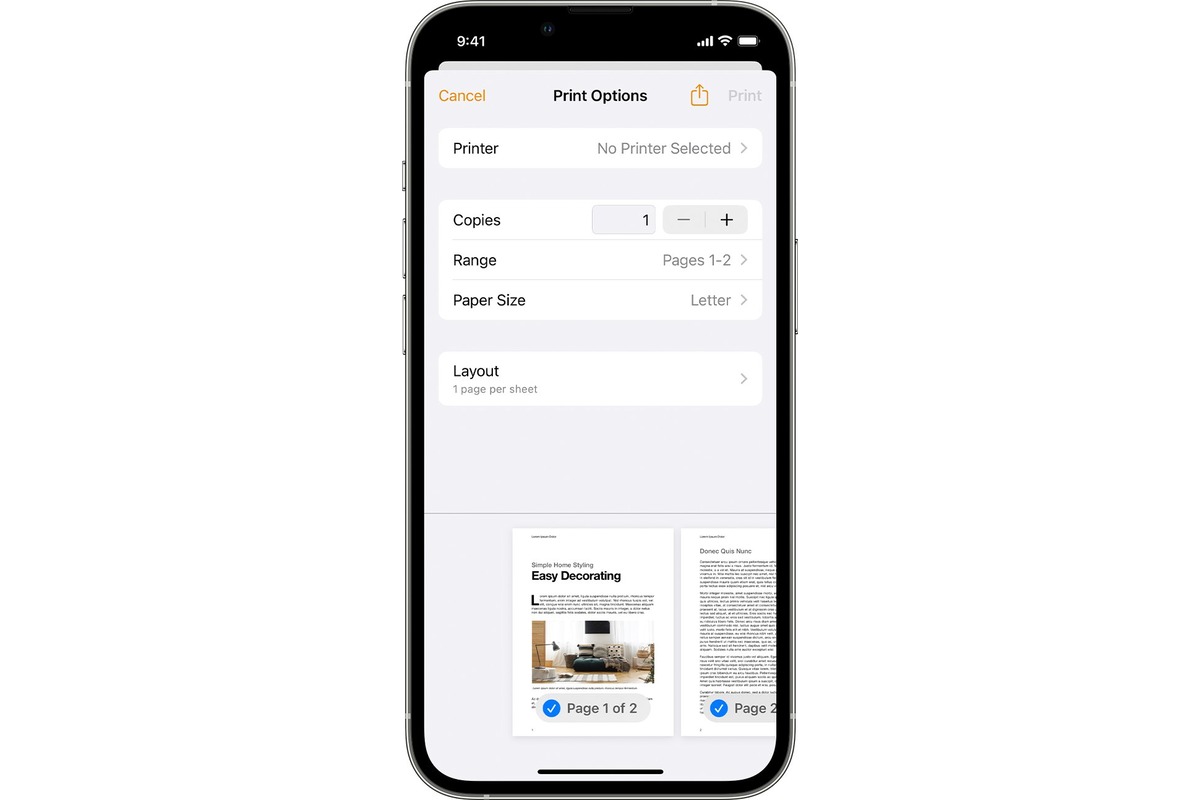
Step 4: Adjust Printer Settings and Start Printing
Once you have successfully connected your Epson printer to your iPhone using the Epson iPrint app and have selected the printer, it’s time to adjust the printer settings and start printing. Follow the steps below to get your printer ready and start printing your documents or photos.
1. Open the Epson iPrint app on your iPhone. You should now see the main interface with various options.
2. Tap on the “Print” option, which will take you to the print settings screen.
3. On the print settings screen, you can adjust different settings such as the number of copies, page range, paper size, orientation, and print quality. You can also select whether to print in color or black and white.
4. Tap on the “Print” button to start the printing process. Your iPhone will send the print job to the Epson printer, and you will hear the sound of the printer processing the job.
5. Depending on the size and complexity of the document or photo, the printing process may take some time. Be patient and avoid interrupting the print job.
6. Once the printing is complete, your document or photo will be ready to pick up from the output tray of your Epson printer.
It’s important to note that the available printer settings may vary depending on the model of your Epson printer and the capabilities of the Epson iPrint app. Make sure to explore the app and familiarize yourself with all the available options.
Printing directly from your iPhone to an Epson printer offers convenience and flexibility, allowing you to print documents and photos on the go. Whether it’s a boarding pass, a business report, or a cherished photograph, the Epson iPrint app and your Epson printer make the process seamless and hassle-free.
So, adjust the printer settings according to your preference, hit the print button, and enjoy the convenience of mobile printing with your Epson printer and iPhone.
Troubleshooting Tips for Epson Printer Connection Issues
If you are experiencing connection issues when trying to connect your Epson printer to your iPhone, don’t worry. There are several troubleshooting tips that you can follow to resolve these issues and get your printer up and running in no time. In this section, we will discuss some common problems and their solutions.
1. Check Wi-Fi Connection: Ensure that your iPhone and the Epson printer are connected to the same Wi-Fi network. If you are unsure, go to your iPhone’s Settings, select Wi-Fi, and verify that both devices are connected to the same network.
2. Restart Devices: Sometimes, a simple restart can solve the problem. Try turning off your iPhone and Epson printer, then turn them back on after a few seconds. This can refresh the connection and resolve any temporary issues.
3. Update Firmware: Make sure that both your iPhone and Epson printer have the latest firmware updates installed. Outdated firmware can cause connectivity problems. Check the manufacturer’s website for the latest software updates and follow the instructions to update your devices.
4. Reset Network Settings: If you are still experiencing connection issues, you can try resetting the network settings on your iPhone. Go to Settings > General > Reset > Reset Network Settings. Keep in mind that this will remove all saved Wi-Fi networks and passwords, so make sure you have them handy.
5. Reinstall the Epson iPrint App: If the previous steps did not resolve the issue, try reinstalling the Epson iPrint app on your iPhone. Delete the app from your device, then visit the App Store and download it again. This can fix any software glitches that may be causing the connection problem.
6. Disable VPN or Proxy: If you are using a VPN or proxy server on your iPhone, try disabling it temporarily. Sometimes, these settings can interfere with the printer connection. Disable the VPN or proxy, and then try connecting your Epson printer again.
7. Contact Epson Support: If you have followed all the troubleshooting steps and are still unable to connect your Epson printer to your iPhone, it may be best to contact Epson support for further assistance. They have a team of experts who can guide you through the process and help you resolve any technical issues.
By following these troubleshooting tips, you can overcome most Epson printer connection issues and enjoy the convenience of wireless printing from your iPhone. Remember to double-check your Wi-Fi connection, update firmware, and try restarting devices before seeking further support from Epson. With these steps, you’ll be back to printing in no time!
Connecting your Epson printer to your iPhone is a convenient way to print documents, photos, and more from your mobile device. By following the simple steps outlined in this article, you can easily establish a wireless connection between your printer and iPhone.
With the ability to print directly from your iPhone, you can save time and effort, whether it’s for business or personal use. Epson printers offer a seamless printing experience, allowing you to produce high-quality prints without the need for a computer or additional cables.
Stay productive and efficient by taking advantage of the wireless printing capabilities of your Epson printer and iPhone. No matter where you are, you can now print important documents or memorable photos with ease. Enjoy the freedom and convenience that comes with connecting your Epson printer to your iPhone.
FAQs
1. How do I connect my Epson printer to my iPhone?
To connect your Epson printer to your iPhone, follow these steps:
- Ensure that both your printer and iPhone are connected to the same Wi-Fi network.
- Download and install the Epson iPrint app from the App Store.
- Open the app and tap on the “Printer” icon at the bottom of the screen.
- Select your printer from the list of available devices.
- Follow the on-screen instructions to complete the setup process.
- Your iPhone is now connected to your Epson printer, and you can start printing wirelessly.
2. Can I print directly from my iPhone without using any apps?
Yes, you can print directly from your iPhone without using any apps. If your Epson printer supports AirPrint, which is a wireless printing feature built into iOS, you can easily print documents, photos, emails, and web pages directly from your iPhone. To use AirPrint, make sure your printer and iPhone are connected to the same Wi-Fi network, open the document or file you want to print, tap the share button, and select the print option. Choose your printer from the list of available devices, adjust any print settings if necessary, and tap print. Your document will be sent to the printer wirelessly.
3. Can I print from my iPhone to an Epson printer using a USB cable?
No, you cannot print from your iPhone to an Epson printer using a USB cable. iPhones do not have USB ports that can be used for direct printing. However, you can still print wirelessly from your iPhone to an Epson printer as long as both devices are connected to the same Wi-Fi network.
4. What if my Epson printer is not showing up on my iPhone?
If your Epson printer is not showing up on your iPhone, here are a few troubleshooting steps you can try:
- Ensure that your printer is powered on and connected to the same Wi-Fi network as your iPhone.
- Restart your printer and iPhone to refresh the network connection.
- Make sure you have the latest version of the Epson iPrint app installed on your iPhone.
- Check if there are any firmware updates available for your printer and install them if necessary.
- If all else fails, try resetting the network settings on your iPhone and set up the connection again.
5. Can I print documents from cloud storage services on my iPhone to an Epson printer?
Yes, you can print documents from cloud storage services on your iPhone to an Epson printer. The Epson iPrint app supports printing from popular cloud storage services like Google Drive, Dropbox, and Box. Simply open the iPrint app, tap on the “Cloud” icon, and select the cloud storage service where your document is stored. Browse through your files, choose the document you want to print, and follow the on-screen instructions to print it wirelessly.