
Welcome to the future of photo sharing on your iOS device! With the release of iOS 16 in 2023, Apple has introduced a revolutionary feature – the iCloud Shared Photo Library. This new and improved way of sharing photos allows you to easily collaborate and create a shared album with your friends, family, and colleagues. Gone are the days of manually sharing individual photos or uploading them to different platforms. Now, using the power of iCloud, you can seamlessly organize, view, and contribute to a shared photo album, all from the convenience of your iOS device. In this article, we’ll guide you through the steps of creating an iCloud Shared Photo Library, making photo sharing a breeze and ensuring your precious memories are easily accessible for everyone involved.
Inside This Article
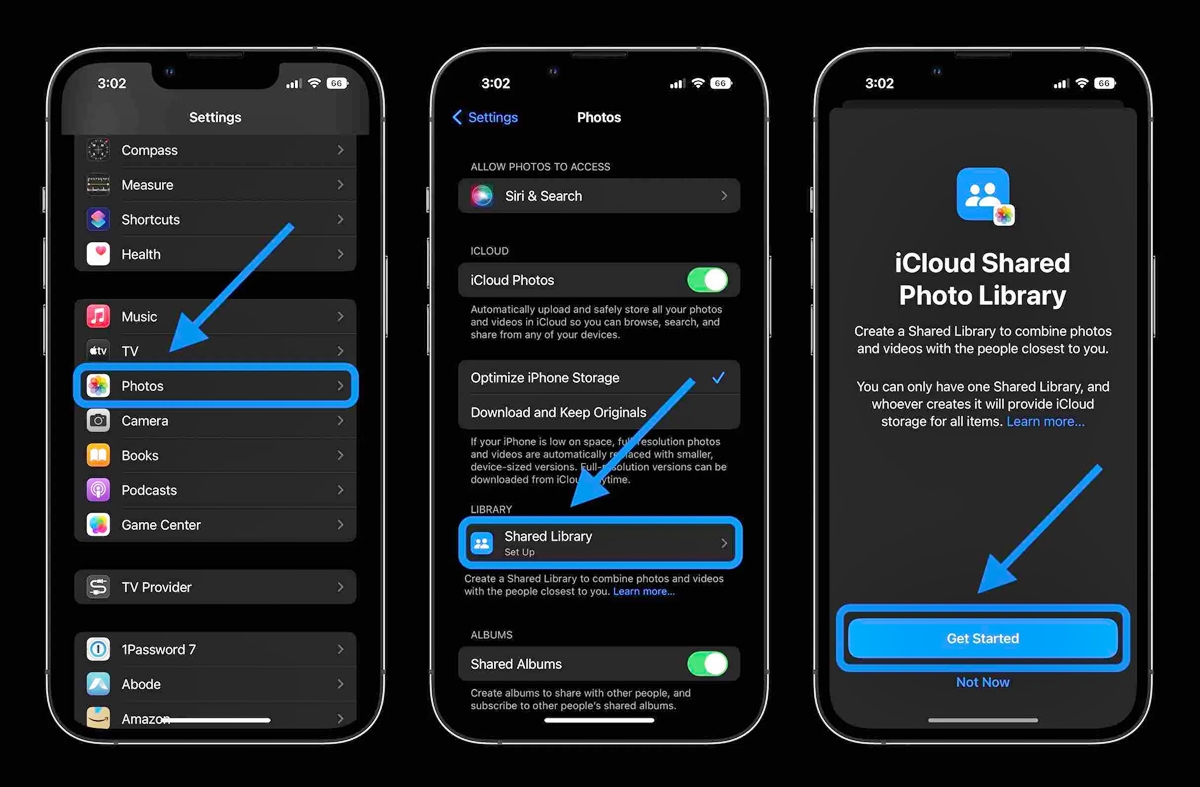
- Enabling iCloud Photo Sharing
- Creating a Shared Photo Album
- Adding Photos to the Shared Album
- Managing Permissions in the Shared Photo Library
- Conclusion
- FAQs
Enabling iCloud Photo Sharing
One of the convenient features of iOS 16 is the ability to create an iCloud Shared Photo Library. This feature allows you to easily share photos with your friends and family members, making it a great tool for collaborative photo albums or simply sharing memorable moments. To get started, you’ll need to enable iCloud Photo Sharing on your device.
To enable iCloud Photo Sharing, follow these simple steps:
1. Open the Settings app on your iOS 16 device.
2. Scroll down and tap on your name at the top of the screen to access your Apple ID settings.
3. Tap on “iCloud” to enter the iCloud settings menu.
4. Look for the “Photos” option and tap on it.
5. On the next screen, you’ll see the “Shared Albums” section. Tap on the toggle switch next to “Shared Albums” to enable iCloud Photo Sharing.
Once you’ve enabled iCloud Photo Sharing, you’ll be able to create and manage shared albums with ease. This feature allows you to add photos, videos, and even comments to a shared album, making it a dynamic and interactive way to share memories with your loved ones.
It’s worth noting that iCloud Photo Sharing works seamlessly across all your Apple devices, including iPhones, iPads, and Macs. This means that you can access and contribute to shared albums from any of your devices, providing a truly unified photo sharing experience.
So go ahead and enable iCloud Photo Sharing on your iOS 16 device to take advantage of this fantastic feature. Start sharing your favorite moments and create lasting memories with your friends and family!
Creating a Shared Photo Album
If you want to share your precious memories with friends and family, creating a shared photo album in iOS 16 is a great way to do it. By utilizing the iCloud Shared Photo Library feature, you can easily collaborate and share photos with your loved ones in just a few simple steps.
To get started, follow these instructions:
- Make sure you are running iOS 16 on your iPhone or iPad. Check for available updates in the Settings app and install the latest version if necessary.
- Open the Photos app on your device. This is where you can manage and organize your photo albums.
- Tap on the “Albums” tab at the bottom of the screen to view your existing albums.
- Scroll down and locate the “Shared” album section. Tap on it to enter.
- Tap on the “Create Shared Album” button to start the process of creating a new shared album.
- Give your album a descriptive title. This could be something like “Family Vacation 2023” or “Summer Memories.”
- Optionally, you can also add a description to provide more context and information about the album.
- Now, you need to invite people to join the shared album. Tap on the “Add People” button.
- You can choose to invite people from your contacts list or enter their email addresses manually. You can also set whether they can only view the photos or contribute and add their own.
- Once you have invited the desired participants, tap on the “Create” button to finalize the creation of the shared album.
- Your shared album is now created. You can start adding photos to it by tapping on the “Add Photos” button.
- You can select photos from your existing albums or take new ones directly from the camera. Simply tap on the photos you want to include and then tap on the “Done” button.
- Your selected photos will now be added to the shared album, and all participants will be able to view and comment on them.
Creating a shared photo album in iOS 16 provides a fun and collaborative way to share moments with your loved ones. So gather your favorite photos, create an album, and start sharing those memories today!
Adding Photos to the Shared Album
Once you have set up your iCloud Shared Photo Library and created a shared album, it’s time to start adding photos to it. Here’s how you can easily add photos to your shared album in iOS 16.
1. Open the Photos app on your iOS device and navigate to the “Albums” tab at the bottom of the screen.
2. Scroll down and find the shared album you want to add photos to. Tap on it to open it.
3. Inside the shared album, tap on the “+” icon located at the top of the screen.
4. You will see two options: “Add Photos” and “Add Video”. Choose the appropriate option depending on the media type you want to add.
5. Select the photos or videos you want to add to the shared album. You can tap on multiple items to select them at once.
6. Tap on the “Add” button located at the top-right corner of the screen to add the selected items to the shared album.
7. The selected photos or videos will now be uploaded to iCloud and added to the shared album. A progress bar will appear to indicate the upload status.
8. Once the upload is complete, the added photos or videos will be visible to all the participants of the shared album.
9. You can repeat the above steps to add more photos or videos to the shared album at any time.
Adding photos to a shared album allows you to easily share and collaborate on memories with your friends and family. Whether it’s a vacation, a special occasion, or just everyday moments, the shared album feature in iOS 16 makes it effortless to curate and enjoy a collection of photos together.
Managing Permissions in the Shared Photo Library
When it comes to sharing photos through the iCloud Shared Photo Library in iOS 16, you have full control over who can access your shared albums and what they can do with the photos. Managing permissions is crucial to ensure your privacy and maintain control over your shared content. Let’s take a closer look at how you can manage permissions in the shared photo library.
1. Invite People to the Shared Album: To grant someone access to your shared album, you need to send them an invitation. Open the shared album in the Photos app, tap on the “People” tab, and click the “Add People” button. You can enter their email address or phone number, or select them from your contacts. Tapping “Send” will send an invitation to join the album.
2. Set Permissions: Once someone has joined your shared album, you can determine the level of access they have to the photos. There are two permission levels: “Can View” and “Can Post.” By default, new members have “Can View” access, which means they can only view the photos. However, you can change their access level to “Can Post” if you want them to be able to add photos and videos to the shared album.
3. Remove People from the Shared Album: If you want to revoke someone’s access to your shared album, you can remove them. Open the shared album, go to the “People” tab, and find the person you want to remove. Swipe left on their name and click the “Remove” button. This will remove their access to the shared album and any contributed photos they added.
4. Disable Public Website: By default, shared albums have a public website where anyone with the album’s link can view the photos. If you want to restrict access to only invited members, you can disable the public website. Open the shared album, tap on the “People” tab, and toggle off the “Public Website” option. This will ensure that only invited members can access the shared album.
5. Revoke Access: In certain situations, you may need to remove all access to the shared album, even for existing members. To do this, open the shared album, go to the “People” tab, and tap on the “Options” button. From there, choose the “Stop Sharing” option. This will revoke access for all members and delete the shared album from their devices.
By managing permissions in the iCloud Shared Photo Library, you can maintain control over your shared content and ensure that only the intended individuals have access to your photos. It’s a powerful tool that allows you to collaborate and share memories with friends and family while safeguarding your privacy.
Conclusion
In conclusion, creating an iCloud Shared Photo Library in iOS 16 (2023) is an excellent way to share and collaborate on photos with friends and family. The new features and improvements brought by iOS 16 make the process even more seamless and convenient. With just a few simple steps, you can create a shared album and start adding photos and videos to it. The ability to like, comment on, and save shared photos enhances the interactive experience and fosters a sense of community among users. Whether you want to share vacation memories, celebrate milestones, or collaborate on a project, the iCloud Shared Photo Library in iOS 16 provides a user-friendly and efficient solution. So go ahead and give it a try!
FAQs
1. Can I create an iCloud Shared Photo Library on my iPhone?
Absolutely! With the release of iOS 16 (2023), creating an iCloud Shared Photo Library on your iPhone has become even easier. This feature allows you to share photos and videos with friends, family, and colleagues seamlessly.
2. How can I create an iCloud Shared Photo Library?
To create an iCloud Shared Photo Library on your iPhone running iOS 16 (2023), follow these steps:
- Open the Photos app on your iPhone.
- Select the photos and videos you want to share.
- Tap on the Share button.
- Choose the “Add to Shared Album” option.
- Enter a name for your shared album and tap “Next”.
- Select the people you want to share the album with.
- Tap “Create” to create the iCloud Shared Photo Library.
3. Can I control who can access my iCloud Shared Photo Library?
Absolutely! When creating your iCloud Shared Photo Library, you have control over who can access it. You can choose specific people to share the album with by selecting their names or email addresses. This way, you can ensure that only the intended recipients can view and contribute to the shared album.
4. Can I remove someone from my iCloud Shared Photo Library?
Yes, you have the ability to remove someone from your iCloud Shared Photo Library. To do so, follow these steps:
- Open the shared album in the Photos app.
- Tap on the People tab at the bottom of the screen.
- Find the person you want to remove and swipe left on their name.
- Tap the Remove button.
Please note that removing someone from the shared album will also remove all of their photos and videos from the album.
5. Can I add or remove photos from an existing iCloud Shared Photo Library?
Certainly! You can easily add or remove photos from an existing iCloud Shared Photo Library. To add photos or videos, simply open the shared album and tap on the “Add” button. From there, you can select the photos and videos you want to include. To remove photos or videos, go to the shared album, tap on the photo or video, and then tap on the “…” button. Finally, choose the “Remove from Album” option.