
Are you tired of constantly sharing photos with your friends and family every time you take a memorable shot? Setting up a shared photo library with auto-sharing could be the perfect solution for you. With this feature, you can easily create a central location where you and your loved ones can access and contribute to a shared album effortlessly.
In this article, we will guide you through the process of setting up a shared photo library with auto-sharing, ensuring that everyone has access to the latest photos without the hassle of manual sharing. Whether you are an iOS user or an Android enthusiast, we have you covered with step-by-step instructions and insights into the benefits and features of this convenient feature.
So, if you’re ready to simplify the way you share and enjoy photos, let’s dive right in and discover how to set up a shared photo library with auto-sharing!
Inside This Article
- Step 1: Choose a Platform
- Step 2: Create a Shared Album
- Step 3: Invite Participants
- Step 4: Enable Auto-Sharing
- Step 5: Customize Sharing Options
- Step 6: Start Sharing and Enjoy!
- Conclusion
- FAQs
Step 1: Choose a Platform
When setting up a shared photo library with auto-sharing, the first step is to choose a platform that best suits your needs. There are several popular options available, each with its own set of features and capabilities. Let’s take a closer look at some of the top platforms:
1. iCloud Photos: If you are an Apple user, iCloud Photos is a great choice. It seamlessly integrates with your iPhone, iPad, and Mac devices, allowing you to access and share your photos across all your Apple devices. iCloud Photos also offers automatic syncing and storage options.
2. Google Photos: Google Photos is a versatile platform that works well for both Android and iOS users. With unlimited storage for high-quality photos and videos, Google Photos offers a user-friendly interface and powerful search capabilities. It also provides easy sharing options with friends and family.
3. Dropbox: Dropbox is a popular cloud storage service that allows you to create shared folders and collaborate with others. While it may not have specific photo organization features like iCloud Photos or Google Photos, it provides a flexible platform for storing and sharing your photos.
4. Microsoft OneDrive: If you are a Windows user, Microsoft OneDrive is an excellent choice. It offers seamless integration with Windows devices and provides automatic photo backup and syncing. With OneDrive, you can easily share your photo library and collaborate with others.
Consider your specific needs, the devices you use, and the features you value the most when choosing a platform for your shared photo library. It’s important to select one that suits your preferences and allows for convenient sharing and collaboration.
Step 2: Create a Shared Album
Once you have chosen the platform you want to use for setting up a shared photo library, it’s time to create a shared album. This album will act as a centralized hub where you and your selected participants can upload, view, and manage the shared photos.
To create a shared album, follow these simple steps:
- Open the photo app or the platform’s designated sharing application on your mobile device.
- Look for the option to create a new album. This option is usually found in the “Albums” or “Create” section of the app.
- Give your shared album a name. Choose a name that is descriptive and easily recognizable by all participants.
- Select the photos you want to include in the shared album. You can choose photos from your existing albums or directly from your device’s camera roll.
- Once you have selected the photos, confirm the creation of the shared album. The album will be created and ready for customization.
Creating a shared album not only establishes a central location for all participants to contribute their photos, but it also provides a sense of organization and structure to your shared photo library. You can easily keep track of the photos added by different participants and ensure that everything is in one designated place.
Step 3: Invite Participants
Once you have created a shared album for your photo library, the next step is to invite participants to join in on the fun! Inviting participants is a simple process that allows your friends and family to contribute their own photos to the shared album.
To invite participants, follow these easy steps:
- Navigate to the shared album on your chosen platform.
- Look for the “Invite” or “Add Participants” button.
- Click on the button to open the invitation settings.
- Enter the email addresses or usernames of the people you want to invite.
- Customize the invitation message, if desired, to make it more personal.
- Send the invitations and wait for your friends and family to respond.
It’s important to ensure that you have the correct email addresses or usernames of the people you want to invite. Double-check for any typos or errors to make sure the invitations reach the intended recipients successfully.
Additionally, take the time to add a personal touch to the invitation message. A warm and friendly message can make your participants feel more included and excited to join the shared photo library. Let them know why you’re creating the album, what memories you want to capture, and how their contributions will enrich the experience for everyone.
Once you have sent out the invitations, it’s time to sit back and wait for the responses. Your invitees will receive an email or notification, depending on your chosen platform, inviting them to join the shared album. They can accept the invitation and start adding their own photos to the library.
Remember, the success of a shared photo library relies on the participation of all participants. Encourage your invitees to actively contribute their photos and engage in conversations about the memories shared within the album. The more people actively participate, the more enjoyable and meaningful the shared photo library experience will be for everyone involved.
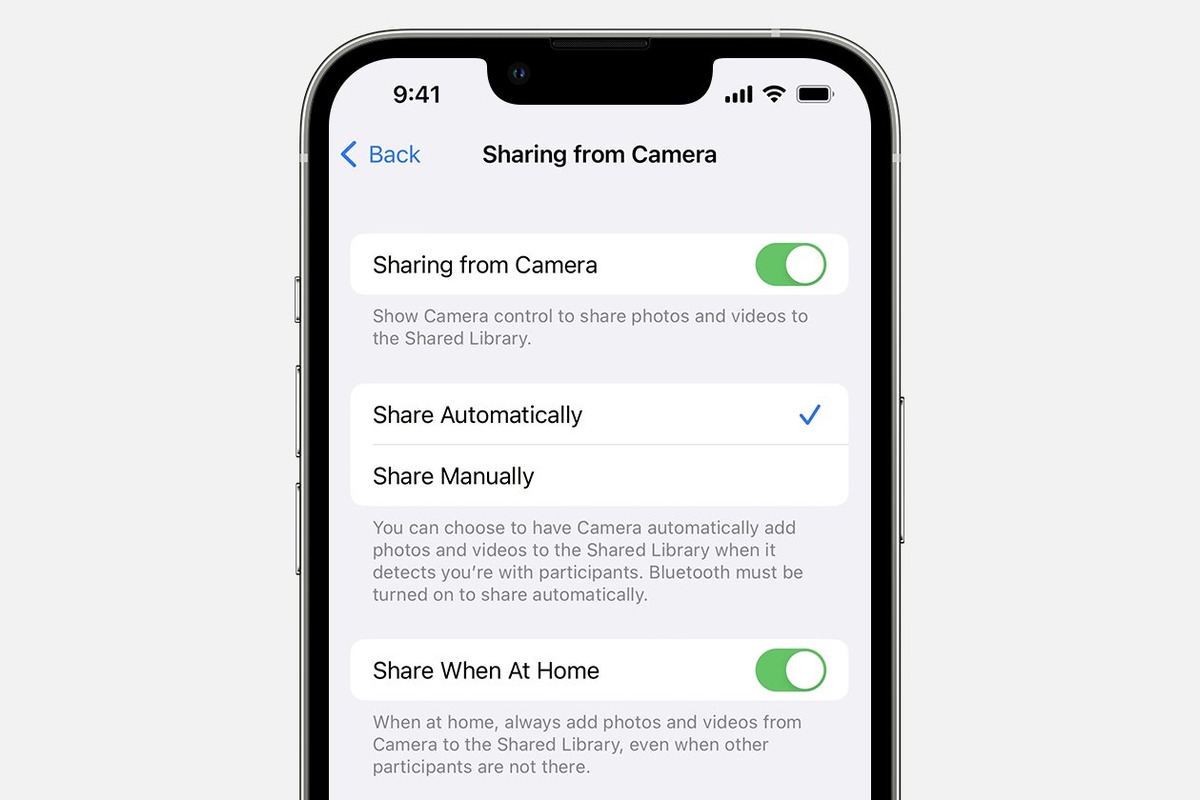
Step 4: Enable Auto-Sharing
Once you have created a shared photo library and invited participants, it’s time to enable auto-sharing. Auto-sharing makes the process of adding and sharing photos with the group effortless and efficient. Instead of manually selecting and sharing each photo, the auto-sharing feature automatically adds any new photos to the shared album and distributes them among the participants.
To enable auto-sharing, follow these simple steps:
- Open the shared photo library in your mobile app or on the web.
- Navigate to the settings or preferences section within the library.
- Look for the option to enable auto-sharing.
- Toggle the switch or checkbox to turn on auto-sharing.
Enabling auto-sharing ensures that any new photos taken or added to your personal library will be automatically shared with the participants of the shared album. This means that everyone in the group will have access to the latest pictures without any manual intervention.
It’s important to note that enabling auto-sharing may require granting permissions to the photo library app or the platform you are using. This is typically a one-time setup process and ensures seamless sharing going forward.
Auto-sharing also allows participants to contribute to the shared album by adding their own photos. This collaborative approach enhances the overall experience and encourages everyone to actively participate and share their favorite moments.
Remember to review any privacy settings and ensure that auto-sharing aligns with your preferences. You may have the option to limit the visibility or access of the shared album to only invited participants or specific groups.
By enabling auto-sharing, you save time and effort while keeping everyone in the shared photo library up-to-date with the latest memories. It’s a convenient and hassle-free way to create a collective album with your friends, family, or colleagues.
Now that you have enabled auto-sharing, you’re ready to move on to the next step: customizing sharing options. This allows you to personalize how the photos are shared and accessed by the participants in the shared photo library.
Step 5: Customize Sharing Options
Once you have created a shared album and invited participants, it’s time to customize the sharing options to ensure your photo library is shared exactly how you want it to be. Customizing the sharing options allows you to have more control over who can access and contribute to the shared album. Here are some key steps to consider:
1. Set Privacy Settings: Determine the level of privacy you prefer for your shared album. You can choose to make it completely public, so anyone with the link can view and contribute, or you can make it more private by requiring participants to request access. This ensures that only trusted individuals can join the shared album.
2. Restrict Editing Rights: If you want to delegate control over the shared album, you can restrict editing rights to specific individuals. This is useful if you want to maintain the overall organization and prevent any accidental deletions or modifications by other participants.
3. Enable Commenting and Sharing: Decide whether you want participants to be able to leave comments on your shared photos. Enabling commenting allows for a more interactive and engaging experience. Additionally, you can choose whether participants can further share the shared album with others or if they need your permission to do so.
4. Manage Notifications: Take control of the notifications you receive regarding the shared album. You can choose to receive notifications for new uploads, comments, or any changes made to the album. This helps you stay updated and in the loop about the activity happening within the shared photo library.
5. Customize Album Appearance: Consider personalizing the appearance of the shared album. Some platforms offer options to add a cover photo, change the layout, or apply filters. Customizing the album’s appearance can make it more visually appealing and unique.
6. Review and Adjust Settings: Before finalizing the sharing options, it’s essential to review and double-check all the settings you have customized. Ensure they align with your preferences and reflect the level of privacy and control you desire.
By customizing the sharing options, you can create a shared photo library that caters to your specific needs and preferences. It allows you to share and enjoy your memories with the right people, while maintaining control over who can access, contribute, and make changes to the shared album.
Step 6: Start Sharing and Enjoy!
Now that you have set up your shared photo library and enabled auto-sharing, it’s time to start sharing those precious moments with your loved ones. Follow these simple steps to begin the sharing process and enjoy the experience:
1. Choose the photos you want to share: Open your photo library and select the photos or albums you want to share. You can choose to share individual photos, entire albums, or even specific moments captured in your timeline.
2. Select the recipients: Decide who you want to share the photos with. You can choose from the list of participants you previously invited or add new recipients. Make sure to include everyone who would appreciate seeing the shared photos.
3. Add a personal touch: Before hitting the ‘Share’ button, consider adding some personal messages or captions to the photos. This will make the shared photos even more meaningful and memorable for the recipients.
4. Set the privacy preferences: Depending on the platform or app you are using, you may have different privacy options. Choose whether you want the photos to be visible to everyone, only to the participants, or to a specific group of people. It’s important to ensure the privacy settings align with your preferences.
5. Hit the ‘Share’ button: Once you have selected the photos, recipients, and set the privacy preferences, it’s time to hit that ‘Share’ button and let the magic happen. The shared photos will now be visible to the selected recipients, allowing them to relive those precious moments together.
6. Enjoy the experience: Sit back, relax, and enjoy the joy of sharing your photos with your loved ones. You can now reminisce about those special moments, receive comments and reactions, and engage in conversations with the participants. It’s a wonderful way to strengthen bonds and create lasting memories.
By following these steps and starting the sharing process, you can make the most out of your shared photo library. Whether it’s sharing family vacation pictures, capturing milestones, or preserving cherished memories, the shared photo library with auto-sharing is a fantastic way to stay connected and relive special moments with your dear ones.
In conclusion, setting up a shared photo library with auto-sharing is a great way to simplify and streamline the process of sharing photos with friends and family. By utilizing the power of mobile apps, you can easily create a centralized hub for all your photos, allowing everyone to access and enjoy them in one place.
Whether you’re planning a family reunion, documenting your travels, or simply wanting to share memories with loved ones, the convenience and efficiency of auto-sharing make it a must-have feature. It eliminates the need for manual sharing and ensures that everyone has instant access to the latest photos.
With the advancements in technology and the widespread use of smartphones, creating a shared photo library has never been easier. Take advantage of the numerous apps available and start sharing your memories effortlessly.
FAQs
1. What is a shared photo library with auto-sharing?
A shared photo library with auto-sharing is a feature that allows multiple users to contribute and access photos in a single shared album. Auto-sharing ensures that any new photos added to the library are automatically shared with all the members, making it convenient for everyone to stay updated with the latest pictures.
2. How can I set up a shared photo library with auto-sharing?
To set up a shared photo library with auto-sharing, you can follow these steps:
1. Choose a platform or app that offers this feature, such as Google Photos or iCloud.
2. Create a shared album and invite the desired members to join.
3. Enable the auto-sharing feature, which will automatically share any new photos added to the album with all the members.
4. Customize the album settings, such as privacy options and access permissions, if available.
3. Can I control who can add photos to the shared library?
Yes, most shared photo library platforms and apps offer options to control who can add photos to the shared library. You can set specific permissions for each member, allowing only selected individuals to contribute new photos. This ensures that the shared library remains organized and only contains relevant content.
4. Are there any limitations or restrictions on file size or format in a shared photo library?
Depending on the platform or app you are using, there may be limitations or restrictions on file size and format in a shared photo library. Some apps may automatically compress large files or limit the file size for easier sharing. It’s important to check the specifications and settings of the chosen platform or app to understand any limitations beforehand.
5. Can I remove or revoke access to the shared photo library?
Yes, as the owner or administrator of the shared photo library, you have the ability to remove or revoke access to the library. If there is a member who you no longer want to have access to the library, you can remove them from the shared album. This ensures that you have control over the content and the members who can view and contribute to the library.