
Managing contacts on your iPhone can become a daunting task, especially if you have a long list of connections. Fortunately, with the help of the built-in Contacts app, you can organize your contacts efficiently by creating groups. Grouping your contacts allows for easier navigation and ensures that you can quickly find and reach out to specific individuals or sets of contacts.
In this article, we will explore the step-by-step process of putting contacts into groups on your iPhone. Whether you want to create groups for work colleagues, friends, or family members, mastering this feature will simplify your contact management and help you stay organized. So, let’s dive in and discover how you can optimize your iPhone’s contact management capabilities!
Inside This Article
- Overview of Contacts and Groups on iPhone
- Step 1: Open the Contacts App
- Step 2: Create a New Group
- Step 3: Add Contacts to the Group
- Step 4: Remove Contacts from a Group
- Step 5: Edit or Delete a Group
- Step 6: Organize and Manage Your Contact Groups
- Troubleshooting: Common Issues and Solutions
- Conclusion
- FAQs
Overview of Contacts and Groups on iPhone
Managing your contacts efficiently is essential for staying organized and maximizing your productivity on your iPhone. The Contacts app on your iPhone allows you to store and access all of your contacts in one place, but did you know that you can also create contact groups to further organize your contacts?
Contact groups on iPhone are a fantastic feature that enables you to group related contacts together, making it easier to send messages, make calls, or organize events with specific sets of people. Whether you want to create a group for your family, friends, coworkers, or any other category, the Contacts app provides a seamless way to do so.
With contact groups, you can send messages to multiple people at once, without having to manually select each contact. It’s also a useful way to filter your contacts to view specific groups, which can save you time and effort in finding the right people when you need them.
In this article, we will walk you through the process of creating and managing contact groups on your iPhone. We’ll also provide some troubleshooting tips for common issues that users may encounter. So, if you’ve been looking for a way to organize your contacts more efficiently on your iPhone, you’ve come to the right place!
Step 1: Open the Contacts App
Opening the Contacts app on your iPhone is the first step to creating and managing contact groups. Here’s how you can do it:
1. Unlock your iPhone and locate the Contacts app.
2. Tap on the Contacts app icon, which is usually a silhouette of a head and shoulders.
3. The Contacts app will open, displaying your list of contacts.
4. You can scroll through your contacts by swiping up or down on the screen. Alternatively, you can use the search bar at the top to quickly find a specific contact.
5. To access additional options and settings, tap on the “Groups” button located in the upper left corner of the screen. This will allow you to view and manage your contact groups.
By opening the Contacts app, you have now set the stage to create and organize contact groups on your iPhone.
Step 2: Create a New Group
Creating a new group in your iPhone’s Contacts app allows you to organize your contacts more efficiently and have better control over your phonebook. Follow these simple steps to create a new group:
- Open the Contacts app on your iPhone.
- Tap on the “Groups” button located at the top left corner of the screen.
- You will see a list of available groups. Scroll down to the bottom of the list and tap on “Add Group.”
- Enter a name for your new group. Choose a name that clearly represents the contacts you plan to add to this group (e.g., “Work Colleagues,” “Family,” “Friends,” etc.).
- Once you have entered the name, tap on “Done” to create the group.
And there you have it! You have successfully created a new group in your iPhone’s Contacts app. Now you can start adding contacts to this group and keep your contacts organized and easily accessible.
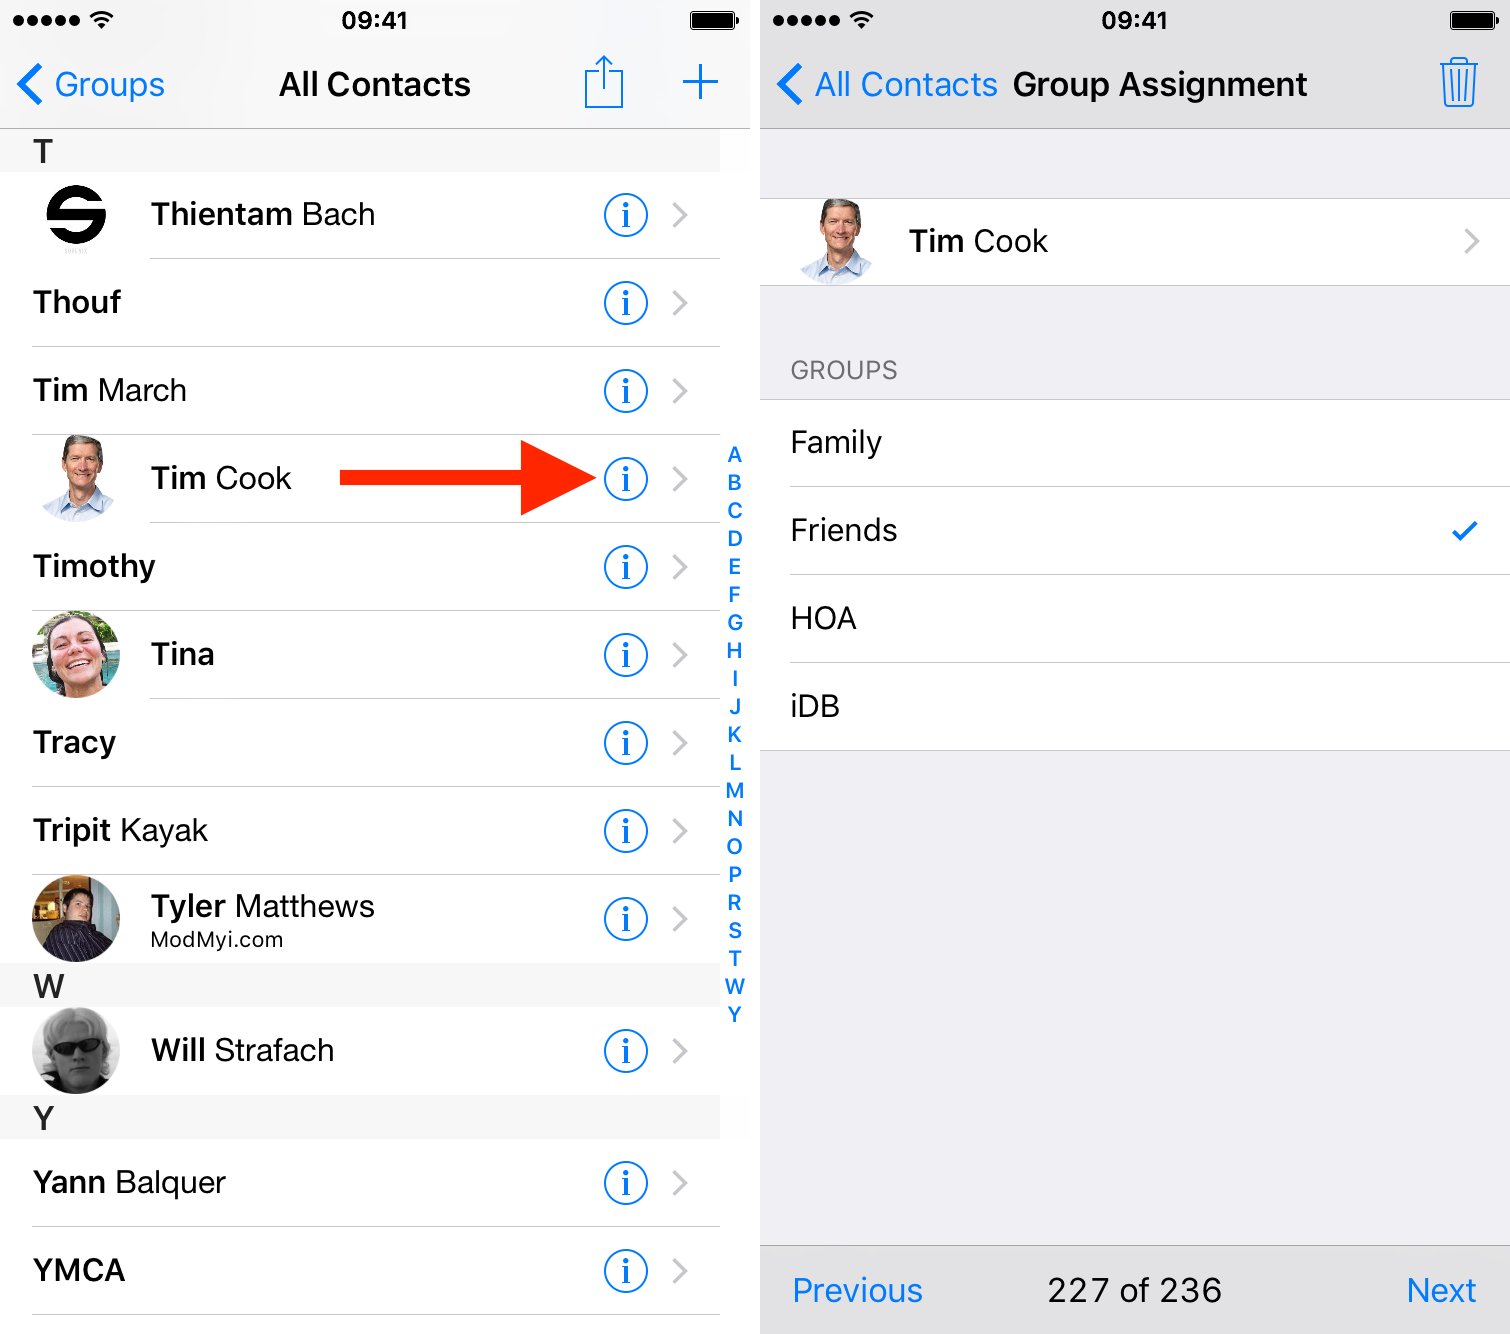
Step 3: Add Contacts to the Group
Adding contacts to a group on your iPhone is a simple and convenient way to organize your contacts based on categories, relationships, or any other criteria that suits your needs. Follow these steps to add contacts to a group:
- Open the Contacts app on your iPhone. You can find it on your home screen or by swiping down and using the Spotlight search.
- Select the “Groups” option at the top left corner of the screen. This will display a list of your existing contact groups.
- Choose the group to which you want to add contacts. If you haven’t created a group yet, refer to Step 2 to create one.
- Tap on the “Add Contact” button, usually represented by a plus (+) sign, located at the bottom center of the screen.
- A list of your contacts will appear. Scroll through the list or use the search bar at the top to find the contact you wish to add to the group.
- Select the contact by tapping on their name. You can add multiple contacts to the group by tapping on each one.
- After selecting the contacts, tap on the “Done” button at the top right corner of the screen to add them to the group.
And there you have it! Your selected contacts are now added to the group on your iPhone. You can repeat these steps to add more contacts to the same group or create additional groups to further organize your contacts.
Step 4: Remove Contacts from a Group
Once you have created and organized your contact groups on your iPhone, you may find the need to remove certain contacts from a particular group. This can be especially useful when a contact’s information changes or when you realize that a contact no longer belongs in a specific group. Follow these simple steps to remove contacts from a group:
1. Open the Contacts app on your iPhone.
2. Tap on the “Groups” option located at the top left corner of the screen. This will display a list of all your contact groups.
3. Select the group from which you want to remove contacts. Tap on the name of the group to access its contacts.
4. Now, scroll through the list of contacts within the selected group until you find the contact that you want to remove.
5. Once you locate the contact, tap on it to open its details.
6. In the contact details, you will find an option that says “Remove from Group” or “Remove from [Group Name]”. Tap on this option.
7. A confirmation prompt will appear, asking if you want to remove the contact from the group. Tap “Remove from Group” to confirm the removal.
8. The contact will now be removed from the selected group and will only be listed under the “All Contacts” section.
9. Repeat these steps for any additional contacts you wish to remove from the group.
It’s important to note that removing a contact from a group does not delete the contact from your iPhone entirely. The contact will still be available in the “All Contacts” section, as well as in any other groups it may belong to.
By removing contacts from a group, you can ensure that your contact lists are always accurate and up-to-date. Whether you need to remove contacts from a business group, family group, or any other customized group, following these steps will help you keep your groups well-organized and streamlined.
Step 5: Edit or Delete a Group
Once you have created a group in your iPhone’s Contacts app, you might need to make changes to it or remove it entirely. Follow these steps to edit or delete a group on your iPhone:
1. Open the Contacts app on your iPhone.
2. Tap on the “Groups” button located in the top left corner of the screen.
3. A list of all your contact groups will appear. Scroll through the list and find the group you want to edit or delete.
4. To edit the group, tap on the “i” button next to the group name.
5. You will now see the details of the group. To edit the name of the group, tap on the “Group Name” field and make the necessary changes. You can also add or remove contacts from the group by tapping on the “Add Contacts” or “Remove Contacts” options.
6. After making the desired changes, tap on the “Done” button to save your modifications.
7. If you want to delete the group entirely, scroll down to the bottom of the group details screen and tap on the “Delete Group” option. Confirm your decision by tapping on the “Delete Group” button when prompted.
8. Once you have edited or deleted the group, you will be taken back to the contact groups list. The changes you made will be automatically saved.
That’s it! You have successfully edited or deleted a group on your iPhone. Now you can keep your contact groups organized and up to date.
Step 6: Organize and Manage Your Contact Groups
Once you have created and added contacts to your groups on your iPhone, it’s important to know how to effectively organize and manage them. Here are some tips to help you stay organized:
1. Rename your contact groups: To easily identify and differentiate your groups, you can rename them. Simply go to the Contacts app, tap on “Groups” at the top left corner, and tap on the group you want to rename. Then, tap on “Edit” and enter the new name for the group.
2. Reorder your contact groups: You can change the order of your contact groups to suit your preferences. To do this, go to the Contacts app, tap on “Groups”, and tap on “Edit” at the top right corner. Drag and drop the groups into the desired order and tap “Done” when finished.
3. Merge or split contact groups: If you find that you have similar contact groups or want to combine multiple groups into one, or split a large group into smaller ones, you can easily do so. Go to the Contacts app, tap on “Groups”, and tap on “Edit” at the top right corner. From there, you can choose to merge or split groups as needed.
4. Share contact groups: If you work collaboratively or want to share a specific contact group with others, you can do so by using the iCloud sharing feature. Simply go to the Contacts app, tap on “Groups”, and tap on the group you want to share. Then, tap on “Share Group” and choose the sharing method that best suits your needs, such as AirDrop, Messages, or Mail.
5. Backup your contact groups: It’s always a good idea to backup your contact groups to ensure you don’t lose any important information. You can do this by using iCloud backup or third-party apps that specialize in contact backups. This way, you can easily restore your contact groups if something goes wrong or if you switch to a new iPhone.
6. Remove duplicate contacts: Over time, you may end up with duplicate contacts in your groups. To keep your contact list clean and organized, it’s important to regularly check for and remove any duplicates. You can do this manually by reviewing your contacts or by using third-party apps that can help you identify and merge duplicate contacts.
7. Stay updated with contact changes: If you have added contacts to groups and their information changes (such as phone number or email address), it’s important to keep your contact groups updated. Make sure to regularly check for any changes and update the contact details in the relevant group to ensure accurate and up-to-date information.
By following these tips and staying organized, you can effectively manage your contact groups on your iPhone and ensure that your contacts are easily accessible and up-to-date.
Troubleshooting: Common Issues and Solutions
While organizing your contacts into groups on your iPhone can be a handy way to manage your contacts efficiently, you may encounter certain issues along the way. Let’s take a look at some common problems that users face and explore possible solutions:
Issue 1: Unresponsive Contacts App
If you find that the Contacts app is unresponsive or freezes when you try to create or edit groups, there are a few steps you can take to resolve the issue. First, make sure that your iPhone’s software is up to date. Go to Settings > General > Software Update and check for any available updates. If an update is available, install it and then try accessing the Contacts app again. If the issue persists, try force closing the app by double-clicking the home button (or swiping up from the bottom on iPhones without a home button) to view the app switcher. Then, swipe up or right to close the Contacts app, and relaunch it to see if it functions properly.
Issue 2: Contacts Not Syncing
If you create or edit groups on your iPhone but find that the changes do not sync across your other devices, the first thing to check is your iCloud settings. Go to Settings > [Your Name] > iCloud and ensure that the Contacts toggle switch is turned on. If it is on, try toggling it off and then back on again. This can sometimes refresh the sync process and resolve any syncing issues. Additionally, make sure that you have a stable internet connection, as poor connectivity can affect syncing between devices.
Issue 3: Duplicate Contacts
Having duplicate contacts in your groups can cause confusion and clutter. If you notice duplicate contacts, there are a few ways to deal with them. One option is to use the built-in “Merge Contacts” feature on your iPhone. Open the Contacts app, find the duplicate contact, tap on it, and select “Edit”. Scroll down and tap on “Link Contacts” or “Merge” to combine the duplicate entries. Alternatively, you can use third-party contact management apps available on the App Store, which offer more advanced features for identifying and merging duplicate contacts.
Issue 4: Group Names Not Displaying
In some instances, you may experience an issue where group names do not display correctly or appear missing. This can make it difficult to identify and select the desired group when adding or removing contacts. To address this problem, try restarting your iPhone by holding down the power button until the “slide to power off” option appears. Slide to power off, wait a few seconds, and then press and hold the power button again to turn your iPhone back on. This simple restart can often resolve minor software glitches and restore proper display of group names in the Contacts app.
Issue 5: Group Contacts Disappearing
If you notice that contacts within a specific group are disappearing or not showing up, it could be due to a filter setting. Open the Contacts app and tap on “Groups” at the top left corner of the screen. Make sure that all the desired groups are selected with a checkmark. If a group is not selected, tap on it to enable it. This will ensure that all contacts within the selected groups are visible and accessible in the Contacts app.
By being aware of these common issues and their solutions, you can troubleshoot and resolve any problems that may arise while organizing your contacts into groups on your iPhone. Remember to always keep your iPhone updated, check your iCloud settings, and utilize available features and apps to manage duplicate contacts effectively. With these tips, you’ll be well-equipped to maximize the efficiency of your contacts management system on your iPhone.
Conclusion
Organizing your contacts into groups on your iPhone can be a convenient way to keep your address book neat and organized. Not only does it make it easier to find specific contacts, but it also allows you to send messages or make calls to multiple contacts at once.
By following the simple steps outlined in this article, you can easily create and manage contact groups on your iPhone. Whether you want to group your family members, colleagues, or classmates, the Contacts app provides a seamless and efficient way to keep your contacts in order.
So, take advantage of this feature and simplify your communication process. Start creating groups on your iPhone today and enjoy the benefits of a well-organized contact list!
FAQs
1. Can I create contact groups on my iPhone?
Yes, you can create contact groups on your iPhone. This feature allows you to organize your contacts and easily access them based on different categories or criteria.
2. How do I create a contact group on my iPhone?
To create a contact group on your iPhone, follow these steps:
- Open the Contacts app on your iPhone.
- Tap on the “Groups” button at the top-left corner of the screen.
- Scroll down and tap on “New Group”.
- Enter a name for your new group and tap “Done”.
- Now, you can add contacts to the group by selecting them and tapping on “Done”.
3. Can I edit or delete a contact group on my iPhone?
Yes, you can edit or delete a contact group on your iPhone. To do so, follow these steps:
- Open the Contacts app on your iPhone.
- Tap on the “Groups” button at the top-left corner of the screen.
- Locate the group you want to edit or delete.
- For editing, tap on the group name and make the necessary changes. Tap “Done” when finished.
- For deleting, swipe left on the group name and tap “Delete”. Confirm the deletion if prompted.
4. Can I add a contact to multiple groups on my iPhone?
No, you cannot add a contact to multiple groups directly on your iPhone. However, you can create a duplicate contact and add it to a different group. This way, you can have the same contact in multiple groups without altering the original information.
5. How can I access my contact groups on my iPhone?
To access your contact groups on your iPhone, follow these steps:
- Open the Contacts app on your iPhone.
- Tap on the “Groups” button at the top-left corner of the screen.
- You will see a list of available groups. Tap on the group name to view the contacts assigned to that group.