
Managing your contacts is an essential part of using a mobile phone, and iPhones make it incredibly convenient to edit and update your contact information. Whether you need to add a new phone number, change an email address, or update a contact’s name, the iPhone provides a user-friendly interface that allows you to make these edits with ease. In this article, we will guide you through the step-by-step process of editing a contact on your iPhone. With just a few taps, you’ll be able to keep your contacts up to date and ensure that you can easily reach out to the important people in your life. Let’s dive in and discover how to effortlessly edit a contact on your trusty iPhone.
Inside This Article
- Preparing to Edit a Contact – Opening the Contacts app on your iPhone – Locating the contact you want to edit – Understanding the different contact details available for editing
- Editing Contact Details: Modifying the contact’s name, phone number, or email address; Adding additional phone numbers or email addresses; Editing the contact’s photo or ringtone; Changing the contact’s address or other miscellaneous details
- Advanced Contact Editing Options
- Saving Changes and Syncing with iCloud
- Conclusion
- FAQs
Preparing to Edit a Contact – Opening the Contacts app on your iPhone – Locating the contact you want to edit – Understanding the different contact details available for editing
Before you can start editing a contact on your iPhone, you need to prepare yourself by familiarizing yourself with the Contacts app. To get started, locate and tap on the Contacts app on your iPhone’s home screen. It is typically represented by a small icon with the outline of a person’s upper body.
Once you have opened the Contacts app, you will need to find the specific contact that you want to edit. The Contacts app displays a list of all your contacts in alphabetical order, making it easy to search for a particular name. You can scroll through the list manually or use the search bar at the top of the screen to quickly find the contact you need.
When you have located the contact you want to edit, tap on their name to open their contact details. The contact’s information will now be displayed on the screen, showing their name, phone number, email address, and other relevant details. This is where you can make changes to the contact’s information and update it according to your needs.
It’s important to understand the different contact details that are available for editing. Apart from the basic information such as the contact’s name, phone number, and email address, you can also edit additional details like the contact’s photo, ringtone, and address. This allows you to personalize and customize the contact’s information to make it more relevant and useful to you.
Editing Contact Details: Modifying the contact’s name, phone number, or email address; Adding additional phone numbers or email addresses; Editing the contact’s photo or ringtone; Changing the contact’s address or other miscellaneous details
One of the most essential tasks when managing your contacts on an iPhone is editing their details. Whether you need to update your friend’s phone number or add a new email address for a colleague, the process is straightforward and user-friendly. In this section, we will explore the various ways to modify and enhance contact details on your iPhone.
To begin, open the Contacts app on your iPhone. It’s usually represented by an icon with a silhouette of a person. Once inside the app, locate the contact that you wish to edit. You can search for them by scrolling through the contacts list or using the search bar.
Once you’ve found the contact, tap on their name to access their contact details. From here, you will see various options for editing their information. To modify the contact’s name, phone number, or email address, simply tap on the corresponding field and make the necessary changes.
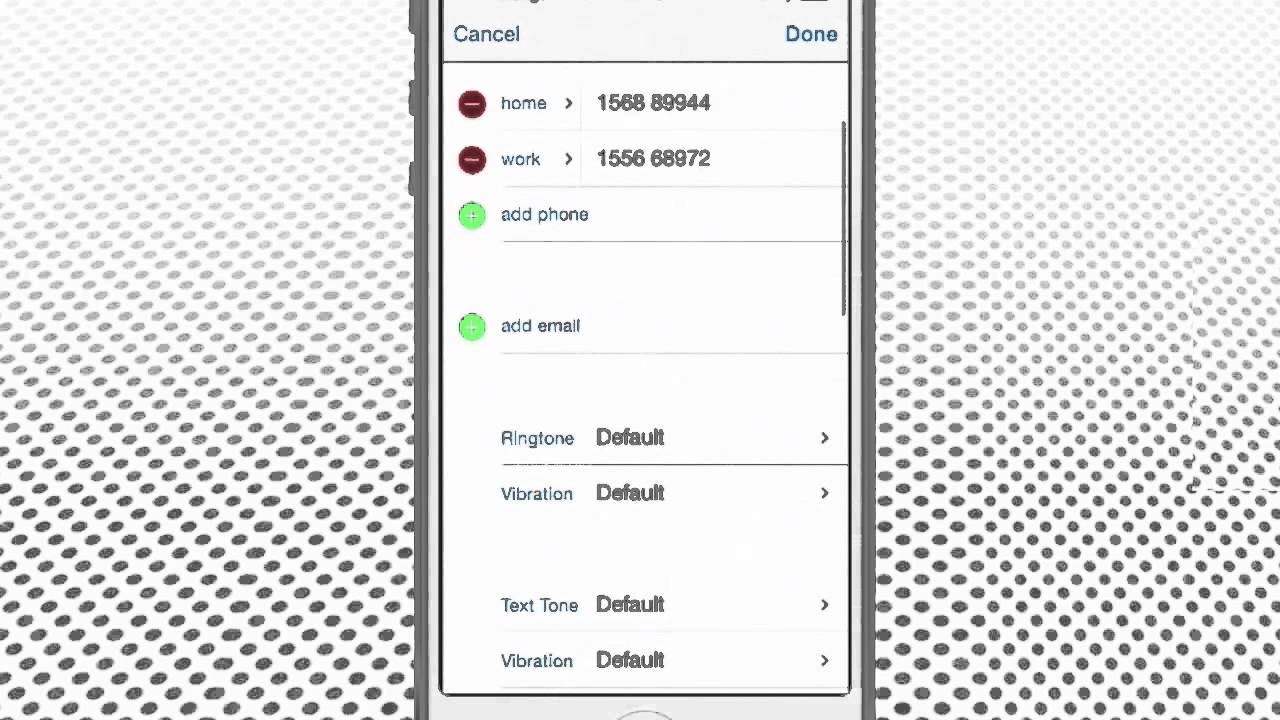
Adding additional phone numbers or email addresses to a contact is also a breeze. Tap on the “Add Phone” or “Add Email” option, depending on the information you want to add. Enter the new phone number or email address, and make sure to select the appropriate label (such as “Mobile” or “Work”) to categorize it correctly.
If you want to personalize the contact further, you can edit their photo or ringtone. To change the contact’s photo, tap on the circular thumbnail located at the top of the contact’s details. You can either select a new photo from your photo library or take a new one using your iPhone’s camera. To change the contact’s ringtone, scroll down to the “Ringtone” section and select your preferred sound.
Additionally, you can modify the contact’s address or other miscellaneous details. To edit the address, tap on the field labeled “Address” and enter the updated information. For other details, such as a birthday or job title, tap on the “Edit” button to access more options.
Remember, you can always preview your changes by scrolling through the contact’s details and reviewing the modified information. If everything looks correct, tap the “Done” button to save your changes.
It’s worth noting that all the changes made to a contact will be synced with your iCloud account if you have it set up. This ensures that your contacts are updated across all your Apple devices. If you haven’t set up iCloud, consider doing so in order to maintain a seamless experience when editing contacts.
By following these steps, you can effortlessly edit and update contact details on your iPhone. Whether it’s modifying names, adding phone numbers, changing photos, or updating addresses, keeping your contacts organized and up to date is a valuable part of managing your iPhone effectively.
Advanced Contact Editing Options
When it comes to managing your contacts on your iPhone, there are several advanced editing options that can help you stay organized and easily access the people you communicate with most often. Here are some of the advanced contact editing features you can explore:
Linking multiple contacts together
Have you ever wanted to merge the information from multiple contacts into one cohesive entry? With the iPhone’s linking feature, you can do just that. Simply navigate to the first contact you want to link and tap on the “Edit” button. Scroll down and select “Link Contacts,” then choose the other contacts you want to merge. This will consolidate all their information into a single entry, making it easier to manage.
Setting a contact as a favorite or adding them to a specific group
To quickly access your most important contacts, you can mark them as favorites. This will place them in a separate section within the Contacts app, allowing you to easily find and message or call them. Additionally, you can create custom groups to further organize your contacts. For example, you could create a group for work colleagues or family members, making it simpler to send group messages or emails.
Blocking or unblocking a contact
If you no longer wish to receive calls, messages, or FaceTime requests from a specific contact, you can block them on your iPhone. Simply open the contact and scroll down to the bottom. Tap on “Block this Caller” and confirm your decision. Conversely, if you’ve previously blocked a contact but decide to unblock them, you can easily do so by following the same steps and selecting “Unblock this Caller.”
Creating custom labels for contact details
While the Contacts app offers pre-defined labels for contact details such as phone numbers and email addresses, you also have the option to create custom labels. This allows you to categorize and organize your contacts’ information in a way that makes sense to you. To create a custom label, simply open the contact, tap on the contact detail you want to label, and select “Add Custom Label.” Enter the desired label and save your changes.
These advanced contact editing options can greatly enhance your contact management experience on your iPhone. Whether you need to consolidate multiple contacts, prioritize important individuals, or personalize contact labels, these features provide the flexibility and customization you need.
Saving Changes and Syncing with iCloud
Once you have made the necessary edits to a contact on your iPhone, it is important to save the changes and ensure they are synced with your iCloud account. This will not only keep your contacts updated across all your devices but also serve as a backup for future reference.
To confirm the changes made to a contact, simply tap on the “Save” button located at the top right corner of the screen. This will update the edited contact and reflect the modifications you’ve made. It is important to double-check the changes before saving to ensure accuracy.
After saving the changes, the next step is to synchronize the contact updates with your iCloud account. iCloud is Apple’s cloud storage and synchronization service that allows you to access your contacts, among other data, from any Apple device linked to your account.
To sync your contact updates with iCloud, follow these steps:
- Go to the “Settings” app on your iPhone
- Scroll down and tap on your Apple ID at the top of the screen
- Select “iCloud” from the menu
- Toggle the “Contacts” switch to the ON position
Once the “Contacts” switch is enabled, any changes made to your contacts will be automatically synced with your iCloud account. This means that the edited contact will be available on all your Apple devices, including your iPhone, iPad, and Mac.
Furthermore, syncing with iCloud ensures that your contacts are backed up for future reference. In case you lose or change your iPhone, you can easily retrieve your contacts by signing in to your iCloud account on a new device.
It is important to regularly backup your contacts to ensure you don’t lose any valuable information. By syncing with iCloud, you can rest assured that your contacts are securely stored and easily recoverable when needed.
Saving changes and syncing with iCloud is a simple yet crucial step in effectively managing your contacts on your iPhone. By following these steps, you can ensure that your contact updates are seamlessly synchronized across your devices and backed up for peace of mind.
Conclusion
In conclusion, editing a contact on your iPhone is a simple process that can be done in just a few steps. Whether you need to update contact information, add a new contact, or delete an existing one, the built-in Contacts app on your iPhone provides all the necessary tools to manage your contacts efficiently.
By following the steps outlined in this article, you can easily navigate through your contacts and make any necessary changes or updates. With just a few taps and swipes, you will have your contacts organized and up-to-date, ensuring that you can easily reach out to the important people in your life.
Remember to regularly back up your contacts to iCloud or another backup service to prevent the risk of losing any valuable information. By keeping your contacts updated and backed up, you can ensure a seamless and hassle-free experience when it comes to managing your iPhone’s contact list.
FAQs
Q: Can I edit a contact directly from my iPhone?
A: Absolutely! Your iPhone allows you to easily edit and update your contacts directly from the Contacts app.
Q: How do I edit a contact on my iPhone?
A: To edit a contact on your iPhone, follow these steps:
- Open the Contacts app on your iPhone.
- Select the contact you want to edit from the list.
- Tap the “Edit” button in the top right corner of the screen.
- Make the necessary changes to the contact details, such as name, phone number, email address, etc.
- Tap “Done” when you’re finished making the changes.
The contact will be updated with the new information in your iPhone’s address book.
Q: Can I add a photo to a contact on my iPhone?
A: Yes, you can easily add a photo to a contact on your iPhone. Simply follow the steps above to edit the contact, and then tap the placeholder image or the camera icon to add a photo from your photo library or take a new photo using your iPhone’s camera.
Q: Can I delete a contact from my iPhone?
A: Yes, deleting a contact from your iPhone is simple. Just open the Contacts app, select the contact you want to delete, tap the “Edit” button, then scroll to the bottom of the contact details and tap “Delete Contact”. Confirm the deletion by tapping “Delete Contact” again. Please note that this action cannot be undone, so be careful when deleting contacts.
Q: Can I restore a deleted contact on my iPhone?
A: If you have deleted a contact from your iPhone accidentally, don’t worry! You can easily restore it using iCloud. Open the Settings app on your iPhone, tap your name at the top of the screen, select “iCloud”, then toggle on the “Contacts” option. Your deleted contact will be restored to your iPhone’s address book from your iCloud backup.