
Sharing lists in the Reminders app on your iPhone can be incredibly useful, whether you’re collaborating on a project with friends or simply need to keep your family organized. With just a few taps, you can easily share your to-do lists, grocery lists, or any other lists you create in the Reminders app with others.
In this article, we’ll guide you through the process of sharing a list in Reminders on your iPhone. We’ll show you how to invite others to access and edit your lists, and how to manage their permissions. So whether you want to plan a trip with your travel buddies, coordinate household chores with your family members, or collaborate on tasks with your work colleagues, we’ve got you covered.
So, let’s dive in and unlock the power of list sharing in the Reminders app on your iPhone!
Inside This Article
- Adding a List in Reminders
- Sharing a List with Others
- Collaborating on a List
- Managing Shared Lists
- Conclusion
- FAQs
Adding a List in Reminders
The Reminders app on your iPhone is a powerful tool that can help you stay organized and keep track of your tasks. One of its useful features is the ability to create different lists for various purposes, such as personal to-do lists, shopping lists, or work-related tasks. Adding a new list in Reminders is quick and easy, allowing you to customize and organize your tasks effortlessly.
To add a new list in Reminders, follow these simple steps:
- Open the Reminders app on your iPhone.
- Tap on the plus sign (+) icon located in the top right corner of the screen to create a new reminder.
- A new window will appear. Tap on “New List” at the top.
- Enter a name for your new list in the text field provided.
- You can also add a description or notes for the list, if desired.
- Choose a color for the list by tapping on the color palette icon.
- Once you’re satisfied with the details, tap on “Done” to create the list.
That’s it! You’ve successfully added a new list to your Reminders app. The list will now appear in the main screen of the app, and you can start adding tasks to it or customize its settings further.
Creating separate lists for different purposes can help you stay organized and efficiently manage your tasks. With the ability to assign due dates, set reminders, and prioritize tasks, the Reminders app becomes a valuable tool to keep you on track and ensure nothing slips through the cracks.
Now that you have a new list in Reminders, it’s time to explore other features and functionalities of the app. Stay tuned for more helpful tips and tricks to make the most out of your iPhone’s Reminders app!
Sharing a List with Others
Sharing a list in the Reminders app on your iPhone is a fantastic way to keep everyone on the same page and ensure effective collaboration. Whether you’re coordinating a grocery list with a roommate or planning a project with colleagues, the ability to share lists can make a world of difference. Here’s a step-by-step guide on how to effortlessly share a list with others on your iPhone:
Step 1: Open the Reminders App
The first thing you need to do is open the Reminders app on your iPhone. The app icon looks like a white notepad with colorful checkmark circles on it.
Step 2: Create a New List
If you haven’t already created a list, you’ll need to do so before you can share it. Tap on the “+” button in the top-right corner to add a new list. Give your list a name and press “Done” when you’re finished.
Step 3: Access the List Sharing Options
Once you have a list created, you’ll see it listed in the main Reminders view. Tap on the list to open it. At the top-right corner of the screen, look for the ellipsis (three dots) symbol. Tap on it to access the list’s options.
Step 4: Share the List
In the list options menu, you’ll see a “Share List” option. Tap on it to proceed.
Step 5: Choose Contacts to Share With
Your iPhone will now display a list of contacts that you can choose from to share the list. You can select multiple contacts by tapping on them. If you can’t find the person you want to share the list with, you can use the search bar at the top to find and add them.
Step 6: Set Sharing Permissions
After selecting the contacts, you’ll be prompted to choose their sharing permissions. By default, the “Can View & Edit” option is selected, allowing others to view and make changes to the list. However, if you only want them to view the list without editing it, you can select the “Can View” option.
Step 7: Send the Invitation
Once you’ve chosen the contacts and set the sharing permissions, you’re ready to share the list. Tap on the “Share” button to send the invitation to the selected contacts.
Step 8: Collaborate and Manage Shared Lists
Now that the list is shared, the recipients will receive an invitation to join. They can accept the invitation, and the shared list will appear in their Reminders app. From there, everyone can collaborate, add new tasks, check off completed items, and stay updated in real-time.
It’s worth noting that you can also manage your shared lists in the Reminders app. To do so, return to the list options menu by tapping the ellipsis symbol, then select “Stop Sharing” to revoke access or “Add People” to invite new contacts.
Sharing lists in the Reminders app on your iPhone makes coordinating tasks and staying organized with others a breeze. By following these simple steps, you’ll be able to seamlessly share lists and collaborate with friends, family, and colleagues.
Collaborating on a List
If you’re someone who likes to work together with others on tasks or projects, collaborating on a list can be incredibly useful. The Reminders app on your iPhone provides you with the ability to share lists with contacts, allowing you to stay organized and productive as a team.
Here’s how you can collaborate on a list using the Reminders app:
- Open the Reminders app on your iPhone.
- Tap on the list that you want to share.
- Click on the ellipsis (…) icon at the top right corner.
- Select the “Add People” option.
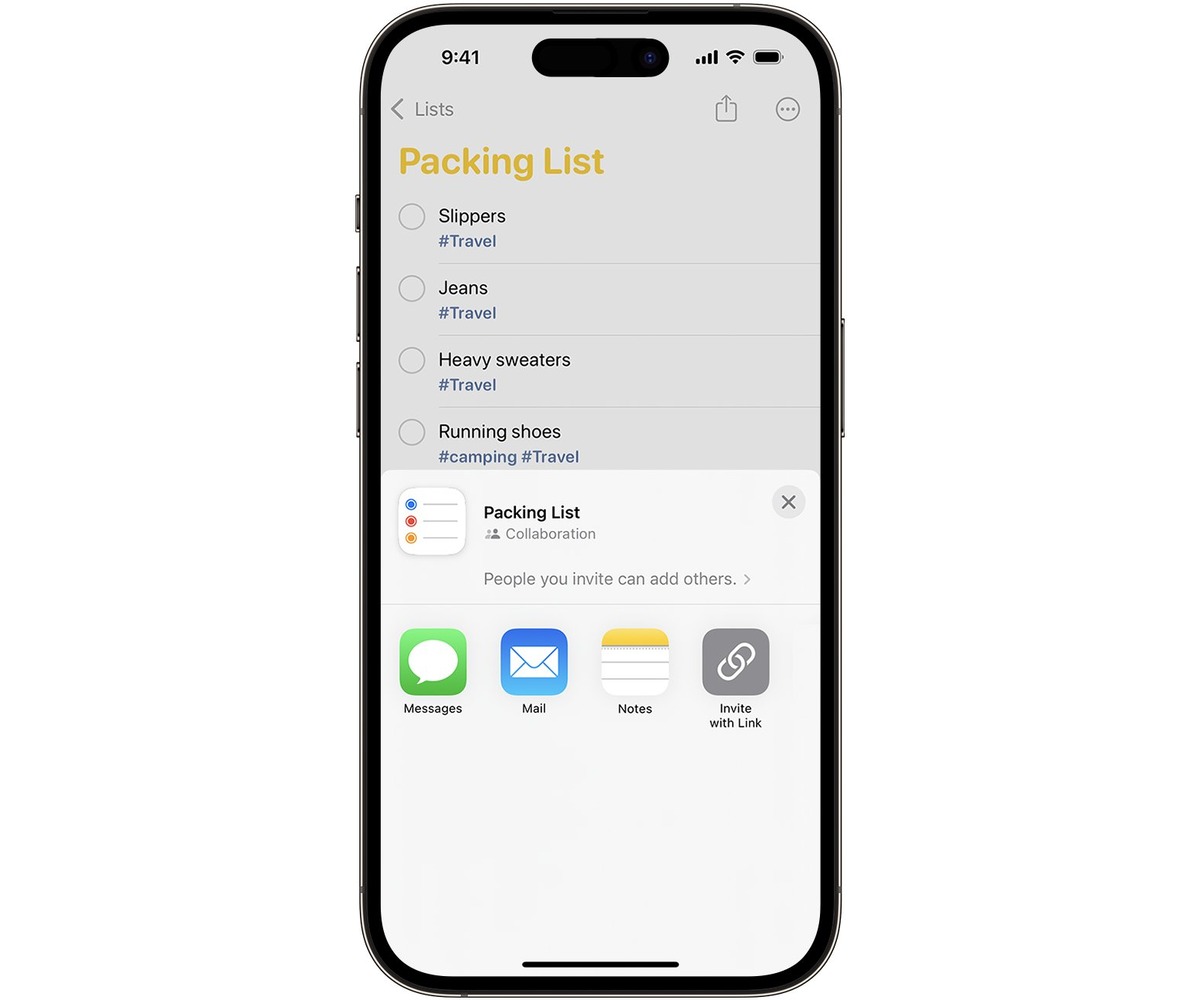
- You will then be prompted to choose how you want to share the list – via AirDrop, Messages, Mail, or other available options.
- Choose your preferred sharing method and select the contact(s) with whom you want to collaborate on the list.
- Once you’ve selected the contact(s), they will receive a notification to join the shared list. They can accept the invitation and start collaborating with you.
When you collaborate on a list with someone, you can both add, edit, and check off items in real-time. This feature is perfect for shared household tasks, group projects, or even to-do lists for a vacation.
Keep in mind that you can also control the permissions for the shared list. You have the option to allow the contact(s) to make changes to the list or only view it. You can adjust these settings by going back to the list settings and modifying the sharing options.
Collaborating on a list using the Reminders app ensures that everyone involved can stay updated and contribute to the task at hand. Whether it’s a grocery list, a work project, or a shared event itinerary, this feature enables seamless coordination and efficient teamwork.
So, the next time you need to collaborate on a list, give the Reminders app on your iPhone a try. It’s a simple yet powerful tool that will simplify your communication and keep everyone organized.
Managing Shared Lists
Once you have shared a list in the Reminders app on your iPhone, there are various ways to manage and interact with the shared list. Let’s explore some of the key features and options available:
1. Inviting Others to Collaborate: If you want to invite more people to collaborate on the shared list, you can easily do so. Simply open the shared list, tap on the “Add Person” icon, and select the contacts you want to invite. They will receive a notification and can start collaborating with you.
2. Setting Permissions: The Reminders app allows you to set different permissions for each collaborator. Depending on their role, you can choose to give them full access or restrict them to only viewing or editing the list. This ensures that everyone has the appropriate level of control over the shared list.
3. Editing Shared Lists: All collaborators can make changes to a shared list, including adding or deleting items, updating due dates, or marking tasks as completed. Any changes made by one person will be instantly synced and visible to all other collaborators using the shared list.
4. Commenting and Communication: In addition to editing tasks, the Reminders app also allows collaborators to communicate with each other through comments. You can leave notes, ask questions, or discuss specific tasks all within the shared list. This feature helps streamline communication and keep everyone on the same page.
5. Notifications: The Reminders app sends notifications to all collaborators whenever there are updates or changes to the shared list. This ensures that everyone stays informed about any modifications made by other people involved. You can also adjust your notification settings to best suit your preferences.
6. Unsharing a List: If you want to stop sharing a list with someone, you have the option to unshare it. Open the shared list, tap on the “Edit” button, select the person’s name, and tap on the “Stop Sharing” option. This will remove their access to the list and can be done at any time.
By effectively managing shared lists in the Reminders app on your iPhone, you can collaborate seamlessly with others and stay organized. Whether you are working on a project with colleagues or planning an event with friends and family, the Reminders app provides a convenient and efficient way to stay connected and productive.
The ability to share lists in the Reminders app on your iPhone is a convenient and efficient way to collaborate with others and stay organized. By following the simple steps outlined in this article, you can easily share lists with friends, family, or colleagues and ensure that everyone stays on the same page.
Whether you’re planning a trip with your loved ones, coordinating a work project, or simply making a grocery list together, the shared list feature in Reminders allows everyone involved to contribute, edit, and check off tasks in real-time.
No more confusion or miscommunication. With the ability to share lists, you can streamline your workflow, keep everyone informed, and accomplish tasks more efficiently. So go ahead, give it a try, and experience the power of collaboration with the Reminders app on your iPhone.
FAQs
1. How do I share a list in Reminders on my iPhone?
To share a list in Reminders on your iPhone, follow these steps:
1. Open the Reminders app on your iPhone.
2. Tap on the list you want to share.
3. Tap the “Edit” button in the top-right corner.
4. Scroll down and tap on “Add People”.
5. Choose a sharing method – you can use Messages to send an invitation, or you can generate a link and share it through various apps.
6. Enter the contact name or phone number of the person you want to share the list with.
7. Select the permissions you want to grant – “View & Edit” or “View Only”.
8. Tap “Add” or “Send” to share the list.
Please note that the recipient needs to have the Reminders app installed on their iPhone to access the shared list.
2. Can I share a list with someone who doesn’t have an iPhone?
Yes, you can share a list with someone who doesn’t have an iPhone. When sharing a list in Reminders, you have the option to generate a link and share it via various apps. The recipient can then access the list using the link on their device, regardless of whether they have an iPhone or not.
3. Can I remove someone’s access to a shared list?
Yes, you can remove someone’s access to a shared list. To do this, follow these steps:
1. Open the Reminders app on your iPhone.
2. Tap on the shared list.
3. Tap the “Edit” button in the top-right corner.
4. Scroll down and find the person’s name or contact.
5. Swipe left on their name or contact.
6. Tap the “Remove” option that appears.
By removing someone’s access, they will no longer be able to view or edit the shared list.
4. Can I control the permissions for each person I share a list with?
Yes, you can control the permissions for each person you share a list with. When adding people to a shared list in Reminders, you have the option to choose between “View & Edit” or “View Only” permissions. The “View & Edit” permission allows the person to make changes to the list, while the “View Only” permission only allows them to view the list without making any edits.
5. How can I stop sharing a list in Reminders?
To stop sharing a list in Reminders, follow these steps:
1. Open the Reminders app on your iPhone.
2. Tap on the shared list.
3. Tap the “Edit” button in the top-right corner.
4. Scroll down and find the person’s name or contact.
5. Swipe left on their name or contact.
6. Tap the “Stop Sharing” option that appears.
By stopping sharing, the person will no longer have access to the shared list.