
Are you struggling with how to forward email on your iPhone? Don’t worry, we’ve got you covered! Forwarding emails from your iPhone is a simple process that allows you to share important messages with friends, colleagues, or family members. Whether you need to send a work-related document, an interesting article, or a funny meme, forwarding emails can be done with just a few taps on your iPhone’s screen. In this article, we will guide you through the step-by-step process of forwarding email on iPhone, so you can easily share information and stay connected on the go. So, let’s dive in and learn how to forward email on your iPhone!
Inside This Article
- Setting up Email Forwarding
- Forwarding Email Manually
- Using Rules to Automatically Forward Email
- Considerations and Limitations
- Conclusion
- FAQs
Setting up Email Forwarding
Setting up email forwarding on your iPhone is a simple process that allows you to receive emails from one account and have them automatically forwarded to another account. This can be especially useful if you have multiple email addresses and want to consolidate your communications in one place.
To set up email forwarding on your iPhone, follow these steps:
- Open the “Settings” app on your iPhone.
- Scroll down and tap on “Mail.”
- Tap on “Accounts” or “Passwords,” depending on your iOS version.
- Select the email account you want to set up forwarding for.
- Tap on “Forwarding” or “Forwarding and POP/IMAP.”
- Tap on “Add Forwarding Address.”
- Enter the email address you want to forward your emails to.
- Tap on “Next” and then confirm the forwarding address.
- Go back to the previous screen and enable the “Forwarding” toggle switch.
- Adjust any additional forwarding settings if necessary.
- Exit the settings menu and your email forwarding will be set up.
Once the email forwarding has been set up, any new emails received by the original account will be automatically forwarded to the designated email address. This ensures that you won’t miss any important messages while keeping your inbox organized.
It’s worth noting that the process for setting up email forwarding may vary slightly depending on the email provider you are using. Some email providers may require you to set up forwarding through their web interface rather than directly on your iPhone. Make sure to consult your email provider’s documentation or support for specific instructions.
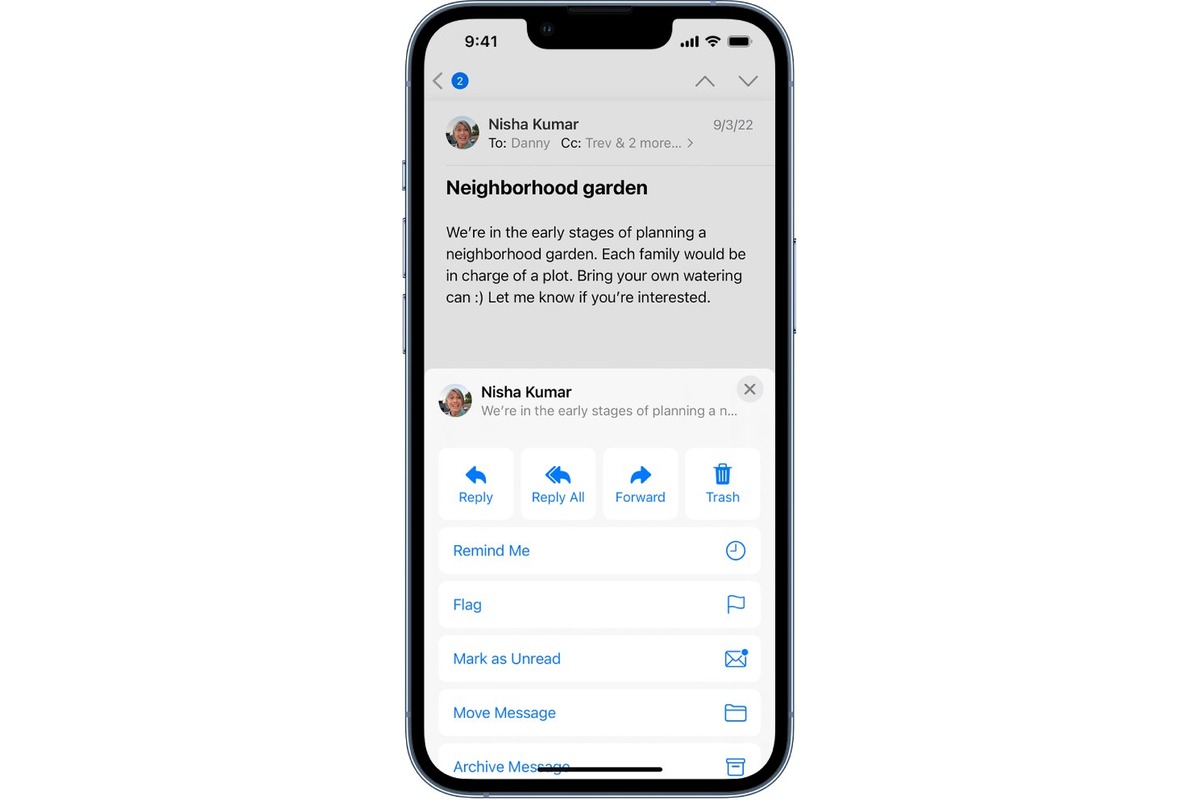
Forwarding Email Manually
Forwarding an email manually on your iPhone is a straightforward process. Just follow the simple steps below:
1. Open the Mail app on your iPhone. You can find it on your home screen, usually with a white envelope icon.
2. Navigate to the email you want to forward. You can find your emails by selecting the appropriate mailbox or by using the search function at the top of the screen.
3. Once you have found the email you want to forward, open it by tapping on it.
4. At the bottom of the email, you will see a toolbar with various options. Tap the arrow icon pointing towards the right.
5. A new window will appear with the recipient field. Enter the email address of the person you want to forward the email to.
6. You can also add any additional comments or explanations in the body of the email if needed.
7. Finally, tap the “Send” button to forward the email. The forwarded email will be sent to the recipient you specified.
That’s it! You have successfully forwarded an email manually on your iPhone.
Using Rules to Automatically Forward Email
Do you find yourself constantly forwarding emails to the same recipients? If so, using rules to automatically forward email on your iPhone can save you time and effort. By setting up specific conditions and actions, you can streamline your email workflow and ensure that important messages always reach the right people.
To start using rules to automatically forward email, follow these simple steps:
- Open the Mail app on your iPhone.
- Navigate to the Inbox or the folder where the email you want to forward is located.
- Select the specific email or multiple emails that you want to set up the forwarding rule for.
- Tap the “More” option, usually represented by three dots (…) located at the bottom right corner of the screen.
- Choose “Create Rule” from the list of options that appear.
- In the “Create Rule” menu, you will see different conditions and actions to choose from. Conditions specify the criteria that must be met for the rule to be applied, while actions outline what should happen when the condition is met.
- Select the appropriate condition(s) for your rule. For example, you can choose to forward emails from a specific sender, with specific keywords in the subject line, or based on other criteria.
- Next, select the action of forwarding the email. You can choose to forward the email to one or multiple recipients, either within your Contacts or by manually entering their email addresses.
- Once you have set up the conditions and actions, tap “Done” to save the rule.
From now on, whenever an email meets the specified conditions, it will be automatically forwarded to the designated recipients. This can be incredibly useful for various purposes, such as forwarding important work emails to your colleagues, sharing specific updates with a team, or simply archiving messages in other mailboxes.
It’s important to note that the rules for automatically forwarding email are specific to the Mail app on your iPhone. They do not affect the settings on other devices or email clients. Additionally, you can create multiple rules to cater to different scenarios or combinations of conditions and actions.
Using rules to automatically forward email on iPhone can be a game-changer for those who rely heavily on email communication. By customizing and automating the forwarding process, you can save time, prevent important messages from slipping through the cracks, and keep your inbox organized.
Considerations and Limitations
While forwarding email on your iPhone can be a convenient way to manage and organize your messages, it’s important to be aware of some considerations and limitations. Here are a few things to keep in mind:
- Compatibility: Forwarding email may depend on the type of email account you have. Some email providers may not support automatic forwarding or have restrictions in place.
- Security: Forwarding emails can potentially expose sensitive information to unintended recipients. Make sure to review the content of the email before forwarding it and ensure that the recipient is trustworthy.
- Email formatting: Depending on the email client or service, forwarded emails may lose formatting or display differently to the new recipient. This can result in broken links, missing images, or altered text formatting.
- Replying and forwarding: Keep in mind that when you reply to a forwarded email, the response might only be sent to the original sender, rather than all the recipients of the forwarded email. Similarly, forwarding an email that contains a thread or conversation may break the chain of replies.
- Storing duplicates: If you regularly forward emails and keep copies in your inbox, you might end up with duplicate copies of the same message. This can clutter your mailbox and make it harder to find specific emails later on.
- Unintended consequences: Automatic forwarding can have unintended consequences, especially if you have set up rules or filters that automatically forward certain types of emails. It’s important to regularly review and update your rules to avoid forwarding sensitive or irrelevant information.
Considering these limitations and taking necessary precautions will help you make the most out of email forwarding on your iPhone while ensuring the security and integrity of your communications.
In conclusion, forwarding email on your iPhone is a simple and convenient process that can help you stay organized and share important information with ease. Whether you need to send an email to a colleague, forward a funny joke to a friend, or share an important document, your iPhone makes it effortless to do so. By following the steps outlined in this article, you can confidently forward emails on your iPhone and take full advantage of this versatile device. So go ahead, try it out and unlock the full potential of your iPhone by mastering the art of email forwarding!
FAQs
1. Can I forward emails on my iPhone?
Yes, you can forward emails on your iPhone. The Mail app on your iPhone allows you to easily forward emails to other recipients.
2. How do I forward an email on my iPhone?
To forward an email on your iPhone, open the Mail app and select the email you want to forward. Then, tap the forward arrow icon at the bottom of the screen. Enter the recipient’s email address and add any additional message if needed. Finally, tap the send button to forward the email.
3. Can I forward multiple emails at once on my iPhone?
Unfortunately, the Mail app on the iPhone does not have a built-in feature to forward multiple emails at once. However, you can forward each email individually by following the steps mentioned in the previous FAQ.
4. Are there any limitations when forwarding emails on the iPhone?
When forwarding emails on your iPhone, it is important to note that any attachments included in the original email will also be forwarded. However, keep in mind that some email providers or email clients may have size limits for attachments, so large attachments may not be successfully forwarded.
5. Can I customize the forwarded email message on my iPhone?
Yes, you can customize the forwarded email message on your iPhone. After selecting the email to forward, you can modify the content of the email before sending it by tapping on the body of the email and making any desired changes.