
Are you a fan of face filters? If you own an iPhone, you’re in luck! Apple’s iPhone camera app offers a plethora of face filters that can transform your self-portraits and selfies into fun and unique creations. From animal faces to funky accessories, these filters add an extra layer of excitement to your photos. In this article, we’ll guide you on how to get face filters on your iPhone camera and take your photography game to the next level. Whether you’re an avid social media user or just love experimenting with filters, these tips and tricks will help you make the most out of your iPhone’s camera capabilities. So, grab your iPhone and let’s dive into the world of face filters!
Inside This Article
- How To Get Face Filters On iPhone Camera
- Enable Face Filters in Camera Settings
- Access Face Filters in the Camera App
- Explore and Use Different Face Filters
- Edit and Share Your Face Filter Photos
- Conclusion
- FAQs
How To Get Face Filters On iPhone Camera
Face filters have become a popular way to add fun and creativity to photos and videos. If you are an iPhone user, you may be wondering how to get face filters on your iPhone camera. Well, you are in luck! With a few simple steps, you can easily enable face filters and start using them to enhance your photos and selfies.
The first thing you need to do is ensure that face filters are enabled in your iPhone camera settings. To do this, open your Settings app and scroll down until you find the “Camera” option. Tap on it to open the camera settings. Look for the “Filters” option and make sure it is toggled on.
Once you have enabled face filters in your camera settings, open the Camera app on your iPhone. You will notice a new option at the top of the screen that looks like a smiling face or a star icon. This is the face filters icon. Tap on it to access the different face filters available.
Now that you have accessed the face filters, it’s time to explore and use them. Swipe left or right on the screen to browse through the different filters. You will see a live preview of each filter on your face as you swipe. Choose the one that you like the most.
Once you have selected a face filter, you can start taking photos or recording videos with the filter applied. The filter will automatically track your face and adjust accordingly, adding a fun and interactive element to your captures. Experiment with different poses and expressions to make the most of the face filters.
After capturing your photos or videos with the face filters, you can also edit them further. The iPhone camera app provides built-in editing tools that allow you to crop, apply additional filters, adjust brightness, and more. You can make your photos even more stunning before sharing them with others.
When you are satisfied with your edited photo or video, it’s time to share it with the world. You can easily share your face filtered creations directly from the camera app to social media platforms like Instagram or Facebook. Just tap on the share icon and choose the platform you want to share it on.
Face filters on the iPhone camera provide an entertaining and creative way to make your photos and videos stand out. With just a few simple steps, you can enable and access face filters on your iPhone camera. So, why not give it a try and have some fun with your selfies?
Enable Face Filters in Camera Settings
Face filters have become increasingly popular on social media platforms, allowing users to add fun and creative effects to their photos. If you’re an iPhone user looking to tap into the world of face filters, you’re in luck! Enabling face filters in your iPhone camera settings is a simple process that will unlock a whole new level of creativity for your photography. Here’s how you can do it:
1. Open the “Settings” app on your iPhone and scroll down until you find the “Camera” option. Tap on it to access the camera settings.
2. In the Camera settings, you will see a toggle button labeled “Filters.” Make sure this toggle is switched on to enable face filters in your camera app.
3. Once you have enabled the face filters, exit the settings app and open the camera app on your iPhone.
4. In the camera app, you will notice a small square icon located at the top right corner of the screen. Tap on this icon to activate the face filters.
5. Congratulations! You have successfully enabled face filters in your iPhone camera settings. You can now begin exploring and using different face filters to add a touch of fun and creativity to your photos.
It’s worth noting that the availability of face filters may vary depending on your iPhone model and the version of iOS you are using. Some filters may require the latest iOS updates or specific camera features that are only available on newer iPhone models.
Now that you know how to enable face filters in your iPhone camera settings, let’s move on to the next section to learn how to access and use these filters in the camera app.
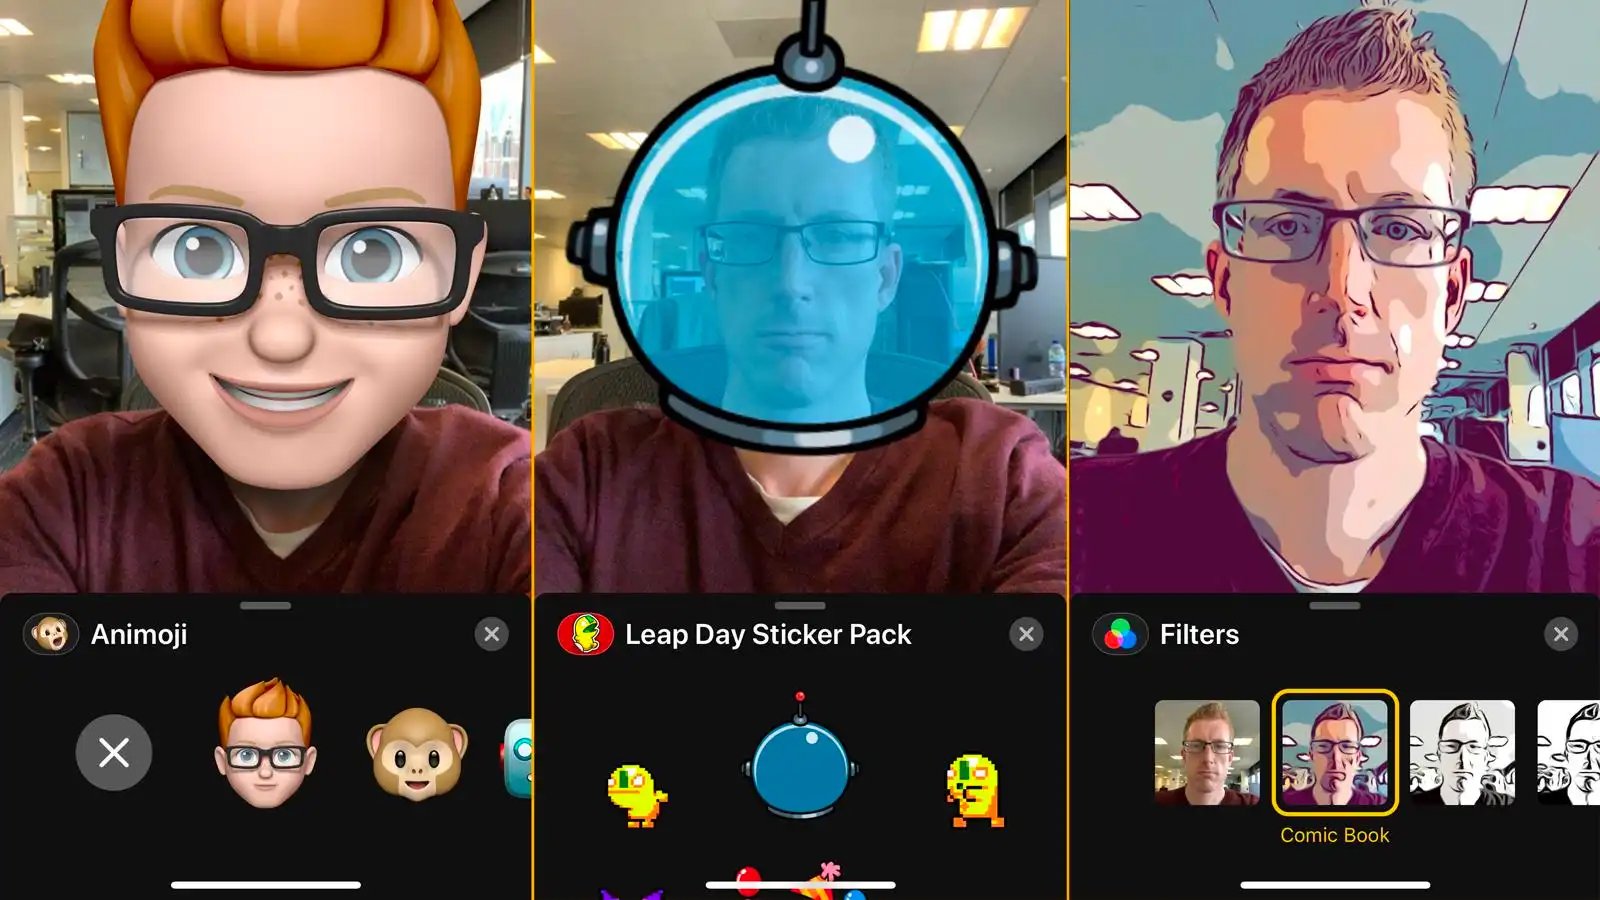
Access Face Filters in the Camera App
One of the great features of modern iPhones is the ability to apply face filters directly within the camera app. Whether you want to add some fun and whimsy to your selfies or unleash your creative side, accessing face filters is a breeze. By following a few simple steps, you can take your photos to the next level.
To access face filters in the camera app, open the camera on your iPhone and switch to the front-facing camera mode. This is usually indicated by an icon of a camera with two arrows in a circular pattern. Once in the front-facing camera mode, you will see a row of icons at the bottom of the screen.
Look for the icon that resembles a smiley face or a face mask. Tap on this icon to access the face filters feature. It may be labeled as “Filters,” “Effects,” or something similar. Once you tap on the icon, a menu will appear, displaying a variety of face filters that you can choose from.
Scroll through the available options to explore different face filters. You will find filters that add virtual accessories like hats, glasses, or even animal features to your face. Some filters may alter your appearance entirely or overlay artistic effects on your photos.
To apply a face filter, simply tap on the filter of your choice. The camera will real-time preview the effect on your face. You can experiment with different filters to find the one that suits your mood or desired look. Once you’re satisfied with the filter, you can capture a photo or record a video using the filter.
Remember to adjust the composition and lighting of your shot to enhance the overall appearance. The face filters are designed to work best under well-lit conditions, so try to find good lighting when capturing your pictures.
Once you’ve taken a great photo or video with the face filter, you can save it to your camera roll or share it directly with your friends and family. The camera app provides options to edit or crop your photo, add captions, or apply additional filters if desired.
Now that you know how to access face filters on your iPhone camera app, let your imagination run wild. Have fun exploring the different filters and adding your unique touch to your selfies and photos. Get ready to capture some memorable moments while showcasing your creativity!
Explore and Use Different Face Filters
Once you have enabled face filters in your iPhone camera settings and accessed the camera app, it’s time to have some fun exploring the variety of face filters available. With a wide range of options, you can transform your face in unique and exciting ways.
To start exploring the different face filters, swipe left or right on the screen. Each swipe will reveal a new filter, giving you plenty of options to choose from. Whether you want to look like a cute animal, a popular movie character, or experiment with crazy effects, the possibilities are endless.
As you swipe through the available face filters, take some time to preview each one. This will help you decide which filter best suits your mood or the intended style of your photo. You may even discover filters that you hadn’t considered before, adding an unexpected touch of creativity to your pictures.
Once you’ve found a face filter that catches your eye, simply tap on the screen to apply it. The filter will instantly transform your face, overlaying various effects or elements to create a unique look. Some face filters may even include animations or interactive elements that add an extra layer of fun to your photos.
Feel free to experiment with different face filters to see which ones you like the most. Remember, there’s no right or wrong choice here – it’s all about expressing your creativity and capturing amazing photos that stand out.
When using face filters, don’t hesitate to experiment with different poses or expressions to enhance the overall effect. Play around with angles and lighting to create stunning and engaging shots that highlight the face filter’s features.
Once you’ve captured your perfect shot with a face filter, you can save it to your photo library or share it directly with your friends and family. The sharing options may vary depending on the apps you have installed on your iPhone, but commonly include social media platforms like Instagram, Facebook, and Snapchat.
Remember, the world of face filters is constantly evolving, with new filters being added regularly. So, be sure to keep an eye out for updates and new releases to stay on top of the latest trends and avail yourself of even more exciting face filter options.
Edit and Share Your Face Filter Photos
Once you have taken amazing selfies with face filters on your iPhone camera, you may want to edit them to further enhance their look and share them with friends and family. Fortunately, editing and sharing your face filter photos is a breeze with the intuitive features and functions of the iPhone camera app.
To start editing your face filter photos, simply tap on the photos app on your iPhone to open it. Locate the photo you want to edit and tap on it to open it in full screen. From there, you can access a range of editing options to perfect your face filter photo.
One of the most popular editing features is the ability to adjust the lighting and colors of your photo. You can use the sliders to tweak the brightness, contrast, saturation, and more, ensuring that your face looks vibrant and eye-catching. Additionally, you can crop and rotate your photo to remove any unwanted elements and frame the image just right.
Furthermore, the iPhone offers a variety of fun and creative filters that can be applied to your face filter photos. These filters can enhance the mood and atmosphere of your photos, giving them a unique and personalized look. Experimenting with different filters can add a touch of artistry and style to your images.
Once you are satisfied with the edits, it’s time to share your masterpiece with the world. With the iPhone camera app, you have multiple options for sharing your face filter photos. You can directly share your photos to social media platforms like Instagram, Facebook, or Twitter, or you can send them to your contacts via messaging apps like WhatsApp or iMessage.
Additionally, you can also save your edited face filter photos to your camera roll or iCloud Drive, allowing you to access them across different devices and share them at a later time. This gives you the flexibility to curate your photo gallery and share your favorite moments whenever and wherever you want.
Remember, the key to creating stunning face filter photos is to experiment, have fun, and let your creativity flow. The iPhone camera app offers a wide range of editing tools and sharing options, empowering you to showcase your unique style and personality. So go ahead, capture those beautiful moments, edit them to perfection, and share them with the world!
Conclusion
Face filters have transformed the way we take photos and videos on our iPhones. With a wide range of filters at your disposal, you can add fun and creative elements to your selfies and capture memorable moments with a touch of imagination. From realistic animal masks to whimsical face distortions, there is a filter for every mood and occasion.
By following the steps outlined in this article, you can easily access and use face filters on your iPhone camera. Remember to keep your device updated with the latest iOS version to ensure compatibility and access to the newest filter features. So, unleash your creativity, have fun, and make your photos and videos truly stand out with face filters on your iPhone.
FAQs
1. Can I get face filters on my iPhone camera?
Yes, you can! The iPhone comes with an amazing feature called “Face Filters” that allows you to add fun and creative filters to your selfies and photos. This feature is available in the native camera app on certain iPhone models.
2. How do I access face filters on my iPhone camera?
To access face filters on your iPhone camera, simply open the camera app and switch to the front-facing camera. Then, look for the “Filters” icon, usually represented by a circle with three overlapping circles inside. Tap on it to reveal a variety of face filters that you can choose from.
3. Can I customize the face filters on my iPhone camera?
Absolutely! Apple provides a range of pre-installed face filters for you to choose from, but you can also download additional filters from the App Store. Simply go to the App Store, search for “face filters,” and explore the various filter options available. Once downloaded, these filters can be accessed and used within the camera app.
4. Do all iPhone models support face filters?
No, not all iPhone models support face filters. The feature was first introduced on the iPhone X and has been included in subsequent iPhone models. If you have an older iPhone model, check your device’s specifications or contact Apple to confirm if it supports face filters.
5. Can I use face filters on video calls?
Yes, you can use face filters on video calls! Apps like FaceTime and popular messaging apps such as Snapchat and WhatsApp allow you to apply face filters in real-time during video calls. Simply open the app, start a video call, and look for the face filter options within the video call interface.