
Is your iPhone in need of service? Whether it’s a broken screen, battery issues, or any other technical problem, getting your device repaired is essential to keep it functioning at its best. But before you hand over your beloved iPhone to the service center, there are a few crucial steps you should take to ensure the safety of your personal information, photos, and apps. In this comprehensive guide, we’ll walk you through the process of getting your iPhone ready for service and protecting your valuable data. From backing up your iPhone to disabling Find My iPhone, we’ll cover all the necessary precautions you need to take. So, let’s dive in and make sure your iPhone and personal information are in safe hands during the repair process.
Inside This Article
- Backup Your iPhone
- Remove Your SIM Card
- Disable Find My iPhone
- Erase All Content and Settings
- Conclusion
- FAQs
Backup Your iPhone
Backing up your iPhone is essential before sending it in for service or repair. This ensures that your data, settings, and preferences are safely stored so that you can easily restore them once your iPhone is back in your hands. Here’s how you can backup your iPhone:
- Connect your iPhone to a Wi-Fi network to ensure a stable and fast internet connection.
- Open the “Settings” app on your iPhone.
- Tap on your Apple ID at the top of the screen.
- Scroll down and tap on “iCloud.”
- From the iCloud menu, tap on “iCloud Backup.”
- Toggle the “iCloud Backup” switch on if it’s not already enabled.
- Tap on “Back Up Now” to start the backup process. Make sure you have sufficient storage space in iCloud to accommodate the backup.
- Alternatively, you can connect your iPhone to a computer and use iTunes to back up your device. Simply connect your iPhone to your computer, open iTunes, select your iPhone, and click on “Back Up Now.”
Once the backup process is complete, you can rest easy knowing that your data and settings are safely stored, ready to be restored when needed. It’s always good practice to regularly back up your iPhone to avoid any potential data loss or inconvenience.
Remove Your SIM Card
Removing the SIM card from your iPhone is an important step when getting your iPhone ready for service or repair. The SIM card, or Subscriber Identity Module, is a small card that stores your mobile network provider’s information and allows your iPhone to connect to the cellular network. Here’s how you can safely remove your SIM card:
- Step 1: Locate the SIM card tray. The location of the SIM card tray varies depending on the iPhone model. For most iPhones, you can find the tray on the side of the device. However, if you have an older iPhone model, the tray might be located at the top or bottom.
- Step 2: Insert the SIM eject tool or a paperclip into the small hole next to the SIM card tray. Apply a little pressure to eject the tray.
- Step 3: Gently pull out the SIM card tray from the iPhone.
- Step 4: Remove the SIM card from the tray by pushing it out with your finger.
It’s important to handle the SIM card with care to avoid any damage. Make sure to store the SIM card in a safe place while your iPhone is being serviced or repaired. Once the service or repair is complete, you can simply insert the SIM card back into the iPhone by following the same steps in reverse order.
Removing the SIM card before sending your iPhone for service ensures that your personal information and data remain secure. By removing the SIM card, you prevent anyone from accessing your contacts, messages, and other sensitive information while the device is being repaired. It also helps to avoid any potential mix-ups or confusion with SIM cards in case you are using multiple devices.
Remember to always power off your iPhone before removing the SIM card to prevent any accidental damage or data loss. Taking the time to properly remove and store your SIM card is an important step to ensure a smooth and worry-free service or repair for your iPhone.
Disable Find My iPhone
Find My iPhone is a useful feature that helps you locate and track your iPhone if it gets lost or stolen. However, when it comes to getting your iPhone ready for service, disabling Find My iPhone is a crucial step to ensure a smooth and hassle-free experience. Here’s how you can disable this feature:
- Open the Settings app: Tap on the Settings app on your iPhone’s home screen. It typically has an icon that resembles gears.
- Tap on your Apple ID: Scroll down and select your Apple ID, which is usually located at the top of the Settings menu. It will display your name or the name associated with your Apple account.
- Select “iCloud”: In the Apple ID menu, you’ll find different options like iCloud, iTunes & App Store, and more. Tap on “iCloud” to access the iCloud settings.
- Find “Find My iPhone”: Scroll down and look for the “Find My iPhone” option within the iCloud settings. It is generally located towards the bottom of the list.
- Disable Find My iPhone: Toggle the switch next to “Find My iPhone” to the off position. You might be prompted to provide your Apple ID password to confirm the action.
Once you’ve disabled Find My iPhone, your device is now ready for service. It’s important to note that disabling this feature doesn’t remove your device from your iCloud account. To completely remove your device, you’ll need to erase all content and settings, which will be discussed in the next section.
Erase All Content and Settings
When it comes to getting your iPhone ready for service or if you’re planning to sell or give it away, one crucial step is to erase all content and settings. This ensures that all your personal data and information are completely removed from the device, protecting your privacy and security.
Erase All Content and Settings is a built-in feature in iPhone that allows you to restore your device to its original factory settings. This process erases everything on your iPhone, including apps, photos, messages, contacts, and settings. It essentially returns your iPhone to the state it was in when you first unboxed it.
To perform this action, follow these simple steps:
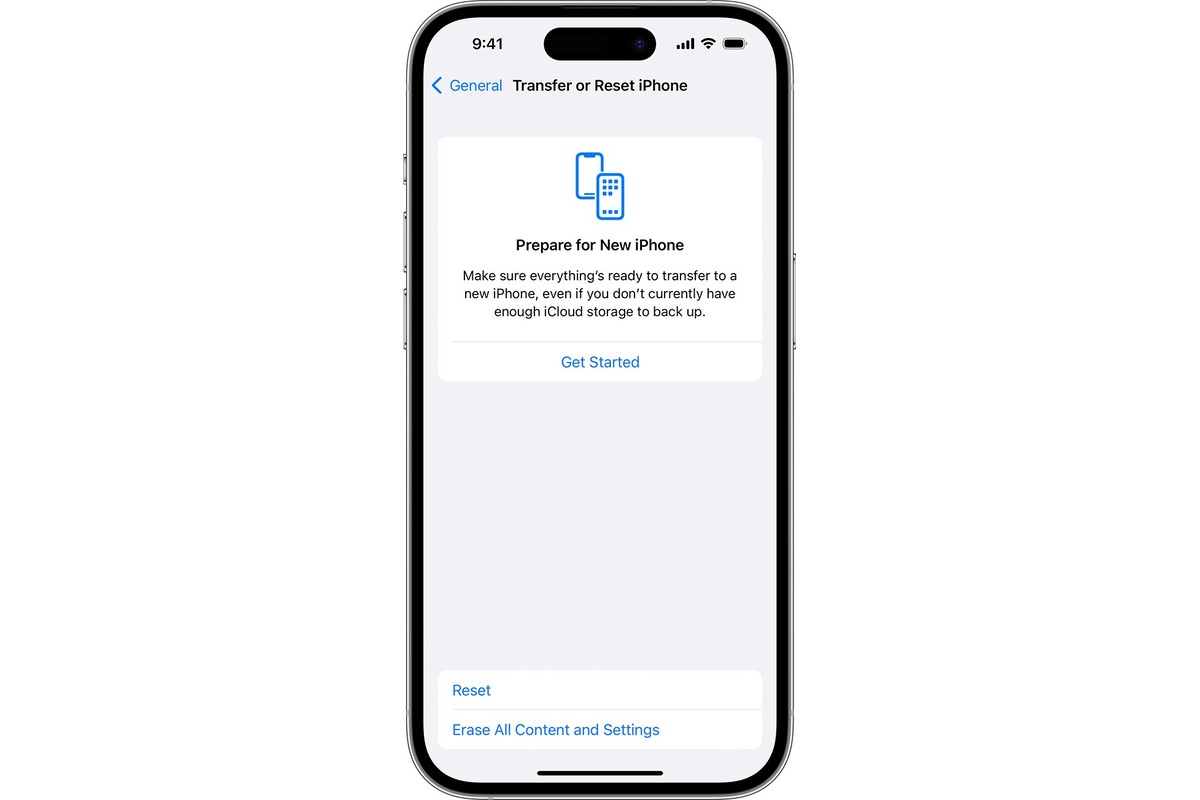
- First, go to the Settings app on your iPhone and tap on “General”.
- Scroll down and select “Reset”.
- At the top of the Reset menu, you’ll find the option “Erase All Content and Settings”. Tap on it.
- A warning message will appear, informing you that this action will delete all media and data. If you’re sure about proceeding, enter your passcode or Apple ID password.
- Next, you’ll be prompted to confirm your selection. Tap on “Erase iPhone” to begin the process.
Keep in mind that the time it takes to erase your iPhone depends on the amount of data stored on it. It could take a few minutes or longer.
Once the process is complete, your iPhone will restart, and you’ll be presented with the initial setup screen, just like when you first got the device. You can now set up your iPhone as new or restore it from a backup.
It’s important to note that erasing all content and settings cannot be undone. Make sure you have backed up any important data before proceeding. Also, remember to remove your SIM card and disable Find My iPhone before performing this action.
By following these steps to erase all content and settings, you can ensure that your iPhone is ready for service, sale, or to pass it on to someone else. Protecting your personal information is crucial, and this simple process helps you achieve that peace of mind.
Conclusion
In conclusion, getting your iPhone ready for service is a crucial step to ensure a seamless experience and protect your valuable information. By following the steps outlined in this article, you can efficiently prepare your device for service, whether it’s a repair, upgrade, or replacement. Remember to back up your data, disable services like Find My iPhone, and remove any personal or sensitive information.
Additionally, take advantage of protective measures like using a passcode or biometric authentication to safeguard your device from unauthorized access. Ensuring that your iPhone is properly prepared for service not only safeguards your privacy but also minimizes the risk of data loss or exposure.
By following these guidelines, you can confidently hand over your device for service, knowing that your information is secure. So go ahead, get your iPhone ready for service, and keep your valuable data protected!
FAQs
1. How can I back up my iPhone before taking it in for service?
Before taking your iPhone in for service, it’s important to back up your data to ensure it is not lost during the repair process. To do this, you can use iCloud or iTunes to create a backup of your iPhone. Simply connect your device to your computer or Wi-Fi network, open iCloud or iTunes, and follow the prompts to make a backup. This will safeguard your photos, videos, contacts, and other important data.
2. Should I remove the SIM card from my iPhone before service?
It is generally recommended to remove your SIM card before taking your iPhone in for service. This is because some repairs may require your device to be completely reset or replaced. By removing the SIM card, you can ensure that your personal information is not accessible to anyone who handles your iPhone during the repair process.
3. How can I protect my iPhone data during service?
To protect your iPhone data during service, it is highly recommended to enable a passcode or use Touch ID/Face ID to secure your device. This way, even if someone has access to your iPhone, they won’t be able to access your personal information without your authorization. Additionally, you can use iCloud to enable Find My iPhone, which allows you to remotely lock or erase your iPhone in case it is lost or stolen during the service process.
4. Can I track the status of my iPhone repair?
Yes, many service providers offer online tracking to allow you to monitor the status of your iPhone repair. You can usually track your repair by entering your repair case or service order number on the service provider’s website. This will give you real-time updates on the progress of your repair, estimated completion time, and other relevant information.
5. What should I do if my iPhone is not covered by warranty?
If your iPhone is not covered by warranty, you have a few options. First, you could consider purchasing AppleCare+ or other extended warranty coverage to protect your device in case of future repairs. Alternatively, you can seek out third-party repair services or independent technicians who may be able to provide more affordable repair options. Just be sure to research and choose a reputable service provider to ensure the quality of the repair.