
Have you ever experienced the frustration of losing all your carefully customized camera settings on your iPhone? It can be quite annoying to have to reconfigure your camera preferences every time you open the app. Luckily, there are ways to preserve your settings in the camera on your iPhone, saving you time and effort.
In this article, we will guide you through the steps to preserve your camera settings on your iPhone, ensuring that your preferred configuration remains intact. Whether it’s adjusting exposure, enabling HDR, or setting a specific shooting mode, we will show you how to maintain your desired settings, providing a seamless photography experience on your iPhone.
Read on to discover the simple techniques that will allow you to preserve your camera settings and capture stunning photos without having to start from scratch each time you open the camera app.
Inside This Article
- Backup Using iCloud
- Backup Using iTunes
- Using Third-Party Camera Apps
- Resetting Camera Settings
- Conclusion
- FAQs
Backup Using iCloud
Backing up your camera settings on your iPhone is essential to ensure that you don’t lose any customized preferences or configurations. One convenient way to preserve your camera settings is by utilizing iCloud, Apple’s cloud storage service. iCloud not only saves your photos and videos but also stores various device settings, including camera settings.
Here’s how you can back up your camera settings using iCloud:
- Open the Settings app on your iPhone.
- Tap on your name at the top of the screen to access your Apple ID settings.
- Select “iCloud” from the menu.
- Scroll down and find the “Photos” option. Make sure it is toggled on.
- Under the Photos section, toggle on the “iCloud Photos” option.
- Wait for your iPhone to sync with iCloud and upload your camera settings.
- Once the upload is complete, your camera settings will be backed up to your iCloud account.
By enabling iCloud Photos, your camera settings will automatically sync to iCloud whenever there is a network connection. This ensures that even if you switch to a new iPhone or restore your current device, you can easily restore your camera settings from iCloud without losing any customizations or adjustments.
Note that if you have limited iCloud storage, you may need to manage your storage settings or consider upgrading to a higher storage plan to accommodate the backup of your camera settings along with your photos and videos.
Using iCloud to back up your camera settings provides a convenient and hassle-free way to preserve your preferences. It ensures that your customized settings are securely stored in the cloud, allowing you to restore them easily whenever needed.
Backup Using iTunes
Another method to preserve your camera settings on your iPhone is by using iTunes. iTunes is a software developed by Apple that allows you to sync and backup your iPhone data to your computer. Follow these steps to backup your camera settings using iTunes:
- Connect your iPhone to your computer using the USB cable.
- Open iTunes on your computer. If you don’t have iTunes installed, you can download it from the Apple website.
- Once your iPhone is connected, click on the device icon that appears in the top-left corner of the iTunes window.
- In the Summary tab, under the Backups section, select “This computer” option.
- To backup your camera settings along with other data on your iPhone, click on the “Back Up Now” button.
- Wait for the backup process to complete. The duration of the backup process may vary depending on the size of your data.
By following these steps, your camera settings will be backed up along with the rest of your iPhone data. This backup can be useful in case you need to restore your device or transfer your settings to a new iPhone.
Using Third-Party Camera Apps
If you’re looking to explore additional camera features and customization options on your iPhone, using third-party camera apps is an excellent option. These apps can provide a wide range of advanced settings and effects that go beyond what the built-in iPhone camera app offers.
There are numerous third-party camera apps available on the App Store, each offering unique features and functionalities. Some popular choices include ProCamera, Camera+, and Halide. These apps often come equipped with manual controls, allowing you to adjust settings like ISO, shutter speed, focus, and exposure.
Additionally, third-party camera apps may offer various shooting modes such as night mode, portrait mode, and long exposure, giving you more flexibility in capturing different types of photographs. These apps also provide advanced editing tools, filters, and presets to enhance your images directly within the app.
Using a third-party camera app is straightforward. Simply download and install the app from the App Store, grant the necessary permissions, and launch the app. Once opened, you can explore the different settings and modes available to find the ones that suit your needs.
It’s important to note that while third-party camera apps can offer an enhanced photography experience, they may have different interfaces and workflows compared to the default iPhone camera app. Take some time to familiarize yourself with the app’s settings and features to make the most out of it.
One advantage of using third-party camera apps is the ability to easily preserve your customized settings. Most of these apps allow you to save your preferred camera configurations as presets, so you can quickly access them for future use. This saves you from having to manually adjust the settings every time you launch the app.
Remember, when using third-party camera apps, always be mindful of your storage space. Some apps may generate larger file sizes compared to the native iPhone camera app, so regularly back up your photos and videos to ensure you don’t run out of storage on your device.
Overall, exploring third-party camera apps can expand your photography options and allow you to unleash your creativity. With their advanced features and customization options, you’ll have more control over your iPhone’s camera settings and capture stunning images.
Resetting Camera Settings
If you’re experiencing issues with your iPhone’s camera or simply want to start fresh with the default settings, resetting the camera settings can be a helpful solution. Here’s how you can do it:
- Open the Settings app on your iPhone.
- Scroll down and tap on Camera.
- At the bottom of the screen, you’ll find the option called Reset Settings. Tap on it.
- A confirmation prompt will appear, asking if you want to reset all camera settings. Tap on Reset to proceed.
- Once the process is complete, your camera settings will be restored to the default factory settings.
Resetting the camera settings can help resolve issues like settings not saved, camera freezes, or unexpected behavior. It’s also a good option if you’ve made numerous adjustments to the settings and want to start fresh.
It’s important to note that resetting the camera settings will not delete any photos or videos from your iPhone. It only affects the camera settings and won’t have any impact on your personal data or media files.
If you still encounter issues with your camera after resetting the settings, you may want to consider restarting your iPhone or updating your iOS to the latest version. Sometimes, software glitches can cause camera problems, and these simple steps can help resolve them.
Remember, before resetting the camera settings, make sure to backup your important data and settings to prevent any potential loss.
Now that you know how to reset the camera settings on your iPhone, you can easily troubleshoot camera-related issues and enjoy capturing stunning photos and videos again.
Conclusion
Preserving settings in the camera on your iPhone is crucial for capturing the best moments with ease. By following the steps outlined in this article, you can ensure that your preferred camera settings are saved and ready to use whenever you need them. Whether it’s adjusting exposure, enabling gridlines, or customizing the video resolution, taking the time to set up your camera preferences can greatly enhance the quality of your photos and videos.
Remember to regularly check and update your camera settings to adapt to different shooting conditions and personal preferences. By making use of the advanced features and functionality of your iPhone’s camera, you can unleash your creative potential and capture stunning images and videos effortlessly.
So, don’t hesitate to explore the various camera settings on your iPhone and make them work for you. Preserve your preferred settings and let your creativity shine through your photographs and videos!
FAQs
FAQ 1: Can I preserve the camera settings on my iPhone?
- Answer: Yes, you can preserve the camera settings on your iPhone by following a few simple steps. First, open the Camera app on your iPhone. Then, adjust the camera settings according to your preferences, such as exposure, focus, and filters. Once you have set the desired settings, they will be preserved until you change them again.
FAQ 2: Is it possible to save a custom camera preset on my iPhone?
- Answer: Unfortunately, iPhone does not have a built-in feature to save custom camera presets. However, you can achieve a similar effect by using third-party camera apps that offer preset saving functionality. These apps allow you to create and store your own camera presets, making it easier to apply consistent settings and styles to your photos.
FAQ 3: Will the preserved camera settings apply to all the camera modes on my iPhone?
- Answer: The preserved camera settings on your iPhone will apply to most of the camera modes, such as Photo, Portrait, and Video. However, keep in mind that certain camera modes, such as Slow-mo, Time-lapse, and Panorama, have specific settings that may not be preserved. It’s always a good idea to double-check the settings for each camera mode before capturing your photos or videos.
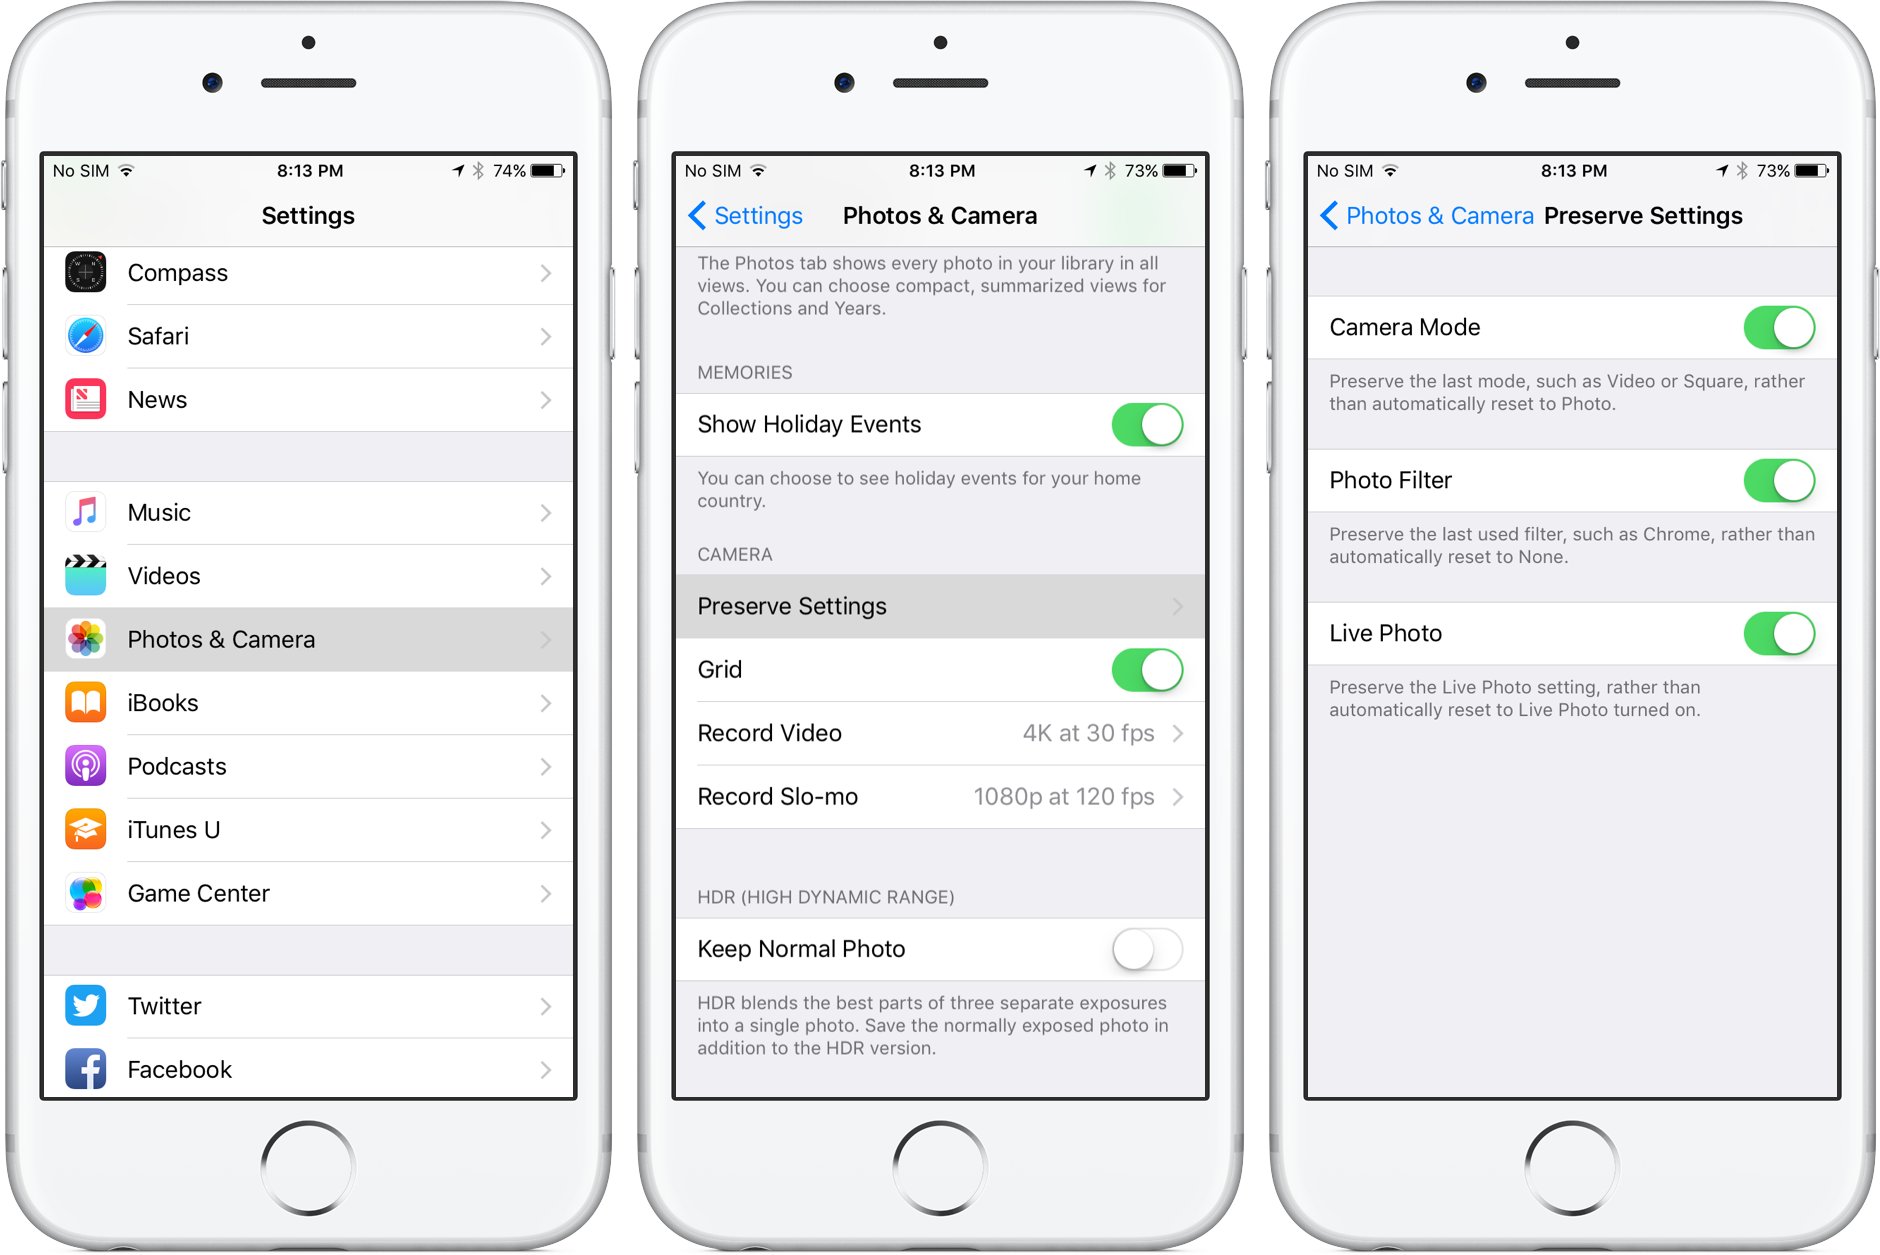
FAQ 4: How do I reset the camera settings on my iPhone?
- Answer: If you want to reset the camera settings on your iPhone and go back to the default settings, you can do so by following these steps:
- Open the Settings app on your iPhone.
- Scroll down and tap on “Camera”.
- Tap on “Preserve Settings”.
- Toggle off the switches next to the settings you want to reset, such as Camera Mode, Filters, and Live Photo.
- Exit the Settings app, and your camera settings will be reset to the default values.
FAQ 5: How can I preserve the camera settings when switching between the front and rear cameras?
- Answer: By default, the camera settings will be preserved when switching between the front and rear cameras on your iPhone. This means that if you have adjusted the exposure, focus, or other settings while using the rear camera, they will be automatically applied when you switch to the front camera, and vice versa. However, if you want to reset the settings when switching between the cameras, you can toggle off the “Preserve Settings” option in the Camera section of the Settings app.