
Are you tired of individually locking each note on your mobile phone? Well, you’re in luck! In this article, we will share with you a simple and effective method to quickly lock all notes at once on your mobile device. Whether you’re an avid note-taker or you simply value the security of your personal information, this guide will walk you through the steps to streamline the process and provide peace of mind. Say goodbye to the tedious task of manually locking each note and hello to a more efficient and secure way of protecting your private data. So, let’s dive in and discover how you can easily lock all your notes with just a few taps!
Inside This Article
- How to Quickly Lock all Notes at Once
- Step 1: Open the Notes app – Launch the Notes app on your device
- Step 2: Select all notes
- Step 3: Lock the selected notes
- Step 4: Verify the locked status – Check if all the notes have a lock icon next to their title – Attempt to open one of the locked notes to ensure it requires authentication to access
- Conclusion
- FAQs
How to Quickly Lock all Notes at Once
If you’re someone who uses the Notes app on your device to store important information, you may be concerned about the security of your notes. Thankfully, there’s a simple way to quickly lock all the notes at once, providing an extra layer of protection for your sensitive information. In this guide, we’ll walk you through the steps to easily lock all your notes in just a few taps.
Step 1: Open the Notes app
To get started, open the Notes app on your device. It can be found on your home screen or in your app drawer. Once you’ve located the app, tap on it to launch.
Step 2: Select all notes
Next, tap on the “Edit” button located at the top right corner of the screen. This will allow you to select multiple notes at once. Once in edit mode, a small circle will appear next to each note. Tap on the circle to select all the notes you wish to lock.
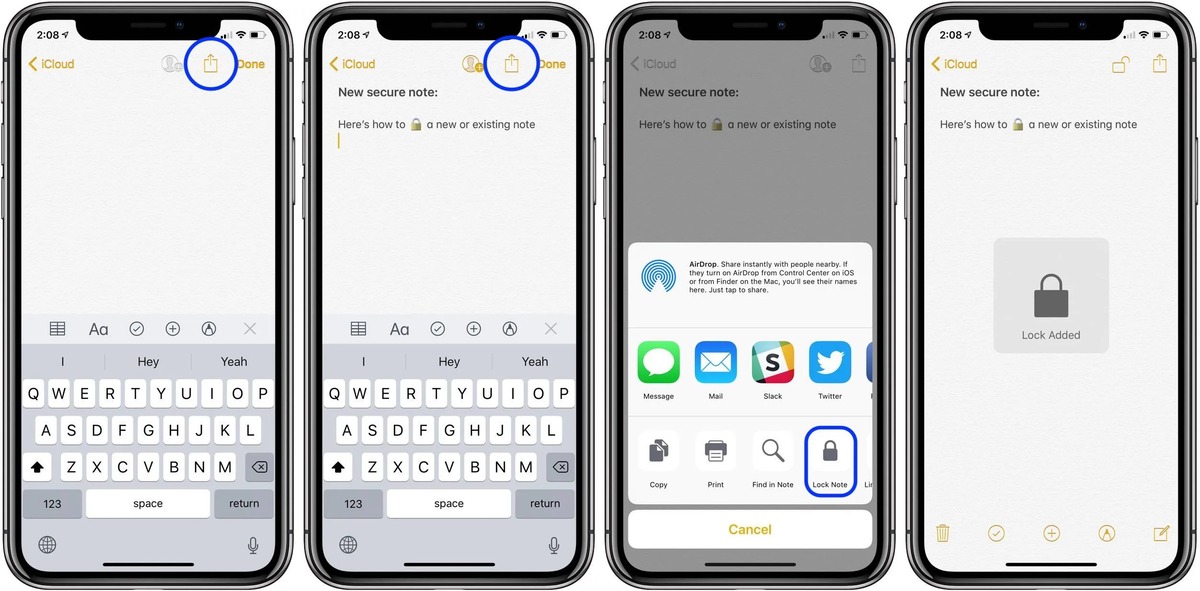
Step 3: Lock the selected notes
Once you have selected all the notes you want to lock, tap on the “Lock” icon located at the bottom of the screen. This icon resembles a padlock and indicates the option to lock the selected notes. Depending on your device’s settings, you may need to authenticate using your passcode, Touch ID, or Face ID to proceed.
Step 4: Verify the locked status
After locking the selected notes, verify that they have been successfully locked. Look for a lock icon next to the title of each note, which indicates that the note is now secured. Additionally, try opening one of the locked notes to ensure it requires authentication to access. This will confirm that your notes are securely locked.
By following these simple steps, you can quickly lock all your notes at once, providing added security and peace of mind. Remember to always keep your device’s passcode or biometric authentication secure to ensure the protection of your locked notes.
So, take a few moments to secure your important information by locking all your notes at once using the Notes app. Enjoy the peace of mind that comes with knowing your sensitive data is protected.
Step 1: Open the Notes app – Launch the Notes app on your device
The first step in quickly locking all your notes at once is to open the Notes app on your device. The Notes app is a pre-installed application on most mobile phones and tablets, allowing you to jot down thoughts, make lists, and save important information.
To access the Notes app, simply locate its icon on your device’s home screen or in the app drawer. Once you’ve found the app, tap on it to open it. This will take you to the main interface of the app, where you can view all your saved notes and create new ones.
Whether you have an iPhone, an Android device, or any other type of mobile phone or tablet, the process of opening the Notes app is generally the same. Look for the app’s recognizable icon, which is usually a notepad or a similar symbol, and tap on it to launch the app.
Step 2: Select all notes
To quickly lock all your notes at once, follow these simple steps:
1. Tap on the “Edit” button located at the top right corner of the screen. This button allows you to enter the editing mode for your notes.
2. Once you enter the editing mode, you will notice a small circle appearing next to each note. This circle serves as a selection marker.
3. To select all the notes at once, tap on the circle that is present next to any note. By doing so, all the circles next to the other notes will also be selected.
4. After tapping on the circle, you will see that all the notes have been marked with a checkmark, indicating that they are now selected.
5. With all the notes selected, you can now perform various actions on them. For example, you can delete multiple notes simultaneously or apply formatting changes to all the selected notes.
By following these steps, you can quickly select all the notes in your Notes app and perform batch actions on them, making it convenient to lock all the notes at once.
Step 3: Lock the selected notes
Once you have selected all the notes you want to lock, it’s time to secure them by tapping on the “Lock” icon. This icon is usually located at the bottom of the screen, but its exact position may vary depending on the device and software version you’re using.
When you tap on the “Lock” icon, a security prompt may appear, asking you to authenticate yourself. This authentication process is essential for ensuring that only authorized users can access the locked notes.
The type of authentication you need to use will depend on your device’s settings. It could be a passcode, Touch ID, or Face ID. If you have a passcode set up on your device, you may be prompted to enter it before the notes are locked. If you have biometric authentication (Touch ID or Face ID) enabled, you may be asked to verify your identity using your fingerprint or facial recognition.
Once you have successfully authenticated yourself, all the selected notes will be locked. This means that they cannot be accessed or viewed without the proper authentication. The locked notes will remain secure even if someone gains physical access to your device.
Locking your notes provides an additional layer of privacy and security for sensitive information. It ensures that only you or authorized users can access and view the contents of the locked notes.
Step 4: Verify the locked status – Check if all the notes have a lock icon next to their title – Attempt to open one of the locked notes to ensure it requires authentication to access
After successfully locking all your notes, it’s important to verify that they are indeed locked and require authentication to access. Follow these simple steps to ensure the locked status of your notes:
1. Check if all the notes have a lock icon next to their title: Take a quick glance at the list of notes in your Notes app. Each locked note should display a small lock icon next to its title. This lock icon serves as a visual indicator that the note is secure and protected.
2. Attempt to open one of the locked notes: Select any locked note from your list and try to open it by tapping on it. You should immediately notice that a layer of security prevents you from accessing the note’s content. Instead of opening the note directly, you will be prompted to authenticate using your device’s passcode, Touch ID, or Face ID.
By requiring authentication, the Notes app ensures that you are the only one who can access your private and confidential information. This provides an additional layer of protection, giving you peace of mind that your notes are secure.
Remember, it is essential to regularly review the locked status of your notes to ensure maximum security. In case you notice any unlocked notes or experience any issues with the locking feature, consider relocking the notes or reaching out to the support team for further assistance.
With these steps, you can confidently verify the locked status of your notes and ensure that your sensitive information remains protected.
Conclusion
In today’s fast-paced and digital world, it is important to prioritize the security of our personal information, including our digital notes. With the help of technology, locking all notes at once on your mobile phone is now a quick and simple process. By following the steps outlined in this article, you can ensure that your confidential notes remain protected from prying eyes.
Whether you want to safeguard sensitive work documents, personal thoughts, or important reminders, taking the time to secure your notes can offer peace of mind and protect your privacy. Remember to regularly update your security settings and use strong, unique passwords to further enhance the security of your locked notes.
By leveraging the convenience and power of mobile phones, you can effortlessly lock all your notes in just a few taps. Don’t compromise on security when it comes to safeguarding your important information. Take control of your privacy today and keep your digital notes locked and secure on your mobile phone.
FAQs
Q: How do I quickly lock all notes at once?
To quickly lock all notes at once, follow these steps:
- Open the Notes app on your device.
- Tap on the “Edit” button at the top right corner of the screen.
- Select the notes that you want to lock by tapping on the circle icon beside each note.
- Once you have selected all the notes you want to lock, tap on the “Lock” button at the bottom center of the screen.
- Enter a passcode or use your device’s biometric authentication to lock the selected notes.
Now, all the selected notes will be locked and can only be accessed by entering the passcode or using biometric authentication.
Q: Can I unlock multiple notes at once?
Yes, you can unlock multiple notes at once by following these steps:
- Open the Notes app on your device.
- Tap on the “Edit” button at the top right corner of the screen.
- Select the locked notes that you want to unlock by tapping on the circle icon beside each note.
- Once you have selected all the notes you want to unlock, tap on the “Unlock” button at the bottom center of the screen.
- Enter the passcode or use your device’s biometric authentication to unlock the selected notes.
After completing these steps, the selected locked notes will be unlocked and accessible without any passcode or biometric authentication.
Q: Can I lock or unlock all notes on my device at once?
No, the Notes app does not provide a built-in feature to lock or unlock all notes on a device at once. You can only lock or unlock notes individually or select multiple notes to perform the lock or unlock operation on them.
Q: Is there a way to protect my notes with a fingerprint or face recognition?
Yes, if your device supports fingerprint or face recognition technology, you can use it to secure your notes. To set up biometric authentication for the Notes app, follow these steps:
- Go to the Settings app on your device.
- Scroll down and select “Notes”.
- Tap on “Password” or “Biometrics“, depending on the available options.
- Follow the on-screen instructions to set up fingerprint or face recognition for the Notes app.
Once configured, you can use your fingerprint or face recognition to lock and unlock your notes.
Q: Can I change the passcode for my locked notes?
Yes, you can change the passcode for your locked notes by following these steps:
- Open the Notes app on your device.
- Tap on the “Lock” icon located at the top of the note you want to change the passcode for.
- Enter the current passcode to unlock the note.
- Once the note is unlocked, tap on the “…” (More) button at the top right corner of the screen.
- Select “Change Password” from the options menu.
- Follow the on-screen instructions to set a new passcode for the note.
After setting a new passcode, the note will be protected with the updated passcode.