
Are you tired of constantly locking your iPhone every time you put it down? Fret not, because we have the solution for you. With the auto lock feature on your iPhone, you can conveniently set a time limit after which your device will automatically lock itself. This not only ensures the security of your phone but also conserves battery life by preventing it from staying on unnecessarily. In this article, we will guide you on how to turn on auto lock on your iPhone, allowing you to enjoy the convenience and peace of mind that comes with this feature. Say goodbye to the hassle of manually locking your phone and let your iPhone take care of it for you!
Inside This Article
- Enable Auto Lock on iPhone
- Set Auto Lock Timeout on iPhone
- Customize Auto Lock Settings on iPhone
- Troubleshooting Auto Lock Issues on iPhone
- Conclusion
- FAQs
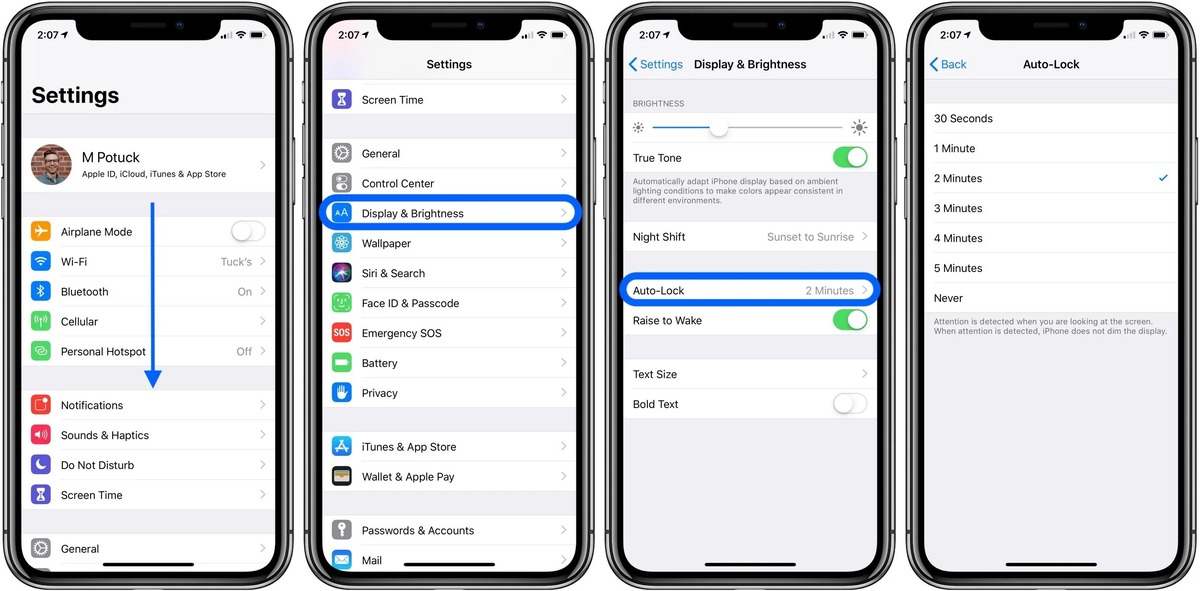
Enable Auto Lock on iPhone
Auto Lock is a useful feature on your iPhone that automatically locks your device after a certain period of inactivity. This not only helps to save battery life but also ensures the security of your personal data. To enable Auto Lock on your iPhone, follow these simple steps:
1. Open the “Settings” app on your iPhone.
2. Scroll down and tap on “Display & Brightness”.
3. Select “Auto Lock” from the list of options.
4. You will see a list of time intervals, ranging from 30 seconds to 5 minutes or “Never”. Choose the desired time interval that suits your needs.
5. Once you have selected the preferred Auto Lock time, simply exit the Settings app.
Now, your iPhone will automatically lock itself after the specified time of inactivity, helping to conserve battery life and keep your device secure.
It is worth noting that enabling Auto Lock may require you to enter your passcode or use Touch ID or Face ID to unlock your device when it is locked. This adds an extra layer of security to your iPhone.
Remember, it is important to balance convenience with security. Choose an Auto Lock time that works best for you, ensuring that your device locks automatically when you’re not using it, but doesn’t lock too quickly, causing constant interruptions.
Now that you’ve enabled Auto Lock on your iPhone, you can use your device with peace of mind, knowing that it will automatically lock itself after the specified time of inactivity.
Set Auto Lock Timeout on iPhone
Auto Lock is a feature on iPhone that automatically locks your device after a certain period of inactivity. This is a great security feature that prevents unauthorized access to your personal data. By default, Auto Lock is set to 1 minute on most iPhone models, but you can adjust the timeout according to your preferences.
To set the Auto Lock timeout on your iPhone, follow these simple steps:
- Open the “Settings” app on your iPhone’s home screen.
- Scroll down and tap on “Display & Brightness”.
- Next, select “Auto Lock” from the list of options.
- You will see a range of predefined time intervals, such as 30 seconds, 1 minute, 2 minutes, etc. Choose the desired timeout that suits your needs.
- Alternatively, you can tap on “Customize” at the bottom to set a custom Auto Lock timeout.
- If you choose the “Customize” option, you can input a specific time duration ranging from 30 seconds to 5 minutes.
Once you have selected the desired Auto Lock timeout, your iPhone will automatically lock itself after the specified period of inactivity. This helps to preserve battery life and ensure the security of your device.
It’s worth mentioning that setting a shorter Auto Lock timeout can help conserve battery life, as your device won’t stay awake unnecessarily. On the other hand, if you often pick up your iPhone or use it frequently, you may want to set a longer Auto Lock timeout to avoid the inconvenience of entering your passcode repeatedly.
Remember that Auto Lock works in conjunction with the passcode or biometric security (like Face ID or Touch ID) on your iPhone. So even if the Auto Lock timeout is set to a longer duration, your device will still require authentication to access the content.
By understanding how to set the Auto Lock timeout on your iPhone, you can strike the right balance between convenience and security.
Customize Auto Lock Settings on iPhone
One of the great features of the iPhone is the ability to customize various settings, including the “Auto Lock” feature. Auto Lock allows you to set the time interval before your iPhone screen automatically locks. This feature is designed to help conserve battery life and protect your privacy.
To customize the Auto Lock settings on your iPhone, follow these simple steps:
1. Open the Settings app on your iPhone.
2. Scroll down and tap on “Display & Brightness”.
3. On the next screen, you will see the “Auto Lock” option. Tap on it.
4. Here, you can choose the desired time interval for the Auto Lock feature. The available options range from 30 seconds to 5 minutes. Simply tap on the preferred option.
5. Once you have selected the desired time interval, exit the Settings app. Your new Auto Lock settings will now be in effect.
Customizing the Auto Lock settings allows you to find the perfect balance between security and convenience. If you find yourself constantly unlocking your iPhone because the screen locks too quickly, you can increase the Auto Lock time interval. On the other hand, if you want to prioritize battery life and security, you can set a shorter Auto Lock time.
Keep in mind that modifying the Auto Lock settings can have an impact on your iPhone’s battery life. The longer the Auto Lock time, the more power your device will consume. Therefore, it is recommended to find a balance that suits your needs without draining the battery excessively.
It’s also worth noting that the Auto Lock settings can be particularly useful in situations where you need to quickly access your iPhone. For example, if you frequently refer to recipes while cooking, you can set a longer Auto Lock time to prevent the screen from turning off while you’re in the middle of a recipe. Alternatively, if you’re concerned about your privacy, setting a shorter Auto Lock time can help ensure your iPhone remains locked when not in use.
By customizing the Auto Lock settings on your iPhone, you have more control over your device’s security and power usage. Experiment with different time intervals to find what works best for you and enjoy a personalized iPhone experience.
Troubleshooting Auto Lock Issues on iPhone
If you’re experiencing any issues with the Auto Lock feature on your iPhone, there are a few troubleshooting steps you can take to resolve the problem. Here are some common issues and their solutions:
1. Auto Lock not working: If your iPhone is not automatically locking as it should, the first thing you should do is check your Auto Lock settings. Go to Settings > Display & Brightness > Auto Lock. Make sure you have selected an appropriate time interval for your device to automatically lock. If the issue persists, try restarting your iPhone or performing a software update.
2. Auto Lock feature missing: In some cases, the Auto Lock feature may be missing from the Display & Brightness settings on your iPhone. This can happen if you have certain restrictions enabled on your device. To check if restrictions are the issue, go to Settings > Screen Time > Content & Privacy Restrictions. Ensure that the “Screen Time” category is not restricted. If it is, you will need to disable the restrictions to regain access to the Auto Lock feature.
3. Auto Lock resetting to default: If your Auto Lock settings keep resetting to the default value even after you have manually changed them, you may need to reset your device’s settings. Go to Settings > General > Reset > Reset All Settings. Keep in mind that this will reset all of your device’s settings back to their factory defaults, so make sure to back up your important data before proceeding.
4. Auto Lock not available during certain apps: Some apps may have specific settings that can override the Auto Lock feature. If you notice that your iPhone is not locking automatically when using a particular app, check the app’s settings. Look for any options related to screen lock or display timeout and adjust them accordingly.
5. Battery drain due to Auto Lock: If you find that your device’s battery is draining quickly, it may be due to frequent Auto Lock activations. To extend your battery life, consider increasing the time interval for Auto Lock or manually turning off the feature when you don’t need it.
By following these troubleshooting steps, you can often resolve common Auto Lock issues on your iPhone. If the problem persists, it is recommended to contact Apple Support for further assistance.
Conclusion
Enabling the Auto Lock feature on your iPhone is a simple and effective way to enhance the security and preserve the battery life of your device. By automatically locking your iPhone after a set period of inactivity, you can prevent unauthorized access to your personal information and prolong the battery life. Whether you prefer a shorter time delay for convenience or a longer delay for flexibility, the Auto Lock feature allows you to customize it to suit your needs.
Remember, taking a few moments to enable this feature can go a long way in safeguarding your device and ensuring its longevity. So why wait? Follow the steps outlined in this guide and start using the Auto Lock feature on your iPhone today!
FAQs
1. Why should I turn on auto lock on my iPhone?
Turning on auto lock on your iPhone is essential for security reasons. It ensures that your device is locked and requires a passcode, Touch ID, or Face ID for access. This helps protect your personal information and sensitive data from unauthorized access if your phone is lost or stolen.
2. How do I turn on Auto Lock on my iPhone?
To turn on Auto Lock on your iPhone, follow these steps:
- Open the Settings app on your iPhone.
- Scroll down and tap on “Display & Brightness.”
- Tap on “Auto-Lock.”
- Select the desired time interval for auto lock (e.g., 30 seconds, 1 minute, etc.).
Once you have selected the desired time interval, your iPhone will automatically lock after the specified period of inactivity.
3. Can I customize the Auto Lock time on my iPhone?
Yes, you can customize the Auto Lock time on your iPhone. Simply follow the steps mentioned in the previous question, and instead of selecting the default time intervals, tap on “Customize…” at the bottom of the list. You can then choose a specific time interval for your iPhone to automatically lock.
4. What are the benefits of setting a shorter Auto Lock time on my iPhone?
Setting a shorter Auto Lock time on your iPhone offers several benefits. Firstly, it enhances the security of your device by ensuring that it locks quickly when not in use. This minimizes the chances of unauthorized access to your personal information. Secondly, a shorter Auto Lock time helps conserve battery life as the screen will turn off sooner, reducing unnecessary power consumption.
5. Can I disable Auto Lock on my iPhone?
While it is recommended to keep Auto Lock enabled for security purposes, you can disable it if needed. To disable Auto Lock on your iPhone, follow these steps:
- Open the Settings app on your iPhone.
- Scroll down and tap on “Display & Brightness.”
- Tap on “Auto-Lock.”
- Tap on “Never” to disable Auto Lock.
Please note that disabling Auto Lock means your iPhone will never automatically lock, which may compromise the security of your device.