
If you’re wondering how to remove a phone number from your iPhone, you’ve come to the right place. Whether you want to delete a contact, remove a number from your recent calls list, or simply stop someone from being able to call or message you, we’ve got you covered. Having unnecessary or unwanted phone numbers cluttering your device can be a hassle, and it’s important to know the steps to take to clean up your contacts and call history. In this article, we’ll guide you through the various methods you can use to remove a phone number from your iPhone, ensuring a streamlined and efficient phone experience. So, let’s get started and declutter your iPhone by getting rid of those unnecessary phone numbers.
Inside This Article
- Overview
- Method 1: Remove a Phone Number from Contacts
- Method 2: Remove a Phone Number from the Recents List
- Method 3: Remove a Phone Number from Messaging Apps
- Method 4: Remove a Phone Number from Call Blocking
- Conclusion
- FAQs
Overview
Are you looking to remove a phone number from your iPhone? Whether it’s outdated, no longer in use, or simply a number you don’t want to have in your contacts anymore, we’ve got you covered. In this article, we will discuss several methods to help you remove phone numbers from your iPhone effortlessly, ensuring that your contacts list stays up-to-date and clutter-free.
From removing a phone number from your contacts to clearing it from the recent calls list and messaging apps, there are various approaches you can take. Each method is simple and straightforward, requiring just a few steps to complete. Whether you’re using a recent version of iOS or an older one, we will cover the steps for each, so you can easily follow along regardless of your device’s software version.
By removing unwanted phone numbers from your iPhone, you’ll have a cleaner and more organized contacts list. It can also help you avoid accidentally dialing or messaging the wrong person, saving you from potential embarrassment or confusion. So, let’s dive into the methods and learn how to remove a phone number from an iPhone.
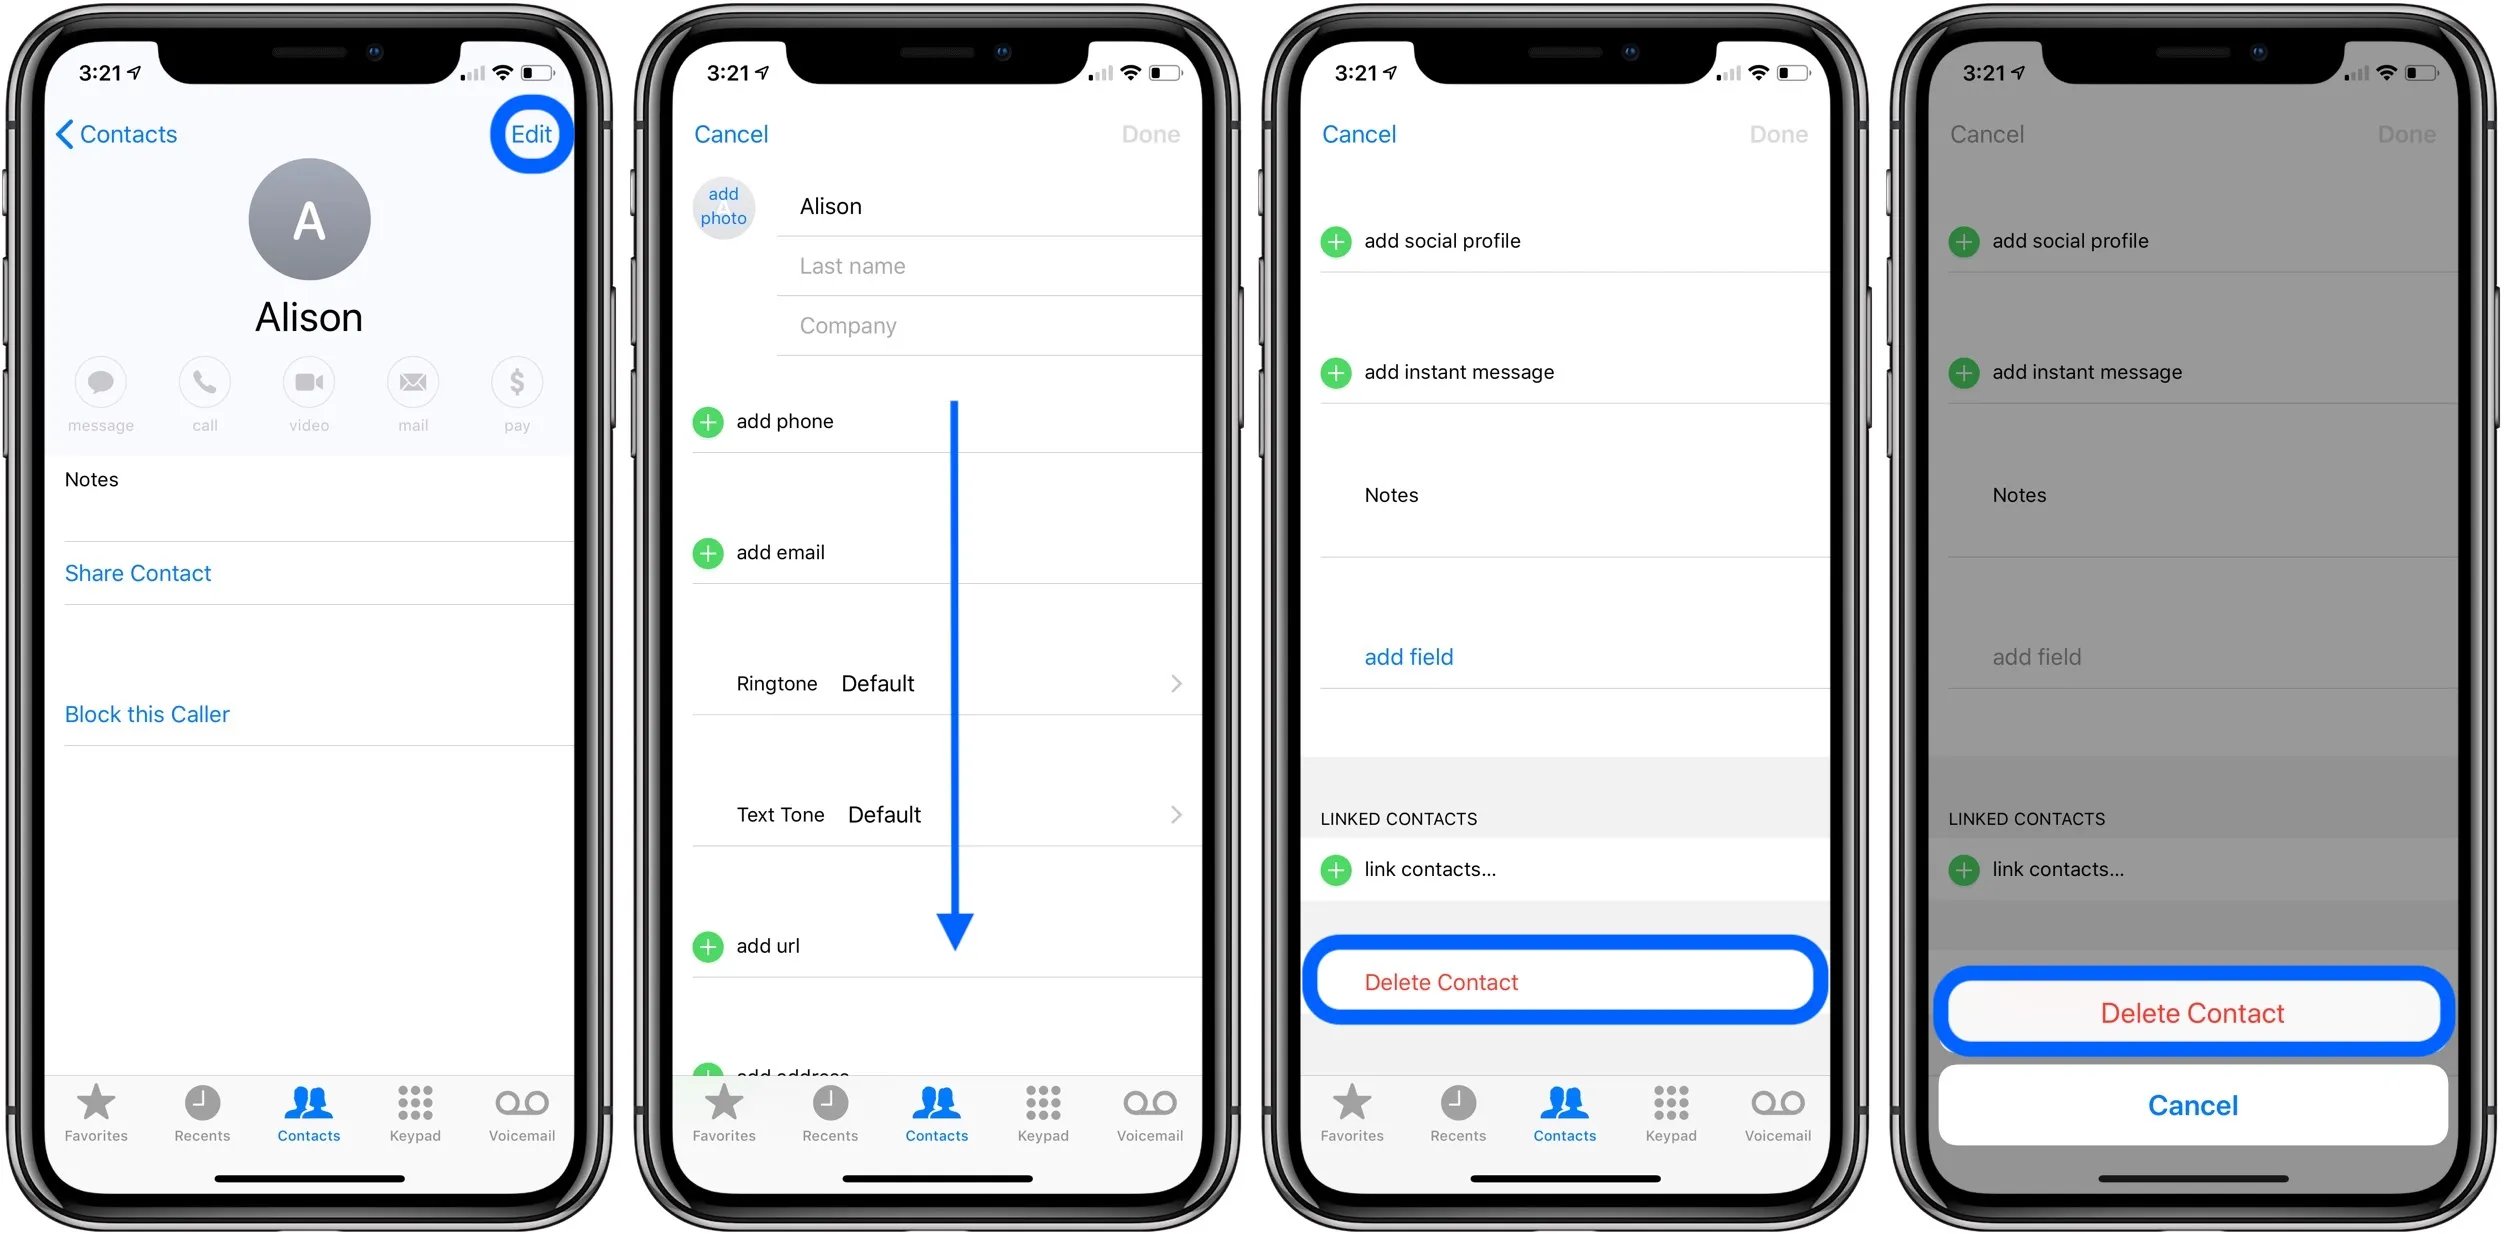
Method 1: Remove a Phone Number from Contacts
Removing a phone number from your iPhone’s contacts is a simple process that can be done in a few quick steps. Here’s how:
1. Launch the Contacts app on your iPhone. You can find this app on your home screen, represented by a silhouette of a person.
2. Scroll or search to find the contact that contains the phone number you want to remove. Tap on the contact to open it.
3. Once the contact is open, scroll down to find the specific phone number you wish to remove. It will be listed under the “Phone” section.
4. Tap on the Edit button located in the top-right corner of the screen. This will allow you to make changes to the contact details.
5. Now, locate the phone number you want to remove and tap on the red minus button next to it. A prompt will appear asking if you want to delete the phone number. Tap on Delete to confirm.
6. Finally, tap on the Done button in the top-right corner to save your changes. The selected phone number will now be removed from the contact.
By following these steps, you can easily remove a phone number from a contact on your iPhone. This method ensures that the unwanted phone number will no longer be associated with the contact in your device’s address book.
Method 2: Remove a Phone Number from the Recents List
If you want to remove a phone number from the recents list on your iPhone, follow these simple steps:
- Open the Phone app on your iPhone.
- Tap on the “Recents” tab at the bottom of the screen. This will display a list of all the recent calls you have made or received.
- Scroll through the list and locate the phone number that you want to remove.
- Swipe left on the phone number to reveal the “Delete” option.
- Tap on “Delete” to remove the phone number from the recents list.
Once you have deleted the phone number, it will no longer appear in your recents list. This method is useful if you want to clear up your call history or remove any sensitive or unwanted phone numbers from the list.
Method 3: Remove a Phone Number from Messaging Apps
Having unnecessary phone numbers cluttering your messaging apps can be quite bothersome. Whether it’s a wrong number or a contact you no longer want to chat with, removing phone numbers from messaging apps can help you maintain a clean and organized chat experience. Follow these steps to remove a phone number from popular messaging apps on your iPhone:
- iMessage: Open the iMessage app and tap on the chat thread that contains the phone number you want to remove. Once the chat thread is open, tap on the contact’s name at the top of the screen. On the next screen, tap on the “i” icon. Scroll down and tap on “Remove from Recents” to remove the phone number from your recent conversations.
- WhatsApp: Launch the WhatsApp app and go to the Chats tab. Find the chat containing the phone number you wish to remove and swipe left on the chat. Tap on the “More” option that appears, then select “Delete Chat.” This will remove the entire chat history, including the phone number, from your WhatsApp conversations.
- Facebook Messenger: Open the Facebook Messenger app and go to the Chats tab. Locate the chat with the phone number you want to remove and swipe left on the chat. Tap on the “Delete” option that appears, then confirm your choice by tapping on “Delete” again. This will remove the chat and the associated phone number from your Messenger conversations.
- Telegram: Launch the Telegram app and go to the Chats tab. Find the chat with the phone number you want to remove and swipe left on the chat. Tap on the “Delete” option that appears, then confirm by tapping on “Delete” again. This will remove the chat and the phone number from your Telegram conversations.
By following these simple steps, you can easily remove unwanted phone numbers from messaging apps on your iPhone. Keeping your chats tidy and clutter-free will help you stay organized and focused on the conversations that matter to you.
Method 4: Remove a Phone Number from Call Blocking
If you have added a phone number to your call blocking list on your iPhone but later decide to unblock it, you can easily remove the number from the blocked list using the following steps:
- Open the “Settings” app on your iPhone home screen.
- Scroll down and tap on “Phone”.
- Tap on “Call Blocking & Identification”.
- You will see a list of numbers that are currently blocked. Find the number you wish to unblock.
- Tap on the red minus sign (-) next to the blocked number.
- A confirmation prompt will appear asking if you want to unblock the number. Tap on “Unblock” to remove the number from the blocked list.
- The number is now unblocked and you will be able to receive calls and messages from that number again.
It’s important to note that removing a phone number from the call blocking list will allow incoming calls and messages from that number to go through. If you later decide to block the number again, simply follow the same steps but tap on the green plus sign (+) instead of the red minus sign (-) to add it back to the blocked list.
By following these simple steps, you can easily remove a phone number from the call blocking feature on your iPhone and regain the ability to receive calls and messages from that number.
Conclusion
Removing a phone number from an iPhone is a simple process that can help you maintain the privacy of your contacts and keep your device organized. Whether you want to delete a single contact or multiple numbers, the steps are easy to follow.
By accessing the Contacts app on your iPhone, you can delete individual numbers by selecting the contact and tapping on the “Edit” button. From there, scroll down to the specific number you wish to remove and tap on the red minus sign next to it. Finally, confirm the deletion by tapping on the “Delete” button.
If you want to delete multiple numbers at once, you can use the “Edit” feature and then select multiple contacts by tapping on the circle next to their names. Once you have selected all the desired contacts, tap on the “Delete” button at the bottom right corner to remove them from your iPhone.
With these simple steps, you can easily manage your phone numbers and keep your contacts list organized on your iPhone. It’s important to periodically review and update your contacts to ensure your device remains clutter-free and only contains the numbers you need.
So, go ahead and remove those unwanted phone numbers from your iPhone and enjoy a cleaner and more organized contacts list!
FAQs
Q: Can I remove a phone number from my iPhone?
A: Yes, you can remove a phone number from your iPhone. In fact, it’s quite simple to do so. Just follow the steps outlined in this article.
Q: Will removing a phone number from my iPhone delete all associated contacts?
A: No, removing a phone number from your iPhone will only remove that specific phone number from the contact. All other contact information, such as email addresses, will remain intact.
Q: Can I remove multiple phone numbers from a single contact on my iPhone?
A: Yes, you can remove multiple phone numbers from a single contact on your iPhone. The process is the same as removing a single phone number, but you will need to repeat the steps for each phone number you want to remove.
Q: Will removing a phone number from my iPhone also remove it from iCloud?
A: If you have iCloud sync enabled for your contacts, removing a phone number from your iPhone will also remove it from iCloud. This means that the phone number will be deleted across all devices that are synced with your iCloud account.
Q: Is there a way to undo the removal of a phone number from my iPhone?
A: Unfortunately, there is no built-in undo feature for removing a phone number from your iPhone. However, if you have a backup of your device, you can restore it to a previous backup to retrieve the removed phone number.