
Are you looking to remove a phone number from your Apple ID? If so, you’ve come to the right place. Your Apple ID is a crucial component of your iPhone experience, as it connects you to various services and ensures seamless integration across devices. However, there may come a time when you need to change or remove a phone number associated with your Apple ID. Whether you’ve recently switched phone numbers, or simply want to update your contact information, this article will guide you through the process of removing a phone number from your Apple ID. From navigating the settings menu to ensuring a smooth transition, we’ll provide you with all the steps and tips you need to successfully remove a phone number from your Apple ID. Let’s get started.
Inside This Article
- Method 1: Remove Phone Number Using iPhone Settings
- Method 2: Remove Phone Number Using Apple ID Website
- Method 3: Contact Apple Support
- Conclusion
- FAQs
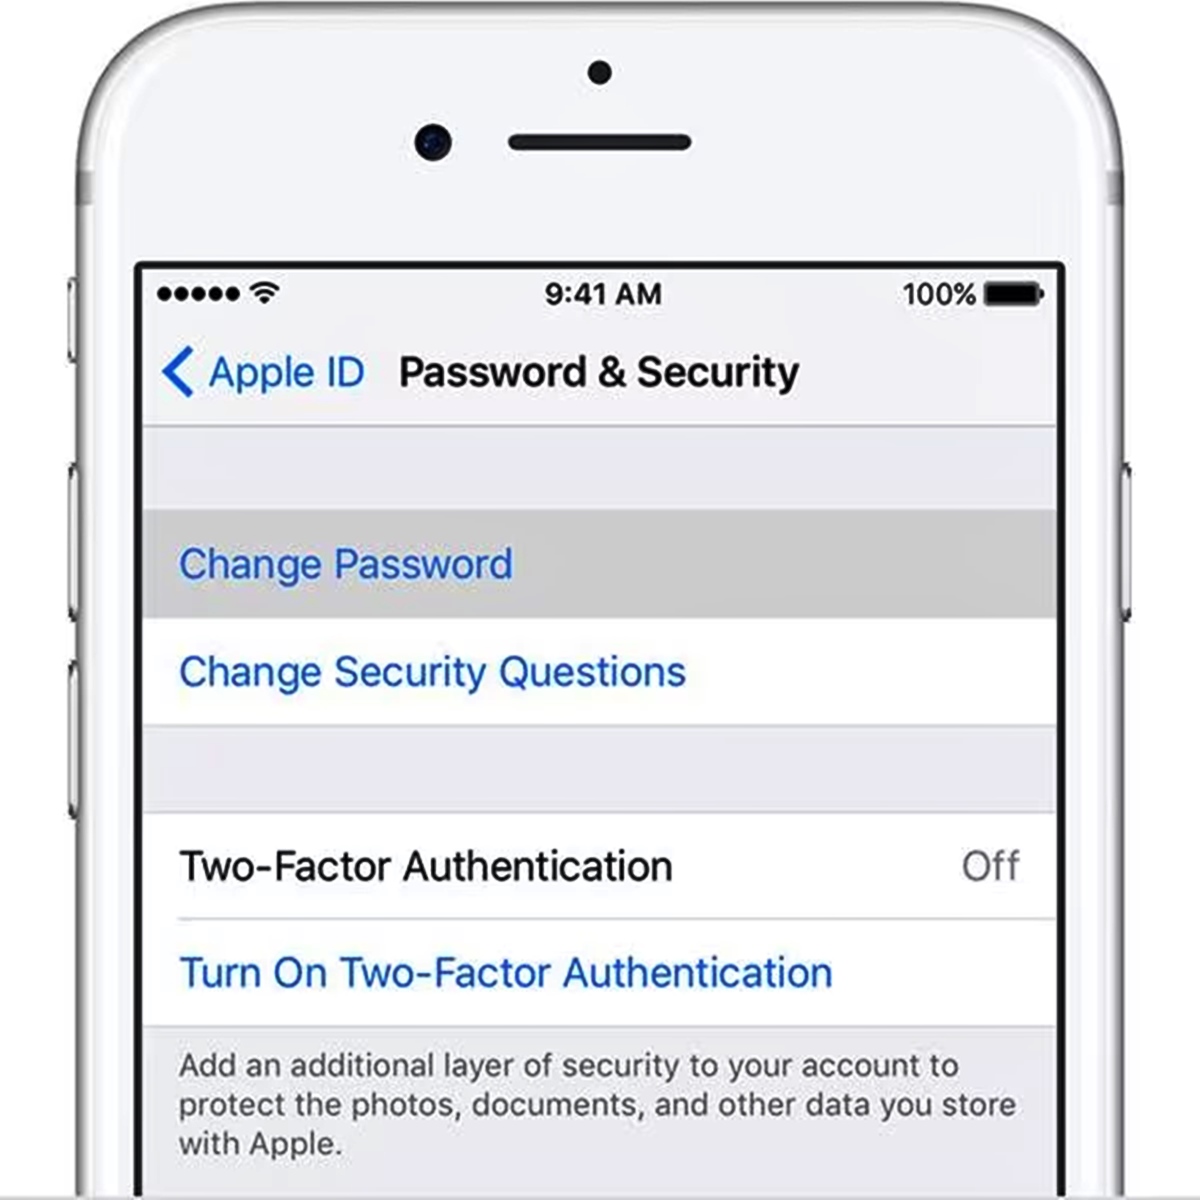
Method 1: Remove Phone Number Using iPhone Settings
If you want to remove a phone number from your Apple ID, you can easily do so using the iPhone settings. Just follow these simple steps:
- Open the Settings app on your iPhone.
- Scroll down and tap on your Apple ID.
- Select “Password & Security.”
- Tap on “Edit” next to the “Trusted Phone Numbers” section.
- You may need to enter your Apple ID password to proceed.
- Find the phone number you want to remove and tap on the “-” button.
- Confirm your choice by tapping on “Remove” when prompted.
And that’s it! Your phone number has been successfully removed from your Apple ID. This means it will no longer be associated with your Apple ID for features like two-factor authentication and iMessage.
Keep in mind that removing a phone number from your Apple ID may result in the loss of certain account capabilities, such as the ability to receive verification codes or access iMessage from that number. If you want to continue using those features, you may need to add a different phone number to your Apple ID.
Method 2: Remove Phone Number Using Apple ID Website
If you prefer to remove a phone number from your Apple ID using a computer, you can do so by accessing the Apple ID website. Here’s how:
- Open a web browser and go to the Apple ID website (https://appleid.apple.com/).
- Sign in to your Apple ID using your registered email address and password.
- Once you’re logged in, you’ll be taken to the “Account” page. Scroll down to the “Security” section and click on the “Edit” button next to “Phone Numbers”.
- You’ll see a list of phone numbers linked to your Apple ID. To remove a phone number, click on the “Delete” button next to it.
- A confirmation pop-up will appear asking if you want to remove the phone number. Click on “Remove” to proceed.
- After removing the phone number, it will no longer be associated with your Apple ID.
It’s important to note that if you remove a phone number from your Apple ID, you won’t be able to use it for two-factor authentication or account recovery. Make sure you have alternative contact information set up to maintain the security and accessibility of your Apple ID.
After following these steps, you have successfully removed a phone number from your Apple ID using the Apple ID website. Keep in mind that this method requires access to a computer or a mobile device with a web browser.
Method 3: Contact Apple Support
If you’re unable to remove your phone number from your Apple ID using the settings on your iPhone or the Apple ID website, don’t worry – there’s still another option. You can contact Apple Support directly for assistance with removing your phone number.
Apple Support is known for their excellent customer service, and they have a dedicated team of experts who can help you with any issues you may be experiencing with your Apple devices or accounts. Whether you’re having trouble with your Apple ID, iCloud, or any other Apple service, their support team is ready to assist you.
To contact Apple Support, you have a few different options. You can call their support hotline, initiate a chat session with one of their support representatives online, or even schedule a call with an Apple expert at a time that’s convenient for you.
When reaching out to Apple Support, be sure to provide them with all the necessary details about your issue, including the fact that you want to remove a phone number from your Apple ID. They will guide you through the process and provide you with step-by-step instructions on how to resolve the issue.
Remember, Apple Support is there to help you, so don’t hesitate to reach out to them if you’re unable to remove your phone number using the other methods mentioned. They’ll work with you to find a solution and ensure your Apple ID is set up exactly as you want it.
At the end of the day, removing a phone number from your Apple ID is a relatively simple process. Whether you choose to do it through your iPhone settings, the Apple ID website, or by contacting Apple Support, you can rest assured that your personal information is secure and your Apple ID is configured according to your preferences.
By following these methods, you can make sure your Apple ID only contains the information you want it to, and that your phone number is not associated with your account. So, if you’re looking to remove a phone number from your Apple ID, try out one of these methods and enjoy a more personalized and secure experience with your Apple devices.
Conclusion
Removing a phone number from your Apple ID is a straightforward process that ensures privacy and security for your account. By following the steps outlined in this article, you can easily detach a phone number from your Apple ID and regain control over your digital presence.
Remember to carefully consider the implications of removing a phone number, as it may affect your ability to use certain features and services linked to that number. Make sure to update your contact information and enable two-factor authentication to enhance the security of your Apple ID.
With the simple instructions provided, you can now confidently manage your Apple ID and maintain a streamlined and secure experience across all your Apple devices.
FAQs
Q: Why would I want to remove a phone number from my Apple ID?
A: There are a few reasons why you might want to remove a phone number from your Apple ID. For example, if you no longer use that number or if you want to transfer it to a different device or account, you may need to remove it from your Apple ID.
Q: How do I remove a phone number from my Apple ID?
A: To remove a phone number from your Apple ID, follow these steps:
- Go to the Apple ID account page on your device
- Sign in with your Apple ID
- Click on “Edit” in the Account section
- Scroll down to the “Phone” section
- Click on “Remove” next to the phone number you want to remove
- Follow the prompts to confirm the removal
- Once the number is removed, it will no longer be associated with your Apple ID
Q: Will removing a phone number from my Apple ID affect iMessage or FaceTime?
A: If you remove a phone number from your Apple ID, it may impact your ability to use iMessage and FaceTime on that specific device. However, if you still have another phone number or email address associated with your Apple ID, you should still be able to use these services.
Q: Can I remove a phone number from my Apple ID from a different device?
A: Yes, you can remove a phone number from your Apple ID from a different device. Simply follow the same steps mentioned earlier, but make sure you sign in with the correct Apple ID on the device you are using to remove the phone number.
Q: What should I do if I accidentally remove the wrong phone number from my Apple ID?
A: If you accidentally remove the wrong phone number from your Apple ID, don’t panic. You can add it back by following these steps:
- Go to the Apple ID account page on your device
- Sign in with your Apple ID
- Click on “Edit” in the Account section
- Scroll down to the “Phone” section
- Click on “Add More Phone Numbers”
- Enter the correct phone number and follow the prompts to verify it
- Once added, the phone number will be associated with your Apple ID again