
In today’s fast-paced technological landscape, keeping our iPhones up-to-date with the latest software updates is essential for optimal performance and security. However, there may be instances when an update doesn’t meet our expectations or causes issues with our device. In those situations, knowing how to remove an update on your iPhone becomes crucial. Whether you want to undo an update due to compatibility issues, performance concerns, or you simply preferred the previous version, this article will guide you through the process. We will explore different methods to remove an update on your iPhone, providing you with step-by-step instructions and insights on when it might be necessary. So, if you find yourself in a predicament where you need to roll back an update on your iPhone, read on to learn how to do it effectively and efficiently.
Inside This Article
- Method 1: Disable Automatic Updates – Turning off automatic updates – Disabling background app refresh
- Method 2: Remove Update Notification- Clearing the update notification- Disabling software update in settings
- Method 3: Preventing Future Update Notifications – Resetting Network Settings – Using a Third-Party App to Block Update Notifications
- Method 4: Restoring iPhone to Previous iOS Version- Backing up iPhone data- Using iTunes to restore a previous iOS version
- Conclusion
- FAQs
Method 1: Disable Automatic Updates – Turning off automatic updates – Disabling background app refresh
If you’re tired of constantly receiving software update notifications on your iPhone, you’ll be glad to know that there are ways to disable automatic updates and prevent them from interrupting your device usage. By turning off automatic updates and disabling background app refresh, you can regain control over your iPhone’s update process. Let’s explore how to do it:
1. Turning off automatic updates:
To disable automatic updates, follow these steps:
- Open the “Settings” app on your iPhone.
- Scroll down and tap on “General”.
- Select “Software Update.
- Tap on “Customize Automatic Updates”.
- Toggle off the option for “Download iOS updates”.
By turning off this option, your iPhone will no longer automatically download and install software updates. You will now have more control over when and how the updates are performed.
2. Disabling background app refresh:
Background app refresh allows apps to update their content in the background while you’re not actively using them. By disabling this feature, you can prevent apps from refreshing and potentially triggering update notifications. Here’s how to do it:
- Go to the “Settings” app on your iPhone.
- Tap on “General”.
- Select “Background App Refresh”.
- Toggle off the option for “Background App Refresh”.
Disabling background app refresh will not only help prevent update notifications but also preserve battery life by reducing unnecessary background activity.
By following these steps to turn off automatic updates and disable background app refresh, you can effectively eliminate unwanted software update notifications on your iPhone. This allows you to have control over the update process and decide when to perform updates at your convenience.
Method 2: Remove Update Notification- Clearing the update notification- Disabling software update in settings
If you’re tired of being constantly reminded to update your iPhone’s software, there are a few methods you can try to remove the update notification. This will prevent the update message from appearing on your device, giving you peace of mind and control over when you want to update. In this Method 2, we will explore two effective approaches: clearing the update notification and disabling software updates in settings.
To begin, let’s start with clearing the update notification. Sometimes, even if you’ve already dismissed the update notification, it may still be lingering in the background, waiting to remind you again. To get rid of it, follow these simple steps:
- Unlock your iPhone and go to the home screen.
- Swipe down from the top-right corner (or swipe up from the bottom, depending on your iPhone model) to open the Control Center.
- Tap and hold the Wi-Fi icon until it expands to reveal more options.
- Tap on the Airplane mode icon to enable it. This will disable both Wi-Fi and cellular connections.
- Wait for a few seconds and then tap on the Airplane mode icon again to disable it. This will re-enable your Wi-Fi and cellular connections.
By performing these steps, you effectively clear any lingering update notification on your iPhone. This method works for most users and is worth a try if the update reminder persists.
If clearing the update notification didn’t work, don’t worry. You can also disable software updates in your iPhone’s settings. Here’s how:
- Open the Settings app on your iPhone.
- Scroll down and tap on “General”.
- Tap on “Software Update”.
- In the Software Update section, you will see the current iOS version installed on your device. Below it, there is an option called “Customize Automatic Updates”.
- Tap on “Customize Automatic Updates”.
- In the Customize Automatic Updates menu, toggle off the “Download iOS updates” and “Install iOS updates” options. This will prevent your iPhone from automatically downloading and installing software updates.
By disabling automatic software updates, you take control of when to update your iPhone. This means you won’t receive update notifications until you manually check for updates in the Settings app.
Remember, it’s important to keep your iPhone’s software up to date to ensure you have access to the latest features and security improvements. However, if you prefer to delay updates or want to handle them manually, these methods will help you remove the update notification and regain control over your device.
Method 3: Preventing Future Update Notifications – Resetting Network Settings – Using a Third-Party App to Block Update Notifications
When it comes to preventing future update notifications on your iPhone, there are a couple of methods you can try. One option is to reset the network settings on your device, which can help clear any cached data related to updates. Another option is to use a third-party app that blocks update notifications altogether.
To reset network settings on your iPhone, follow these steps:
- Go to the Settings app on your iPhone.
- Scroll down and select “General”.
- Scroll down again and tap on “Reset”.
- Choose “Reset Network Settings”.
- Enter your passcode if prompted.
- Confirm the reset by selecting “Reset Network Settings” again.
This process will reset your network settings, including Wi-Fi passwords and cellular settings. It may also help clear any update-related data that could trigger future update notifications.
If resetting network settings doesn’t fully solve the problem, you can consider using a third-party app to block update notifications. There are several apps available in the App Store that provide this functionality. One popular choice is “Software Update Blocker”. This app allows you to block both major and minor iOS updates, preventing them from showing up on your device.
Once you have installed the app, simply follow the instructions to block update notifications. Keep in mind that using third-party apps may involve additional risks or limitations, so it’s essential to research and choose a reliable app from a trusted developer.
By applying either the network settings reset or using a third-party app to block update notifications, you can reduce or eliminate future update notifications on your iPhone. This can be particularly useful if you prefer to stick with a specific iOS version or if you have experienced compatibility issues with the latest updates.
Remember, staying up-to-date with software updates is generally recommended for security and performance reasons. However, if you have specific reasons for avoiding updates and want to prevent future update notifications, these methods can help you achieve that.
Method 4: Restoring iPhone to Previous iOS Version- Backing up iPhone data- Using iTunes to restore a previous iOS version
If you’re unhappy with the latest iOS update on your iPhone and wish to revert to a previous version, you have the option to restore your device using iTunes. This method involves backing up your iPhone data and then using iTunes to install the desired iOS version. Here’s how you can go about it:
1. Back up your iPhone data: Before proceeding with the iOS restoration, it’s crucial to back up your iPhone to ensure you don’t lose any important data. Connect your iPhone to your computer and launch iTunes. Select your device from the list and click on “Back Up Now” to initiate the backup process. Make sure the backup is successfully completed before proceeding to the next step.
2. Using iTunes to restore a previous iOS version: Once your iPhone data is backed up, you can now proceed with restoring a previous iOS version using iTunes. Follow these steps:
- Launch iTunes on your computer and connect your iPhone using a USB cable.
- Select your iPhone device in iTunes. If prompted for a passcode or to Trust This Computer, follow the instructions.
- In the Summary tab, click on the “Restore iPhone” button.
- A pop-up message will appear asking if you want to restore your iPhone to factory settings or restore from a backup. Choose the option that says “Restore Backup.”
- Select the backup you made earlier from the list of available backups and click “Restore.”
- Wait for the restoration process to complete. Your iPhone may restart several times during this process.
Once the restoration process is finished, your iPhone will restart with the previous iOS version you selected. It’s important to note that restoring your iPhone to a previous iOS version using iTunes will erase all data on your device after the backup was made. Therefore, it’s crucial to perform a backup before proceeding with the restoration process to avoid losing any important data.
Remember that installing a previous iOS version may also mean missing out on the latest features, security patches, and bug fixes introduced in the most recent updates. Consider your decision carefully and weigh the benefits and potential drawbacks before proceeding with the restoration process.
Conclusion
In conclusion, removing updates on your iPhone can be a simple process that can help you reclaim storage space, improve performance, and optimize your device for your specific needs. Whether you want to uninstall a recent update or prevent future updates from being installed automatically, there are various methods you can use depending on your preferences and requirements.
Keep in mind that removing updates may have consequences, such as potential security vulnerabilities or missing out on bug fixes and new features. It’s important to weigh the pros and cons before proceeding and consider the impact it may have on your device’s overall functionality.
If you decide to remove an update, be sure to follow the instructions provided carefully and make a backup of your important data to avoid any unexpected data loss. Remember to regularly check for important system updates and install them to ensure your iPhone stays secure and up to date.
By taking the time to understand your options and making well-informed decisions, you can effectively manage updates on your iPhone and optimize your device for a better user experience.
FAQs
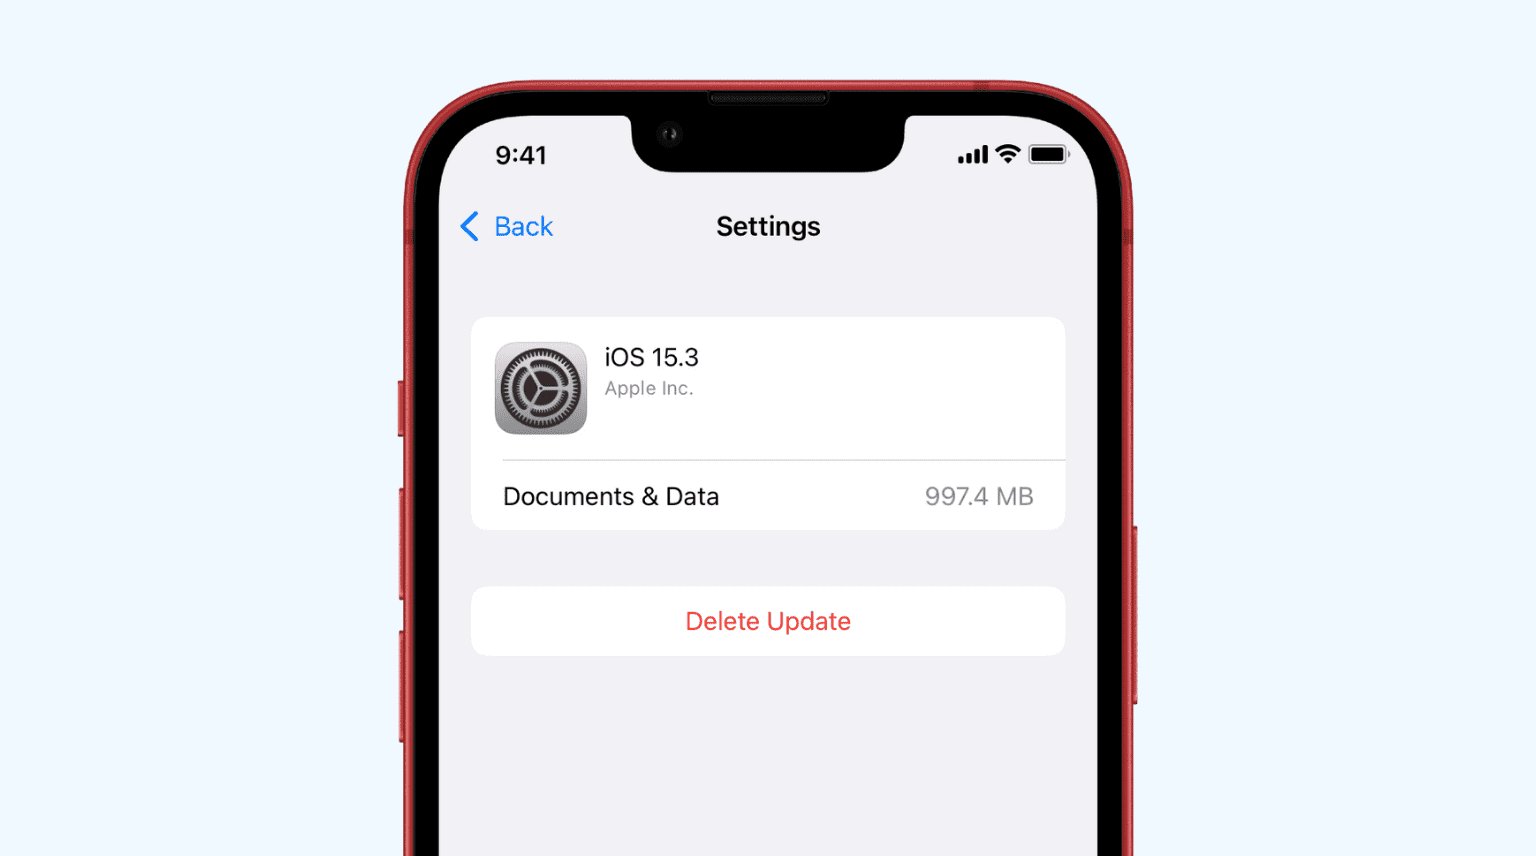
1. How do I remove an update on my iPhone?
To remove an update on your iPhone, go to the Settings app and select General. Then, tap on iPhone Storage and look for the iOS update in the list of apps. Tap on it and select “Delete Update” to remove it from your iPhone.
2. Can I reinstall an update that I have removed?
Yes, you can reinstall the update that you have removed on your iPhone. Simply go to the Settings app, select General, and tap on Software Update. Your iPhone will check for the latest update available, and if the one you deleted is still the latest, you can download and install it again.
3. Will removing an update affect my iPhone’s performance?
Removing an update from your iPhone will not affect its performance. However, it is recommended to keep your iPhone up to date with the latest software to ensure optimal performance, security, and access to new features and improvements.
4. Why would I want to remove an update on my iPhone?
There could be various reasons why you would want to remove an update on your iPhone. One common reason is if the update caused issues or compatibility problems with your device or specific apps. Removing the update allows you to revert to the previous working version until a fix or a more stable update is available.
5. Can I prevent updates from automatically installing on my iPhone?
Yes, you can prevent updates from automatically installing on your iPhone. Go to the Settings app, select General, and tap on Software Update. From there, you can toggle off the “Download iOS updates” or “Install iOS updates” option to prevent automatic updates. However, it is advisable to manually check for updates regularly to stay up to date with important security patches and new features.