
When it comes to getting a new phone, one of the challenges many people face is transferring their data and settings from their old device to their new one. Thankfully, if you have been backing up your data to Google, this process can be made much simpler.
In this article, we will explore the step-by-step process of restoring your Google backup to a new phone. Whether you are switching to a different Android device or even switching from iOS to Android, Google’s backup service can come in handy. We will cover everything from setting up your new phone to restoring contacts, apps, photos, and more. So, if you want to ensure a seamless transition to your new phone without losing any of your precious data, keep reading!
Inside This Article
- Step 1: Check Google Backup Settings
- Step 2: Set Up New Phone
- Step 3: Select Backup to Restore
- Step 4: Restore Google Backup to New Phone
- Conclusion
- FAQs
Step 1: Check Google Backup Settings
Before you can restore your Google backup to a new phone, it’s important to ensure that your backup settings are correctly configured. Follow these steps to check your Google backup settings:
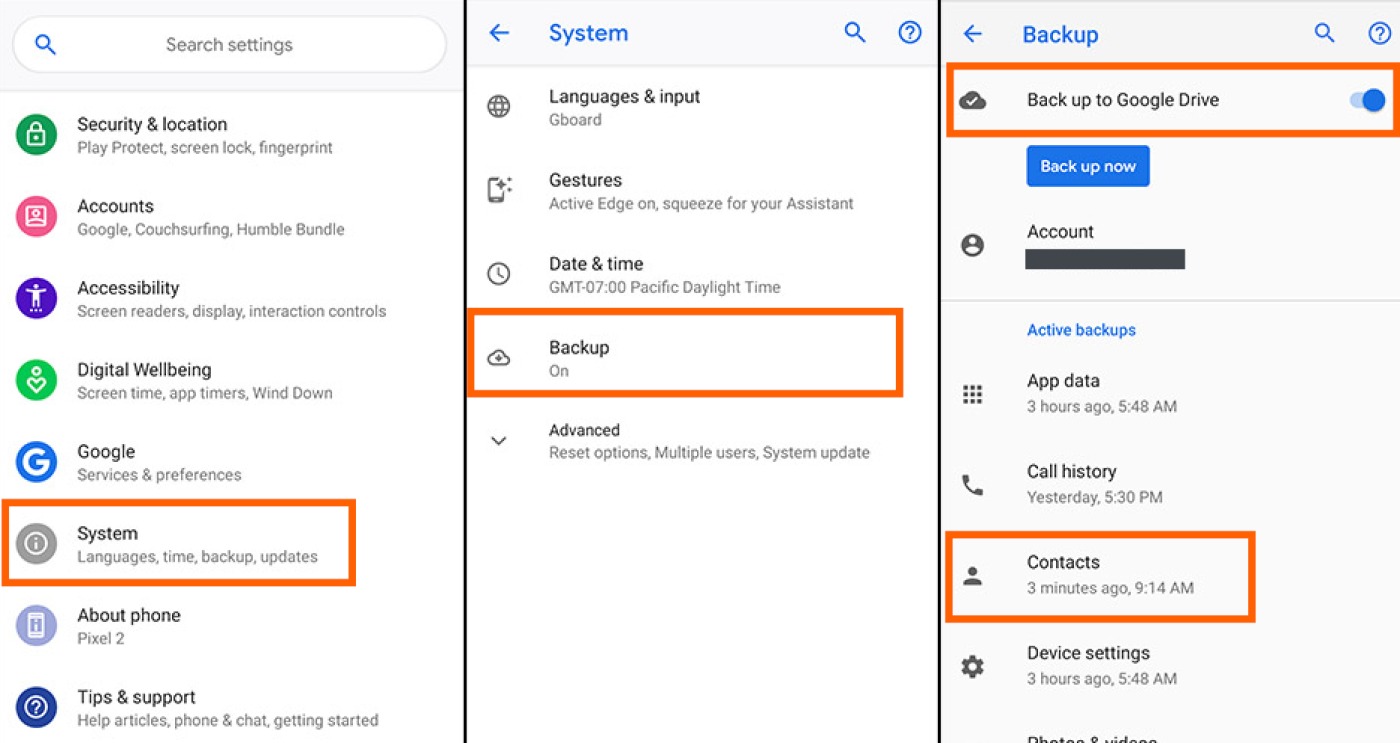
1. Open the “Settings” app on your Android phone.
2. Scroll down and tap on “System”.
3. In the “System” menu, tap on “Backup”.
4. Ensure that the switch next to “Back up to Google Drive” is turned on. This will allow your device to automatically backup your data to your Google account.
5. Tap on “Account” to select the Google account that you want to use for backup.
6. To specify the types of data you want to backup, tap on “Backup items”. Here, you can choose from options such as “App data”, “Contacts”, “Device settings”, and more.
7. Once you have selected the backup items, tap on the back arrow to save your settings.
By ensuring that your Google backup settings are properly configured, you can securely store your important data and seamlessly transfer it to a new phone.
Step 2: Set Up New Phone
Setting up a new phone can be an exciting and rewarding experience. Whether you’ve just purchased the latest flagship device or received a replacement for your old phone, this step is crucial to ensure a smooth transition. Here are some essential steps to follow when setting up your new phone:
1. Power on the Phone: To begin, locate the power button on your new phone. Press and hold it until the device powers on. You may need to follow any on-screen instructions to complete the initial boot-up process.
2. Language and Region: Once your phone has powered on, you’ll be prompted to select your preferred language and region. Choose the options that best suit your needs and proceed to the next step.
3. Connect to Wi-Fi: Before proceeding further, it’s essential to connect your new phone to a Wi-Fi network. This will allow for a faster and more reliable data transfer during the setup process. Tap on the Wi-Fi icon in the settings menu and choose your network from the list. Enter the password if required.
4. Sign in to Your Google Account: If you have an existing Google account, sign in with your credentials. This will give you access to your contacts, apps, and settings from your previous device. If you don’t already have a Google account, you can create one during this step.
5. Restore or Set Up as a New Device: Now, you’ll be given the option to restore your apps, data, and settings from a previous device or set up your phone as a new device. If you want to restore from a previous backup, select the appropriate option and follow the prompts. If you prefer a fresh start, choose the “Set up as a new device” option.
6. Install Essential Apps: Once your phone has been set up, it’s time to install the essential apps you use daily. Head to the app store on your new phone, such as the Google Play Store or the Apple App Store, and download the apps you need. This could include social media apps, messaging apps, productivity tools, and more.
7. Customize Your Settings: Take some time to customize your settings according to your preferences. Adjust settings for notifications, display, sound, privacy, and security to create the personalized experience you desire.
8. Transfer Data (Optional): If you didn’t restore your data during the setup process, you can transfer your contacts, photos, and other files from your previous device using various methods. These may include transferring via the cloud, using a USB cable, or utilizing a third-party app.
9. Update System and Apps: It’s essential to keep your new phone’s operating system and apps up to date to ensure optimal performance and security. Check for system updates in the settings menu and install any available updates. Similarly, update your apps by visiting the respective app stores.
By following these simple steps, you can successfully set up your new phone and get it ready for use. Whether you’re restoring data from a previous device or starting fresh, this process will help you get the most out of your new phone.
Step 3: Select Backup to Restore
Once you have set up your new phone and signed in with your Google account, the next step is to select the backup you want to restore. Google provides a seamless way to manage your backups, allowing you to restore your data and settings effortlessly.
To select the backup to restore, follow these steps:
- Open the Settings app on your new phone.
- Scroll down and tap on “Accounts” or “Cloud and accounts”, depending on your device.
- Select “Google” from the list of account types.
- Tap on your Google account.
- Scroll down and find the “Backup” or “Backup & Restore” section.
- Tap on “Restore” or “Restore Data”.
Your device will now display a list of available backups. This includes backups from all your previous devices associated with your Google account. The backups are usually labeled with the device name and the date they were created.
Review the available backups and select the one that you want to restore to your new phone. If you only have one backup available, it will be automatically selected.
It’s important to note that some data may not be included in the backup, depending on your settings. For example, if you chose not to back up app data, your apps may not be restored to their previous state. Additionally, certain app-specific settings and data may not be included in the backup.
Once you have selected the backup, tap on “Restore” or “Restore Data” to begin the restoration process. Your device will start retrieving the selected backup and restore the data and settings to your new phone.
Please be patient during this process, as it may take some time depending on the size of the backup and your internet connection speed. Ensure that your new phone is connected to a stable Wi-Fi network during the restoration process.
If prompted, follow any additional on-screen instructions to complete the restoration. Once the process is complete, your new phone will have all the data and settings from the selected backup, making it feel like your old phone.
Remember to go through the settings and make any necessary adjustments to ensure everything is set up the way you prefer on your new phone.
Step 4: Restore Google Backup to New Phone
After setting up your new phone and connecting it to your Google account, it’s time to restore your backed-up data. This process ensures that all your important information, such as contacts, text messages, app data, and settings, is transferred to your new device.
To restore your Google backup to a new phone, follow these simple steps:
- On your new phone, go to the initial phone setup screen and sign in with the same Google account that you used to create the backup.
- Follow the on-screen prompts and complete the setup process, including configuring your Wi-Fi connection.
- Once you reach the “Copy apps & data” screen, you will see an option to restore data from a previous device.
- Tap on the “Restore” option to proceed with restoring your Google backup.
- A list of available backups associated with your Google account will be displayed. Select the most recent backup that you want to restore.
- The restore process will begin, and depending on the size of the backup, it may take a few minutes to complete. Make sure your phone is connected to a stable Wi-Fi network and has sufficient battery power.
- Once the restore process is done, your new phone will be populated with all the data from your previous device, including installed apps, app data, contacts, messages, and settings.
- Continue with the remaining setup steps, such as adding your Google account and customizing your preferences, to complete the setup of your new phone.
It’s important to note that not all data might be available for restore, as it depends on the apps and settings you had on your previous device. However, Google backup does a great job of preserving your most essential data and making the transition to a new phone seamless.
By following these steps, you can quickly and efficiently restore your Google backup to a new phone and continue using your device with all your crucial data intact.
The process of restoring Google backup to a new phone is a straightforward and convenient way to transfer your important data and settings. With just a few simple steps, you can seamlessly migrate from one device to another, ensuring that all your files, contacts, app data, and settings are preserved.
By utilizing Google’s backup and restore feature, you can enjoy a hassle-free transition to a new device without the fear of losing any valuable information. Whether you’re switching to a new phone or need to recover data after a factory reset, the Google backup option provides a reliable solution.
Additionally, Google’s backup ensures that you can easily access your data across multiple devices, allowing for a seamless and synchronized experience. This flexibility enables you to effortlessly switch between devices while maintaining a consistent digital ecosystem.
So, the next time you acquire a new phone, remember to utilize Google’s backup and restore functionality. It’s a quick and efficient way to transfer your data and settings, ensuring a smooth transition and peace of mind.
FAQs
1. Can I restore Google backup to a new phone?
Yes, you can restore Google backup to a new phone. Google provides a built-in backup solution for Android devices that allows you to save and restore your app data, settings, and other important information. By signing in to your Google account on your new phone, you can easily restore your backup and transfer your data seamlessly.
2. How do I restore Google backup to a new phone?
To restore your Google backup to a new phone, follow these steps:
- Power on your new phone and complete the setup process.
- When prompted, sign in to your Google account or add it if not already set up.
- During the initial setup, you’ll be asked if you want to restore from a backup. Tap “Restore” and select your Google account.
- Choose the backup you want to restore from and continue through the setup process.
- Once the process is complete, your apps, settings, and other data will be restored to your new phone.
3. What data does Google backup include?
Google backup can include various data from your Android device, such as app data, call history, contacts, device settings, Google Calendar, Chrome bookmarks, Wi-Fi passwords, and even some third-party app data. It’s important to note that the specific data backed up may vary depending on the apps installed on your device and the backup settings you have configured.
4. Can I choose which data to restore from Google backup?
Google backup is designed to restore your complete data to a new device. However, during the setup process, you can choose whether to restore all data from your Google backup or selectively restore specific apps and their associated data. This allows you to customize the data you want to transfer to your new phone and exclude any unnecessary information.
5. Are there any limitations to restoring Google backup?
While Google backup is a convenient way to transfer data to a new phone, there are a few limitations to keep in mind. Some app-specific data may not be included in the backup, as it depends on the developer’s implementation. Additionally, certain system settings may not be restored if the new device has a different Android version or a modified operating system. It’s always a good idea to double-check your settings and manually transfer any important data that may not be covered by the backup.