
Screen recording has become an essential tool for users to capture and share their activities on a Mac. Whether you’re a content creator looking to produce tutorial videos or a professional who needs to record a presentation, knowing how to screen record on a Mac is a valuable skill to have. With the ever-evolving technology, it’s important to stay updated on the latest methods and techniques for screen recording.
In this article, we will guide you through the process of screen recording on a Mac and provide you with an update on the latest methods and tools available in 2023. From built-in screen recording features to third-party applications, we will explore various options that cater to different needs and preferences. So, let’s dive in and discover how you can harness the power of screen recording on your Mac.
Inside This Article
- Overview
- Method 1: Using the built-in QuickTime Player
- Method 2: Using a third-party screen recording tool
- Method 3: Using macOS Mojave or later’s built-in screenshot and screen recording feature
- Conclusion
- FAQs
Overview
Screen recording on Mac has become an essential feature for many users, whether it’s for creating tutorials, capturing gameplay, or documenting important content. Fortunately, there are multiple methods available to help you effortlessly record your screen on a Mac. In this article, we will explore three different methods to accomplish this task effectively.
By leveraging the built-in QuickTime Player, you can easily record your screen without the need for any additional software. This method is perfect for Mac users who prefer a simple and straightforward approach. Alternatively, you can explore third-party screen recording tools that offer more advanced features and customization options. These tools provide a seamless recording experience with a variety of formats and editing capabilities. Lastly, macOS Mojave and later versions offer a built-in screenshot and screen recording feature, making it even easier to capture your screen.
Whether you are a professional content creator, a teacher, or just someone who wants to share their Mac screen with others, learning how to screen record on Mac can be incredibly useful. By following the methods outlined in this article, you will be able to choose the approach that best suits your needs and start recording your screen effortlessly.
Method 1: Using the built-in QuickTime Player
The built-in QuickTime Player on your Mac is not just for playing videos, but it also has a screen recording feature that can capture your Mac’s screen with ease. Follow the steps below to learn how to use QuickTime Player for screen recording:
Step 1: Launch QuickTime Player from the Applications folder or search for it using Spotlight.
Step 2: In the QuickTime Player menu, click on “File” and select “New Screen Recording”.
Step 3: A small window will appear with recording options. You can choose to record the entire screen or a specific portion. Click on the red “Record” button to start the recording.
Step 4: If you want to record audio along with the screen, click on the arrow next to the record button and select the desired audio source.
Step 5: You can also adjust the microphone volume by clicking on the volume icon. Once you’re ready, click on the “Record” button to start recording.
Step 6: To stop the recording, click on the “Stop” button in the menu bar or press the Command + Control + Esc keys on your keyboard.
Step 7: After stopping the recording, QuickTime Player will automatically open the recorded video. From here, you can preview, trim, and save the recording to your desired location on your Mac.
Step 8: Congratulations! You have successfully recorded your Mac screen using the built-in QuickTime Player.
QuickTime Player offers a simple and straightforward approach to screen recording on your Mac. However, if you are looking for more advanced features like annotation tools, editing options, or the ability to record webcam and audio simultaneously, you may want to explore other third-party screen recording tools.
Method 2: Using a third-party screen recording tool
If you prefer to use a third-party screen recording tool to capture your screen on your Mac, there are several options available that offer additional features and flexibility. These tools are designed specifically for screen recording and often provide more advanced options to enhance your recording experience.
One popular third-party screen recording tool for Mac is ScreenFlow. ScreenFlow allows you to capture your screen, record audio from your computer or external microphones, and even edit your recordings with a variety of professional editing features. With ScreenFlow, you can easily create high-quality screen recordings and add annotations, transitions, and other effects to make your videos more engaging.
Another powerful screen recording tool is Camtasia. Camtasia offers a user-friendly interface and a wide range of screen recording and editing features. You can record your screen, add audio and video effects, and even create interactive quizzes and annotations to enhance your videos. Camtasia also offers a built-in video editor that allows you to trim, crop, and merge your recordings.
If you’re looking for a free screen recording tool, QuickTime Player can also be used. Though primarily known as a multimedia player, QuickTime Player also includes a built-in screen recording feature. While its feature set may be more limited compared to dedicated screen recording tools, it still allows you to capture your screen and basic audio recordings.
When choosing a third-party screen recording tool, make sure to consider your specific needs and preferences. Some tools may offer more advanced editing features, while others may prioritize simplicity and ease of use. Take the time to explore different options and read reviews to find the tool that best suits your requirements.
Method 3: Using macOS Mojave or later’s built-in screenshot and screen recording feature
If you’re using macOS Mojave or a later version of the operating system, you have the advantage of accessing a built-in screenshot and screen recording feature. This means you don’t need to download any additional software or rely on third-party tools. Apple has made it even easier to capture and record your screen with just a few simple steps.
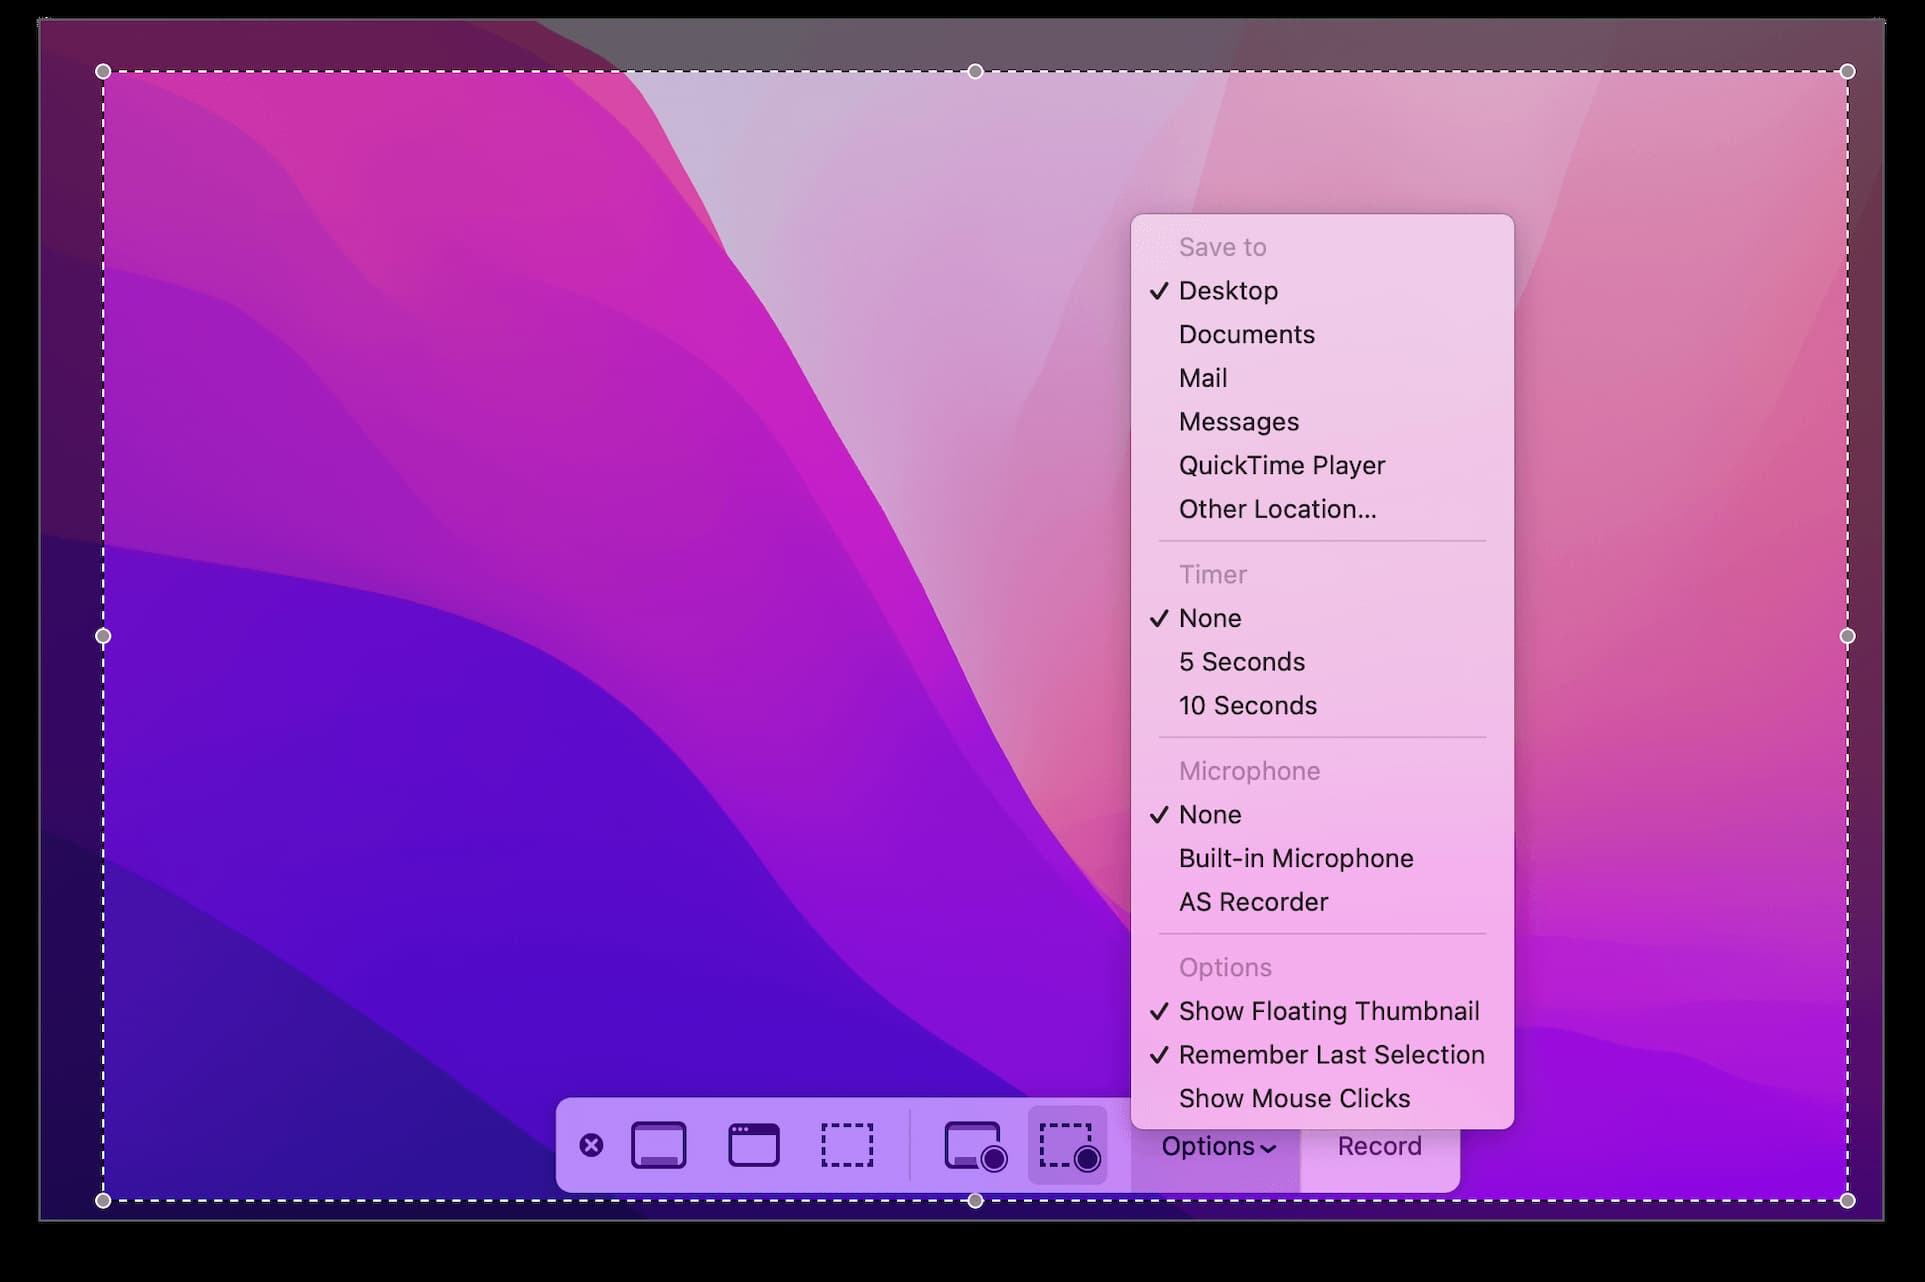
To begin, go to the area of the screen you want to capture or record. This could be an entire window, a specific application, or a particular region. Once you’re ready, press the following keys simultaneously: Command + Shift + 5. This will open the screenshot and screen recording toolbar.
The toolbar presents you with various options. You can capture the entire screen, a selected window, or a specific portion of the screen by choosing the corresponding option from the toolbar. Additionally, you can decide whether to include or exclude the cursor in your captures.
If you want to record your screen, select the “Record Entire Screen” or “Record Selected Portion” option. You can also choose whether to include audio from your microphone or not. Once you’ve made your selections, click on the “Record” button.
While recording, a menu bar will appear at the top of the screen to help you manage the recording process. It allows you to pause, resume, or stop the recording. Keep in mind that when you stop the recording, the file will be saved automatically in the location specified in your system settings.
Once the recording is complete, you can access it by going to the location where it was saved or by clicking on the thumbnail that appears on the bottom-right corner of the screen immediately after you stop recording.
Utilizing macOS Mojave or later’s built-in screenshot and screen recording feature is not only convenient, but it also ensures seamless integration with your Mac’s operating system. Whether you need to capture a screenshot for documentation purposes or record a tutorial video, this feature has you covered.
So, take advantage of the native screenshot and screen recording feature on your Mac and start capturing and recording your screen effortlessly.
Conclusion
Screen recording on a Mac has become an essential feature for many users, whether for creating tutorial videos, capturing gameplay moments, or documenting important information. With the advancements in technology, screen recording has become more accessible and user-friendly.
In this article, we have explored various methods to screen record on your Mac, from built-in tools like QuickTime Player to third-party applications such as OBS Studio and ScreenFlow. Each method offers its own set of features and benefits, catering to different user preferences and requirements.
By following the step-by-step instructions and tips provided, you can now record your screen effortlessly and effectively. Whether you are a content creator, educator, or simply someone who wants to save and share moments from your digital activities, screen recording on your Mac can greatly enhance your productivity and creativity.
So, don’t hesitate to give it a try and start capturing those special moments on your Mac today!
FAQs
1. How do I screen record on Mac?
To screen record on your Mac, you can use the built-in screen recording feature in macOS. Simply press Command + Shift + 5 to open the screen recording toolbar. From there, you can choose to record either the entire screen or a selected portion. Click on the “Record” button to start your screen recording and click again to stop when you’re done. Your screen recording will be saved as a video file on your Mac.
2. Can I record audio while screen recording on Mac?
Yes, you can record audio while screen recording on your Mac. When you open the screen recording toolbar using Command + Shift + 5, click on the Options button. From there, you can choose to record audio from the built-in microphone or an external microphone. Make sure you have the desired audio source selected before you start your screen recording.
3. What formats are supported for screen recordings on Mac?
Screen recordings on Mac are saved in the .mov (QuickTime) format by default. However, you can easily convert the recording to other formats using various video conversion software or online tools. Popular formats like MP4, AVI, and WMV are widely supported and compatible with most devices and platforms.
4. Can I edit my screen recordings on Mac?
Yes, you can edit your screen recordings on Mac using video editing software like iMovie or Final Cut Pro. These applications offer a wide range of editing tools and effects to enhance your screen recordings. You can trim, cut, add captions, adjust audio levels, and more to create professional-looking videos.
5. Is there a time limit for screen recordings on Mac?
By default, there is no time limit for screen recordings on Mac. You can record as long as your storage space allows. However, keep in mind that recording longer videos will result in larger file sizes. It’s recommended to monitor your available storage space and optimize your recordings accordingly to prevent running out of storage during a screen recording session.