
The iPhone camera is known for its exceptional image quality and user-friendly features. One such feature that comes in handy is the timer function. Whether you want to capture a group photo or take a self-portrait without stretching your arm, setting up a timer on the iPhone camera can make the process much easier. In this article, we will guide you through the steps to set up a timer on your iPhone camera, allowing you to capture the perfect shot every time. From adjusting the duration of the timer to selecting the burst mode, we’ll cover all the essential tips and tricks to make the most of this convenient feature. So, grab your iPhone and get ready to explore the world of timer photography!
Inside This Article
- Setting up the Timer on iPhone Camera
- # 1. Accessing the Camera App
- # 2. Enabling the Timer Function
- # 3. Choosing the Timer Duration
- # 4. Capturing a Photo with the Timer
- Conclusion
- FAQs
Setting up the Timer on iPhone Camera
The iPhone is equipped with a versatile camera that allows you to capture stunning photos. One of the features it offers is a timer function, which allows you to set a delay before the photo is taken. This can be incredibly useful in situations where you want to be in the photo yourself or when you need to keep the camera steady for a long exposure shot. In this article, we will guide you through the steps of setting up the timer on the iPhone camera.
1. Accessing the Camera App
To set up the timer on your iPhone camera, start by accessing the camera app. You can find the camera icon on your home screen or in the dock at the bottom of your device. Simply tap on the camera icon to open the camera app.
2. Enabling the Timer Function
Once you have opened the camera app, look for the timer icon located at the top of the screen or on the side, depending on your iPhone model and iOS version. The timer icon looks like a clock with a small circular arrow around it. Tap on the timer icon to enable the timer function.
3. Choosing the Timer Duration
After enabling the timer function, you will be presented with different options for the timer duration. The available options typically include a 3-second timer and a 10-second timer. Choose the timer duration that suits your needs by tapping on the corresponding option.
4. Capturing a Photo with the Timer
With the timer set up and the duration selected, you are now ready to capture a photo using the timer function. Position your iPhone securely, frame your shot, and tap the capture button. The timer will start counting down, giving you a few seconds to get into the photo or adjust the camera’s position if needed.
Once the timer reaches zero, the iPhone will automatically capture the photo. You can either use the rear camera or switch to the front-facing camera for selfies or group photos. Experiment with different timer durations to find the one that works best for your specific photography needs.
Setting up the timer on your iPhone camera is a simple process that can greatly enhance your photography experience. Whether you want to take a group photo without needing someone to press the shutter or capture a stable long exposure shot, the timer function on your iPhone camera has got you covered.
# 1. Accessing the Camera App
Setting up a timer on your iPhone camera allows you to take photos with a delay, giving you ample time to position yourself and be a part of the shot. Accessing the camera app is a simple process that can be done in just a few taps.
To access the camera app on your iPhone, begin by unlocking your device and locating the camera icon on your home screen. It is usually found in the bottom right corner, represented by a small camera icon. Tap on this camera icon to open the camera app.
If you are using an iPhone with a Face ID (such as iPhone X or newer models), you can also access the camera app by swiping left from the lock screen. This shortcut allows you to jump directly into the camera app without needing to unlock your device.
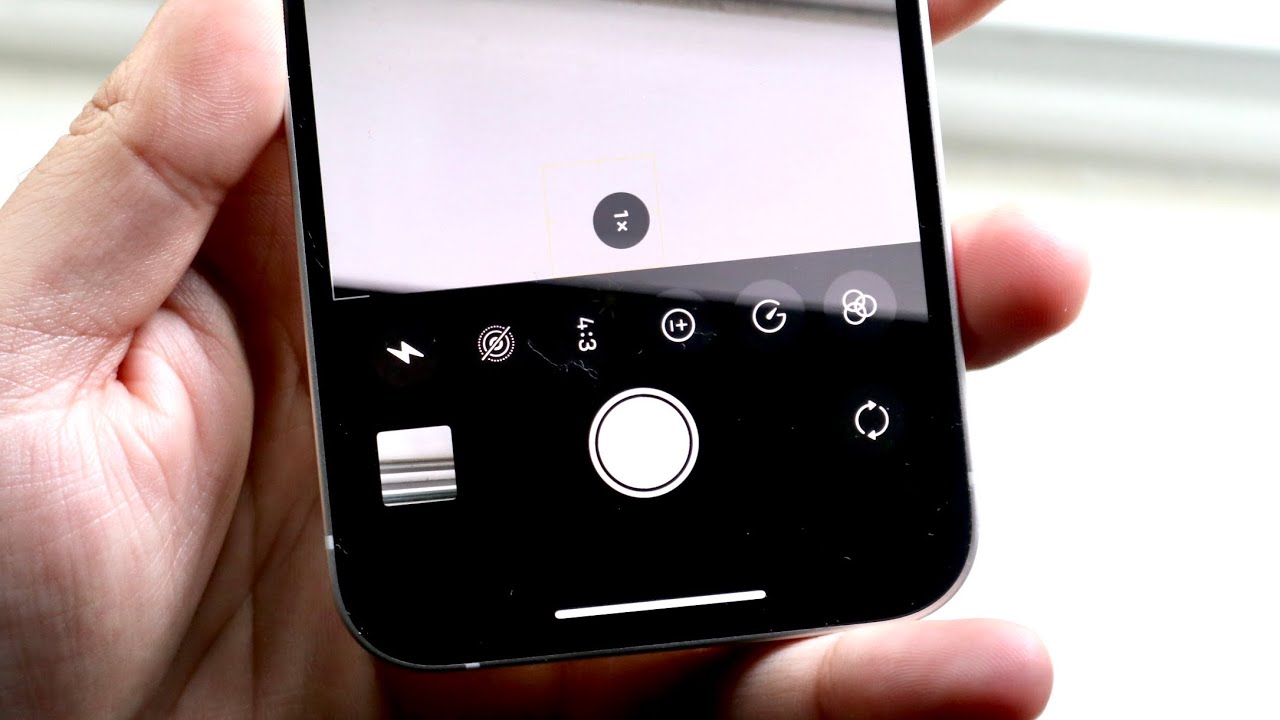
Once you have opened the camera app, you will be greeted with various shooting modes such as Photo, Video, Portrait, and more. At the top of the screen, you will see several icons including the flash, filters, and a timer icon. These icons allow you to customize your camera settings and enable specific features, such as the timer function.
# 2. Enabling the Timer Function
To capture the perfect shot without the need for a selfie stick or someone to take the photo for you, the timer function on your iPhone camera can come to the rescue. Enabling the timer function allows you to set a countdown before the photo is taken, giving you enough time to get in position, strike a pose, and capture that beautiful moment.
Here’s how you can enable the timer function on your iPhone camera:
- Open the Camera app on your iPhone. You can do this by tapping on the camera icon on your home screen or swiping left from the lock screen.
- Once the Camera app is open, you’ll see various options at the top of the screen. Look for the timer icon, which looks like a clock, and tap on it.
- A menu will appear with different timer duration options. You can choose between 3 seconds, 10 seconds, or even a custom duration by tapping on the desired option. Each option represents the countdown time before the photo is taken.
- After selecting the desired timer duration, the timer function will be enabled and a countdown will begin based on the duration you’ve chosen. The camera app will display a visual countdown and make a sound just before taking the photo.
Now that you’ve enabled the timer function on your iPhone camera, you’re ready to capture stunning photos without the need for immediate assistance. Whether you’re taking a group photo, a selfie, or capturing a moment in nature, the timer function ensures you have enough time to compose your shot and be in it. Remember to find a stable surface or use a tripod to avoid blurry photos caused by camera shake during the countdown.
Continue reading to discover how you can choose the perfect timer duration for your specific needs.
# 3. Choosing the Timer Duration
When setting up the timer on your iPhone camera, you have the option to choose the duration before the photo is captured. The timer duration determines the amount of time you have to position yourself and get ready for the shot. Follow the steps below to select your desired timer duration:
- Open the Camera app on your iPhone.
- Tap the Timer icon, which looks like a stopwatch, located in the top-center of the screen.
- A menu will appear at the bottom of the screen, displaying different timer options.
- Choose the timer duration that best suits your needs. The available options are usually 3 seconds, 5 seconds, and 10 seconds.
- Once you’ve selected the desired timer duration, the menu will close automatically.
It’s important to consider the specific situation you are in when choosing the timer duration. If you have limited time to position yourself, a shorter duration like 3 seconds might be more appropriate. On the other hand, if you need more time to get into the frame or adjust your composition, a longer duration like 10 seconds could be more suitable.
The timer duration can also depend on the type of photo you’re trying to capture. If you’re taking a group photo with friends or family, a longer timer duration allows everyone to get ready and gather in the frame. For self-portraits or solo shots, a shorter duration may be sufficient.
Experiment with different timer durations to find what works best for your specific needs. Don’t be afraid to adjust the timer duration based on the situation or subject you’re photographing. Having the flexibility to choose the timer duration gives you more control over your shots and helps you capture the perfect moment.
# 4. Capturing a Photo with the Timer
Once you have set up the timer on your iPhone camera, capturing a photo is a breeze. The timer allows you to have enough time to set up the perfect shot and get yourself in the frame if needed. Here’s how to capture a photo with the timer:
- Position your iPhone securely on a stable surface or use a tripod to ensure it remains steady.
- Ensure that your subject is in focus and composed exactly how you want it in the frame.
- Tap the shutter button on the camera interface. You will see a countdown display indicating the time remaining before the photo is captured.
- Quickly get into position and strike the perfect pose.
- Once the timer hits zero, your iPhone will automatically capture the photo.
- You can review the photo by tapping on the thumbnail that appears at the bottom-left corner of the camera interface.
- If you are not satisfied with the photo and want to retake it, simply tap the Retake button. Otherwise, tap Done to save the photo to your Camera Roll.
Using the timer function on your iPhone camera is an excellent way to capture photos without needing to rely on someone else to take the shot. It gives you the freedom to experiment with different compositions, poses, and expressions.
Whether you want to capture a group photo with family or friends, take a self-portrait, or shoot a stunning landscape, the timer function on your iPhone camera ensures you can achieve the perfect shot every time.
Conclusion
Setting up a timer on your iPhone camera can be a helpful tool, whether you’re taking selfies, group photos or capturing moments with friends and family. With just a few taps, you can set a countdown and have the freedom to position yourself in the frame without rushing.
This feature is particularly useful when you’re traveling alone or want to capture a spontaneous moment without the need for a tripod or someone to take the photo for you. With the timer function, you can ensure every photo is perfectly timed and composed.
Remember, the timer option is available on most iPhone models, so take advantage of this handy feature and elevate your photography game. Say goodbye to blurry or rushed shots and hello to stunning, well-composed photos!
FAQs
1.
Q: How do I set up a timer on my iPhone camera?
A: To set up a timer on your iPhone camera, follow these steps:
- Open the Camera app on your iPhone.
- Swipe to the right to access the different camera modes available.
- Tap on the Timer button, which looks like a clock.
- Select the desired timer duration (3 seconds or 10 seconds).
- Position your iPhone and tap on the shutter button.
- The timer will count down, and the iPhone will take a photo once the timer reaches zero.
2.
Q: Can I change the timer duration on my iPhone camera?
A: Yes, you can change the timer duration on your iPhone camera. Follow these steps:
- Open the Camera app on your iPhone.
- Swipe to the right to access the different camera modes available.
- Tap on the Timer button, which looks like a clock.
- Select the desired timer duration (3 seconds, 10 seconds, or Off).
- Position your iPhone and tap on the shutter button.
- The timer will count down, and the iPhone will take a photo once the timer reaches zero.
3.
Q: Can I use the timer on the front-facing camera?
A: Yes, you can use the timer on the front-facing camera of your iPhone. To do so, follow the same steps to set up the timer as you would for the rear camera.
4.
Q: Can I cancel the timer after it has been started?
A: Yes, you can cancel the timer after it has been started by tapping on the “X” button that appears next to the timer countdown. This will cancel the timer and prevent the iPhone from taking a photo.
5.
Q: Can I adjust the number of shots taken with the timer?
A: No, the timer on the iPhone camera is designed to take a single shot after the specified duration. If you wish to take multiple shots using the timer, you will need to manually activate the timer for each shot.