
Are you wondering how to transfer FaceTime from your iPhone to your Mac? Look no further! In this article, we will guide you step-by-step on how to seamlessly transfer your FaceTime calls from your iPhone to your Mac. FaceTime is a popular video calling app that allows Apple users to communicate with friends, family, and colleagues across different devices. By transferring FaceTime to your Mac, you can enjoy larger screen real estate and a more comfortable video calling experience. Whether you want to have virtual meetings, catch up with loved ones, or simply have a crystal-clear video call, transferring FaceTime to your Mac is a great solution. So let’s dive in and discover how to make the most of this convenient feature.
Inside This Article
- Prerequisites for FaceTime Transfer
- Method 1: Using iCloud Sync
- Method 2: Using AirDrop
- Method 3: Using Third-Party Apps
- Conclusion
- FAQs
Prerequisites for FaceTime Transfer
Before you can begin transferring FaceTime from your iPhone to your Mac, there are a few prerequisites that you need to ensure are in place. These prerequisites will help facilitate a smooth and successful transfer process. Here are the key requirements:
1. A Compatible iPhone and Mac: Make sure that both your iPhone and Mac are compatible with FaceTime. FaceTime is available on devices running iOS 7 or later, and macOS 10.9 or later. Ensure that your devices meet these minimum software requirements.
2. Active FaceTime Accounts: FaceTime transfers require both your iPhone and Mac to have active FaceTime accounts. If you haven’t set up FaceTime on your devices yet, you can easily do so by accessing the “Settings” app on your iPhone and the “FaceTime” app on your Mac, and following the instructions provided.
3. iCloud Account: You will need an active iCloud account on both your iPhone and Mac. This is because the transfer process may involve syncing data through iCloud. If you haven’t set up an iCloud account yet, you can do so by going to the “Settings” app on your iPhone and the “Apple ID” settings on your Mac.
4. Stable Internet Connection: To ensure a seamless and uninterrupted transfer process, it is essential to have a stable internet connection on both your iPhone and Mac. Whether you are using Wi-Fi or cellular data, make sure that you have a reliable internet connection.
5. Sufficient Storage Space: Before initiating the transfer process, check the available storage space on your iPhone and Mac. If either device does not have enough free space, you may encounter issues during the transfer. Free up storage space by deleting unwanted files or apps to ensure a smooth transfer.
By meeting these prerequisites, you can ensure that you have all the necessary elements in place to successfully transfer FaceTime from your iPhone to your Mac. Once you have confirmed that these requirements are met, you can proceed with the transfer process using one of the methods mentioned below.
Method 1: Using iCloud Sync
One of the easiest and most convenient ways to transfer FaceTime from iPhone to Mac is by using iCloud Sync. iCloud Sync allows you to seamlessly sync your FaceTime data across multiple Apple devices, including your iPhone and Mac.
Here’s how you can transfer FaceTime from iPhone to Mac using iCloud Sync:
- Make sure that your iPhone and Mac are connected to the same iCloud account.
- On your iPhone, go to Settings and tap on your Apple ID at the top of the screen.
- Select iCloud and make sure that FaceTime is turned on.
- On your Mac, open the FaceTime app.
- In the menu bar, click on “FaceTime” and select “Preferences”.
- Make sure that the “Enable this account” box is checked next to your Apple ID.
- Close the preferences window.
- Your iPhone and Mac will now sync your FaceTime data, including your contacts, call history, and settings.
Once the sync is complete, you’ll be able to access your FaceTime data on your Mac. This means that you can initiate FaceTime calls and receive them on your Mac, just like you would on your iPhone.
Keep in mind that it may take some time for the initial sync to complete, especially if you have a large amount of FaceTime data. Also, make sure that both your iPhone and Mac have a stable internet connection during the sync process.
Using iCloud Sync to transfer FaceTime from iPhone to Mac is a quick and hassle-free method. It ensures that your FaceTime data is always up to date and easily accessible on all of your Apple devices.
Method 2: Using AirDrop
If you want to transfer FaceTime from your iPhone to your Mac, another convenient method is by using a feature called AirDrop. AirDrop allows you to wirelessly transfer files, photos, and videos between Apple devices, including FaceTime recordings. Here’s how you can transfer FaceTime from iPhone to Mac using AirDrop:
Step 1: Make sure AirDrop is Enabled
On your iPhone, swipe up from the bottom of the screen to open the Control Center. Tap on the AirDrop icon to enable it. On your Mac, open the Finder and click on AirDrop in the sidebar. Make sure AirDrop is set to receive files from either “Contacts Only” or “Everyone”.
Step 2: Choose the FaceTime Recording on iPhone
Open the FaceTime app on your iPhone and locate the recording you want to transfer. Tap and hold on the recording until the options menu appears. Select “Share” from the menu.
Step 3: Select your Mac from the AirDrop List
A list of available devices will appear. Look for your Mac’s name and tap on it. On your Mac, a notification will pop up asking if you want to accept the incoming file. Click “Accept” to start the transfer.
Step 4: Find the FaceTime Recording on your Mac
After the transfer is complete, the FaceTime recording will be saved to your Mac’s Downloads folder by default. You can access it by opening Finder and navigating to the Downloads folder. From there, you can move it to a different location if desired.
AirDrop provides a quick and simple way to transfer FaceTime recordings between your iPhone and Mac without the need for cables or external software. It’s convenient for those who frequently use FaceTime on their devices and want to access their recordings on their computers.
Note: In order to use AirDrop, both devices must be within close proximity to each other and have Wi-Fi and Bluetooth enabled.
Method 3: Using Third-Party Apps
If you’re looking for an alternative method to transfer FaceTime from your iPhone to your Mac, you can rely on third-party apps. These apps are designed to provide a seamless and convenient experience when it comes to transferring data across different devices. Here are a few popular options to consider:
1. Syncios
Syncios is a versatile application that allows you to transfer various types of data, including FaceTime calls, between iOS devices and your Mac. It supports a wide range of file formats and provides a user-friendly interface, making it easy to navigate and operate. Simply download and install Syncios on both your iPhone and Mac, connect your devices, and follow the on-screen instructions to initiate the FaceTime transfer.
2. iMazing
iMazing is another excellent option for transferring FaceTime calls from your iPhone to your Mac. This app offers a comprehensive suite of features, allowing you to manage, backup, and transfer various types of data effortlessly. With iMazing, you can quickly export your FaceTime call history, along with other important files, and import them to your Mac. This ensures that you always have a backup of your FaceTime calls, accessible whenever you need them.
3. IOTransfer
IOTransfer is a user-friendly app that simplifies the process of transferring FaceTime calls and other data from your iPhone to your Mac. It provides a one-click solution that allows you to export your FaceTime call history and save it as a backup file on your Mac. Additionally, IOTransfer offers additional features, such as managing and organizing media files on your iPhone, making it a comprehensive tool for iOS device management.
4. AnyTrans
AnyTrans is a versatile tool that enables you to transfer FaceTime calls and other data from your iPhone to your Mac seamlessly. Its intuitive interface and advanced features make it a popular choice among iPhone users. With AnyTrans, you can easily export your FaceTime call history and import it to your Mac with just a few clicks. It also provides options for selective transfers, allowing you to choose specific FaceTime calls to transfer, ensuring maximum flexibility and convenience.
Using third-party apps is an excellent option if you want more control and flexibility over your FaceTime transfer process. These apps allow you to easily transfer FaceTime calls and other data between your iPhone and Mac, ensuring that you can access and backup your valuable conversations whenever you need them.
Conclusion
Transferring FaceTime from iPhone to Mac is a convenient way to take your video calls and conversations to a larger screen. By following the steps outlined above, you can seamlessly move your FaceTime sessions from your iPhone to your Macbook and enjoy a more immersive experience.
Whether you’re looking to have group video chats, share your screen, or simply enjoy better audio and visual quality, transferring FaceTime to your Mac is a straightforward process that allows you to make the most of this popular communication feature.
Remember to keep your devices updated with the latest software versions to ensure compatibility and reliability. So, go ahead and enjoy the benefits of FaceTime on your Mac and elevate your video calling experience to a whole new level.
FAQs
1. Can I transfer FaceTime calls from my iPhone to my Mac?
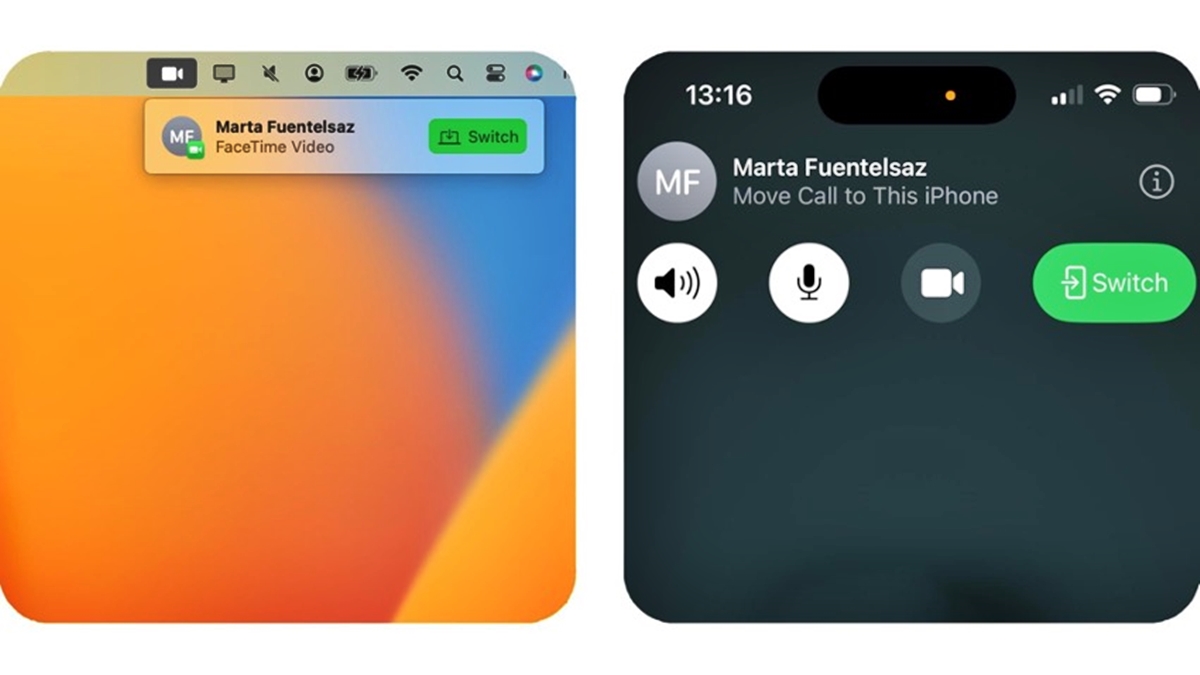
Yes, you can transfer FaceTime calls from your iPhone to your Mac. This convenient feature allows you to seamlessly switch devices without interrupting your call. Simply follow the steps mentioned in this article to transfer your FaceTime call to your Mac.
2. What are the advantages of transferring FaceTime calls to my Mac?
Transferring FaceTime calls to your Mac offers several advantages. Firstly, you can enjoy a larger screen for video calls, making it easier to see the person you are talking to. Secondly, your Mac may have a better camera and audio quality, enhancing the overall call experience. Lastly, transferring calls to your Mac allows you to multitask on your iPhone while participating in your FaceTime call.
3. Are there any requirements to transfer FaceTime calls to my Mac?
Yes, there are a few requirements you need to meet in order to transfer FaceTime calls to your Mac. Firstly, ensure that your iPhone and Mac are both connected to the same Wi-Fi network. Secondly, make sure that you are signed in to FaceTime with the same Apple ID on both devices. Lastly, ensure that you have the latest version of iOS and macOS installed on your iPhone and Mac respectively.
4. Can I transfer a FaceTime call from my Mac back to my iPhone?
Yes, you can transfer a FaceTime call from your Mac back to your iPhone. If you need to move around or go somewhere outside the range of your Mac, you can easily transfer the call by following the same steps mentioned in this article, but in reverse. This way, you can seamlessly continue your call on your iPhone without any interruptions.
5. Can I transfer FaceTime calls from my iPad to my Mac?
Yes, you can transfer FaceTime calls from your iPad to your Mac if both devices are connected to the same Wi-Fi network and signed in with the same Apple ID. The process to transfer the call is similar to transferring it from an iPhone to a Mac. Simply follow the steps mentioned in this article, and you’ll be able to switch your FaceTime call from your iPad to your Mac effortlessly.