
In today’s interconnected world, staying in touch with loved ones and colleagues is essential. One popular way to bridge the distance is through Apple’s FaceTime feature, which allows seamless video and audio calls between Apple devices. If you’re an iPhone user looking to switch your FaceTime call from your iPhone to your Mac, you’re in luck! In this article, we’ll guide you through the simple steps to transfer your FaceTime call from your iPhone to your Mac. Whether you need to continue a conversation on a larger screen or share something on your Mac during the call, this guide will enable you to effortlessly switch FaceTime from your iPhone to your Mac. So let’s dive in and discover how to make the transition with ease!
Inside This Article
- Overview of FaceTime
- Steps to Switch FaceTime from iPhone to Mac
- Troubleshooting Tips for FaceTime on Mac
- Conclusion
- FAQs
Overview of FaceTime
FaceTime is a popular video and audio calling service provided by Apple for its devices. It allows users to connect with family, friends, and colleagues in real-time, regardless of distance. FaceTime offers a seamless communication experience with high-quality audio and video, making it a go-to choice for millions of Apple users worldwide.
One of the standout features of FaceTime is its integration across multiple devices within the Apple ecosystem. This means that you can initiate a FaceTime call on your iPhone and seamlessly switch it to your Mac without any interruptions. This capability makes it incredibly convenient for users who are constantly switching between their mobile devices and desktop computers.
With FaceTime, you can have one-on-one conversations or group calls with up to 32 participants, making it ideal for business meetings, remote learning sessions, or virtual hangouts with friends. The service also supports features like screen sharing, which allows you to easily present documents, photos, or videos during a call.
FaceTime utilizes Apple’s end-to-end encryption, ensuring that your conversations remain private and secure. This level of security is crucial in today’s digital landscape where data breaches and privacy concerns are prevalent.
In addition to video and audio calls, FaceTime also supports other forms of communication. You can send text messages, photos, and videos through the service, making it a versatile communication platform.
Overall, FaceTime encapsulates the essence of seamless and high-quality communication for Apple users. Whether you’re catching up with loved ones, collaborating with colleagues, or simply staying connected, FaceTime provides a reliable and intuitive solution.
Steps to Switch FaceTime from iPhone to Mac
If you’re wondering how to switch FaceTime from your iPhone to your Mac, you’ve come to the right place. FaceTime is a popular video and audio calling service that allows seamless communication between Apple devices. By following these simple steps, you can easily switch FaceTime from your iPhone to your Mac and continue your conversations without any interruptions.
- Ensure FaceTime is enabled on your iPhone: Before you can switch FaceTime to your Mac, make sure it is enabled on your iPhone. To do this, go to the “Settings” app on your iPhone, scroll down and tap on “FaceTime”. Toggle the switch to enable FaceTime if it is currently disabled.
- Sign in to FaceTime on your Mac: Open the FaceTime app on your Mac. If you don’t have it already installed, you can download it from the App Store. Sign in using your Apple ID and password. Make sure you use the same Apple ID that you are using on your iPhone for FaceTime.
- Ensure both devices are connected to the same Wi-Fi network: For FaceTime to work seamlessly between your iPhone and Mac, both devices need to be connected to the same Wi-Fi network. This ensures a stable and reliable connection for your FaceTime calls.
- Launch FaceTime on your Mac: Once you have signed in to FaceTime on your Mac, launch the app. You will see a familiar interface similar to your iPhone’s FaceTime app.
- Sync your contacts: To see your contacts on your Mac’s FaceTime app, make sure you have synced your contacts between your iPhone and Mac. To do this, go to the “System Preferences” on your Mac, click on “Internet Accounts”, and ensure that your contacts are selected to sync with your Apple ID.
- Start a FaceTime call on your iPhone: Before you can switch FaceTime to your Mac, you need to start a FaceTime call on your iPhone. Open the FaceTime app on your iPhone, select a contact, and initiate a video or audio call.
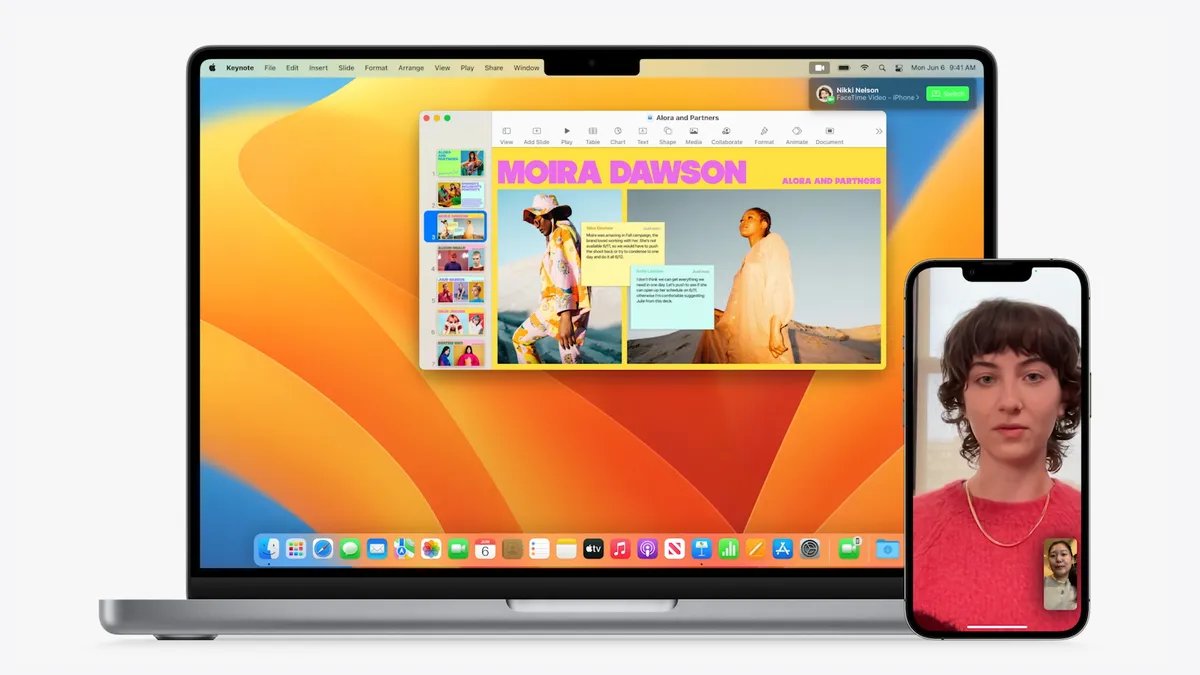
- Switch to your Mac: While your FaceTime call is ongoing on your iPhone, unlock your Mac and click on the FaceTime app. You will notice a banner notification at the top of the app, indicating the ongoing call on your iPhone.
- Accept the call on your Mac: Click on the banner notification to accept the call on your Mac. Your FaceTime call will now switch from your iPhone to your Mac, allowing you to continue the conversation seamlessly.
That’s it! You have successfully switched FaceTime from your iPhone to your Mac. Now you can enjoy FaceTime calls on the bigger screen of your Mac and make use of its enhanced audio and video capabilities.
Troubleshooting Tips for FaceTime on Mac
If you’re experiencing issues with FaceTime on your Mac, don’t worry! We’ve compiled a list of troubleshooting tips to help you get back to enjoying seamless video calls. Whether you’re having trouble connecting, experiencing audio or video problems, or encountering any other difficulties, these tips are here to assist you.
1. Check your internet connection: A stable and reliable internet connection is essential for FaceTime. Make sure you are connected to a strong Wi-Fi network or have a stable Ethernet connection. Slow or intermittent internet speeds can cause FaceTime to lag or freeze.
2. Update FaceTime and macOS: Ensure that both FaceTime and your operating system are up to date. Apple regularly releases software updates that address bugs and improve performance. Go to the App Store and click on “Updates” to check for any available FaceTime or system updates.
3. Restart your Mac: Sometimes, a simple restart can resolve many software-related issues. Close all applications, click on the Apple menu, and select “Restart” to give your Mac a fresh start. Once your Mac restarts, open FaceTime and check if the issue persists.
4. Check FaceTime settings: Verify that your FaceTime settings are correctly configured. Open FaceTime, click on “Preferences” in the top menu bar, and ensure your Apple ID is logged in. Additionally, check your audio and video settings to make sure the correct microphone and camera are selected.
5. Disable Firewall or VPN: If you have a firewall or VPN enabled on your Mac, try temporarily disabling them. Sometimes, these security measures can interfere with FaceTime’s functionality. If the issue is resolved after disabling them, consult the documentation for your firewall or VPN provider to configure them properly for FaceTime.
6. Reset FaceTime preferences: If all else fails, you can try resetting FaceTime preferences. To do this, quit FaceTime, go to the Finder, click on “Go” in the top menu bar, and select “Go to Folder.” Enter “~/Library/Preferences” and locate the “com.apple.facetime.plist” file. Move this file to the Trash, then relaunch FaceTime.
7. Contact Apple Support: If you’ve tried all the troubleshooting steps and are still experiencing issues with FaceTime on your Mac, it may be time to reach out to Apple Support for further assistance. They have the expertise to address complex problems and can guide you through additional troubleshooting steps or provide further solutions.
Remember, FaceTime is a convenient and reliable way to stay connected with friends, family, and colleagues. By following these troubleshooting tips, you can quickly overcome any obstacles and enjoy uninterrupted FaceTime calls on your Mac.
Conclusion
Switching FaceTime from iPhone to Mac is a simple yet powerful way to enhance your video calling experience. By following the steps outlined in this guide, you can seamlessly transition between devices and enjoy the convenience of FaceTime on your Mac.
Whether you need a larger screen for a group video chat, want to make a FaceTime call while working on your Mac, or simply prefer the Mac interface, being able to switch FaceTime to your Mac opens up a whole new world of possibilities.
Make sure to keep your devices updated to the latest versions of iOS and macOS, and ensure a strong internet connection for uninterrupted video and audio quality during FaceTime calls. Now, go ahead and take advantage of the flexibility and convenience that FaceTime offers across your Apple devices. Happy FaceTiming!
FAQs
1. Can I switch FaceTime from my iPhone to my Mac?
Yes, you can switch FaceTime from your iPhone to your Mac. FaceTime is an Apple video and audio calling service that allows you to seamlessly move your call from your iPhone to your Mac and vice versa.
2. How do I switch FaceTime from my iPhone to my Mac?
To switch FaceTime from your iPhone to your Mac, follow these steps:
– Make sure you are signed in to FaceTime with the same Apple ID on both devices.
– On your iPhone, open the FaceTime app and start a FaceTime call.
– Once the call is active, swipe up from the bottom of your iPhone screen to open the Control Center.
– In the Control Center, tap on the “Audio” button to switch the audio output to your Mac.
– On your Mac, the FaceTime call will appear automatically, and you can continue the conversation on your Mac.
3. Can I switch FaceTime from my Mac to my iPhone?
Certainly! You can switch the FaceTime call from your Mac to your iPhone seamlessly. This feature allows you to move the ongoing FaceTime call from one device to another without any interruption.
4. How do I switch FaceTime from my Mac to my iPhone?
To switch a FaceTime call from your Mac to your iPhone, you can follow these simple steps:
– Make sure you are signed in to FaceTime with the same Apple ID on both devices.
– On your Mac, open the FaceTime app and start a FaceTime call.
– While the call is active, click on the green “Audio” button at the top of the FaceTime window.
– From the drop-down menu, select your iPhone from the list of available devices.
– The call will automatically switch to your iPhone, allowing you to continue the conversation on your mobile device.
5. Are there any limitations when switching FaceTime between devices?
When switching FaceTime between devices, it’s important to note a few limitations:
– Both devices need to be signed in to FaceTime using the same Apple ID.
– Make sure that both devices are connected to the same Wi-Fi network or have a stable cellular data connection.
– FaceTime switching may not be supported on older iPhone or Mac models. Check for compatibility with the latest software updates from Apple.
– If the FaceTime call is a group call, only the device that initiated the call can switch devices. Other participants will remain on the original device.