
Are you tired of accidentally tapping on links or phone numbers when reading text on your iPhone? The Live Text feature, introduced in iOS 15, may be the culprit. Live Text automatically detects text in photos and allows you to interact with it, but it can also be a bit intrusive at times.
If you’re looking for a way to disable Live Text on your iPhone, you’ve come to the right place. In this article, we will guide you through the process of disabling Live Text and regaining control over your text interaction experience. Whether you find it distracting or simply prefer the traditional way of reading text, we’ve got you covered.
So, if you’re ready to take control of how you interact with text on your iPhone, let’s dive into the steps to disable Live Text.
Inside This Article
- # How to Disable Live Text on iPhone
- Overview
- Method 1: Disable Live Text in Settings
- Method 2: Disable Live Text for Specific Apps
- Method 3: Use Screen Time to Restrict Live Text
- Troubleshooting Tips
- Conclusion
- FAQs
# How to Disable Live Text on iPhone
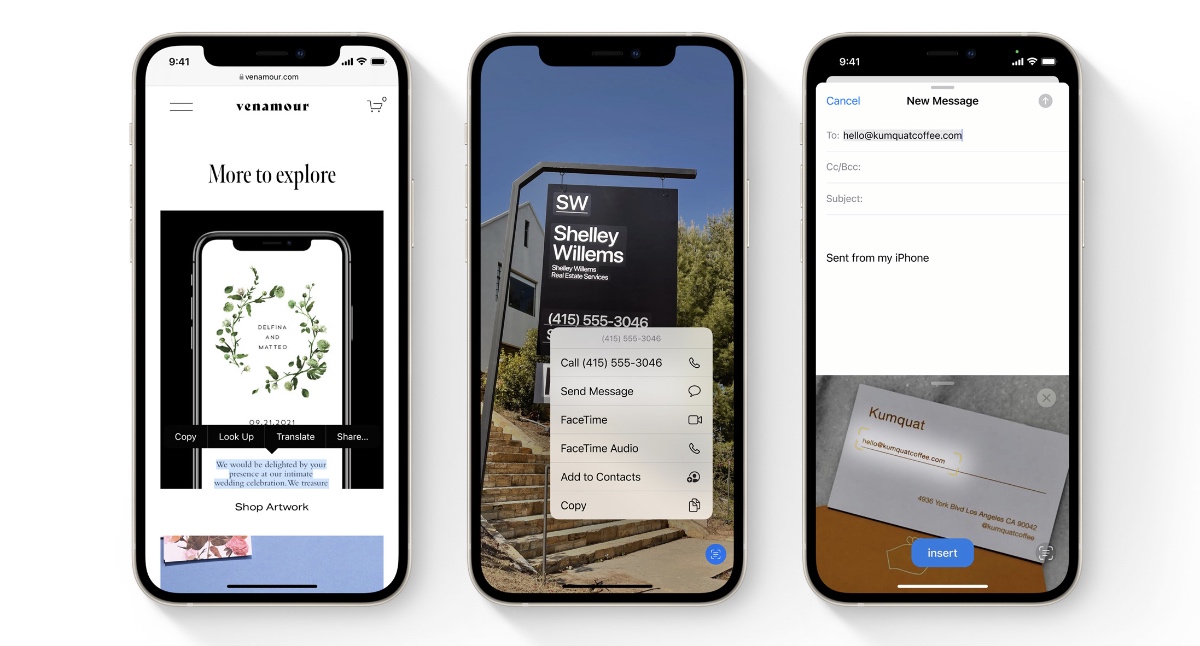
Live Text is a powerful feature introduced in iOS 15 that allows you to interact with text in photos, screenshots, and even live camera views. It can recognize phone numbers, addresses, email addresses, and more, making it easier than ever to take action on the information you come across. However, if you find this feature intrusive or if you have privacy concerns, you may want to disable Live Text on your iPhone. In this article, we will guide you through the process of disabling Live Text.
There are a few different methods you can use to disable Live Text on your iPhone. Let’s take a look at each of them:
Method 1: Disable Live Text in Settings
The first method involves disabling Live Text system-wide in your iPhone’s settings. Here’s how you can do it:
- Open the Settings app on your iPhone.
- Scroll down and tap on “Camera”.
- Toggle off the option for “Live Text”.
Once you’ve disabled Live Text in the Camera settings, you won’t see Live Text prompts and options when you encounter text in photos or camera views.
Method 2: Disable Live Text for Specific Apps
If you still want to use Live Text in some apps but disable it in others, you can do so by following these steps:
- Open the Settings app on your iPhone.
- Scroll down and tap on “Live Text”.
- Toggle off the switch for the specific apps in which you want to disable Live Text.
By disabling Live Text for certain apps, you can control which apps have access to this feature and which do not.
Method 3: Use Screen Time to Restrict Live Text
If you want to limit access to Live Text on your iPhone, particularly for yourself or other users of your device, you can use the Screen Time feature. Here’s how:
- Open the Settings app on your iPhone.
- Tap on “Screen Time”.
- Go to “Content & Privacy Restrictions” and enable it if it’s not already enabled.
- Tap on “Allowed Apps”.
- Scroll down and find “Camera” in the list of apps.
- Disable Live Text for the Camera app by toggling it off.
Restricting Live Text through Screen Time allows you to control its usage on your iPhone, ensuring that only authorized users can access the feature.
Troubleshooting Tips
If you’ve followed the methods above and Live Text is still enabled on your iPhone, try the following troubleshooting tips:
- Make sure that you have updated your iPhone to the latest version of iOS.
- Restart your iPhone and check if Live Text is disabled.
- If the issue persists, you can contact Apple Support for further assistance.
Remember, disabling Live Text on your iPhone may limit your ability to quickly interact with text in images or camera views. However, it also helps ensure your privacy and gives you control over the information you share. Choose the method that suits your needs best and enjoy a personalized iPhone experience.
Now, you know how to disable Live Text on your iPhone. Take the necessary steps to customize your device settings and make the most out of your iPhone experience!
Overview
Live Text is a powerful feature introduced in iOS 15 that allows you to extract text from images and use it in various ways. It can recognize text in photos, screenshots, and even in the camera viewfinder. While Live Text can be useful in many situations, some users may prefer to disable it for personal preferences or to conserve battery life. In this article, we will explore different methods to disable Live Text on your iPhone.
By disabling Live Text, you can prevent your iPhone from automatically detecting and processing text in images. This means that the Live Text toolbar, which appears when you tap on the detected text, will no longer be available. Keep in mind that disabling Live Text will not affect the overall functionality of your iPhone; it simply turns off this specific feature.
Whether you find Live Text to be a distraction or simply want to save resources, let’s dive into the methods to disable Live Text on your iPhone.
Method 1: Disable Live Text in Settings
Live Text is a powerful feature on the iPhone that allows you to interact with text in images and screenshots. However, if you find yourself not using this feature often or prefer to keep your device’s performance optimized, you can easily disable Live Text in the Settings. Follow these simple steps to turn off Live Text:
1. Open the Settings app on your iPhone.
2. Scroll down and tap on “Camera”.
3. In the Camera settings, toggle off the “Live Text” option.
4. You can also disable Live Text for the “Photos” app by going back to the main Settings screen, scrolling down, and selecting “Photos”. Then, turn off the “Live Text” option.
Once you have disabled Live Text, you will no longer see the Live Text icon when you hover over text in images or screenshots. This can be beneficial if you want to avoid accidentally triggering Live Text or if you simply prefer a cleaner interface without the Live Text feature.
Please note that disabling Live Text in the settings will apply to all apps and system-wide, so you won’t be able to use this feature anywhere on your device. However, you can still enable or disable Live Text for specific apps using Method 2, which we will cover next.
Method 2: Disable Live Text for Specific Apps
If you want to disable Live Text for specific apps on your iPhone, you can do so through the app settings. Here’s how you can customize Live Text settings for individual apps:
1. Open the “Settings” app on your iPhone and scroll down to find the specific app you want to disable Live Text for. For example, if you want to disable Live Text for the Messages app, scroll down and tap on “Messages”.
2. In the app settings, you will see various options and settings related to that particular app. Look for the “Live Text” or “Smart Selection” option, which may vary depending on the app.
3. Tap on the “Live Text” or “Smart Selection” option to access the Live Text settings for that app. In most cases, you will find a toggle switch to enable or disable Live Text. Tap on the switch to turn Live Text off for that app.
4. Once you have disabled Live Text for the specific app, you can exit the settings and use the app as usual. Live Text will no longer be activated when you interact with text in that app.
Repeat the above steps for any other apps you want to disable Live Text for. Keep in mind that Live Text settings may not be available for all apps, as it depends on the app developer’s implementation.
By disabling Live Text for specific apps, you can have more control over which apps utilize this feature. It allows you to make a conscious choice based on your preferences and the apps you use most frequently.
Remember, you can always go back to the app settings and re-enable Live Text for any specific app if you change your mind later.
Method 3: Use Screen Time to Restrict Live Text
If you want to have more granular control over Live Text and restrict its usage on specific apps or during certain times of the day, you can utilize the Screen Time feature on your iPhone. Screen Time offers a range of options to manage and limit various aspects of your device’s usage, including Live Text.
To use Screen Time to restrict Live Text, follow these steps:
- Open the Settings app on your iPhone.
- Scroll down and tap on “Screen Time.”
- Tap on “Content & Privacy Restrictions.”
- If Content & Privacy Restrictions is not enabled, tap on “Enable Restrictions” and create a passcode.
- Scroll down and tap on “Allowed Apps.”
- Disable the toggle next to “Camera” and “Photos” to prevent Live Text from being used in those apps.
- To set specific time restrictions for Live Text, tap on “Downtime” and enable it. Choose the start and end times during which Live Text will be restricted.
By utilizing Screen Time, you can have more control over when and where Live Text can be used on your iPhone. This is especially useful if you want to minimize distractions or limit the usage of this feature to specific scenarios.
It’s important to note that restricting Live Text using Screen Time will apply to all apps that support the feature. This means that Live Text will be disabled across the board on your device during the specified restrictions.
Using Screen Time is a great option if you want to have a more structured approach to managing Live Text on your iPhone and ensure that it aligns with your usage preferences and habits.
Troubleshooting Tips
If you’re experiencing any issues while trying to disable Live Text on your iPhone, don’t worry. We’ve got you covered with some troubleshooting tips that can help resolve common problems. Here are a few things you can try:
1. Restart your iPhone: Sometimes a simple restart can solve various software-related issues. Press and hold the power button until you see the “slide to power off” option. Then, slide it to turn off your device. Wait for a few seconds and press the power button again to turn it back on.
2. Update your iPhone: Ensure that your iPhone is running the latest version of iOS. Apple frequently releases software updates to fix bugs and improve functionality. To check for updates, go to Settings > General > Software Update and follow the on-screen instructions.
3. Reset settings: If the Live Text feature is still not disabled, you can try resetting your iPhone’s settings. Go to Settings > General > Reset, and select “Reset All Settings.” Keep in mind that this will not erase your data but will revert all settings to their default configurations. You’ll need to reconfigure any personalized settings afterward.
4. Contact Apple Support: If none of the above solutions work, it’s best to reach out to Apple Support for further assistance. They have a team of experts who can guide you through the troubleshooting process or help diagnose any hardware-related issues.
Remember, troubleshooting tips can vary depending on your specific iPhone model and iOS version. If you’re unsure or encountering a unique problem, it’s always advisable to seek professional support for the most accurate guidance.
In conclusion, disabling Live Text on your iPhone can help enhance your privacy, improve battery life, and reduce distractions. By following the simple steps outlined in this article, you can easily turn off this feature and regain control over how you interact with text within images.
Remember, Live Text is a powerful tool that can be incredibly useful in certain situations, such as quickly extracting information from photos or screenshots. However, if you find it to be more of a hindrance than a help, don’t hesitate to disable it. Your iPhone is a versatile device that can be customized to suit your personal preferences and needs.
Whether you disable Live Text temporarily or permanently, it’s important to explore different features and settings to make the most out of your iPhone. With its advanced capabilities and user-friendly interface, your iPhone can truly be a powerful tool in your hands.
FAQs
Here are some frequently asked questions about disabling Live Text on iPhone:
1. What is Live Text on iPhone?
Live Text is a feature introduced in iOS 15 that allows users to extract text from images and use it in various ways. It uses optical character recognition (OCR) technology to recognize and convert text in photos into selectable and searchable text.
2. Why would I want to disable Live Text?
While Live Text can be a convenient feature for extracting information from images, some users may prefer to disable it for privacy or performance reasons. Disabling Live Text can help save battery life and reduce background processing on your iPhone.
3. How do I disable Live Text on my iPhone?
To disable Live Text on your iPhone, go to Settings, then navigate to Camera. From there, you can toggle off the “Live Text” option to disable the feature. Please note that this may vary slightly depending on the version of iOS you are running.
4. Will disabling Live Text affect other features on my iPhone?
No, disabling Live Text will only affect the Live Text feature itself. All other features and functionalities of your iPhone will remain unaffected.
5. Can I enable Live Text again after disabling it?
Yes, if you decide to re-enable Live Text on your iPhone, you can simply follow the same steps mentioned above and toggle on the “Live Text” option in the Camera settings.
Remember, disabling Live Text is a personal preference, and you can choose to enable or disable it based on your needs and preferences.