
Are you struggling to update your email on your iPhone? Well, you’re in the right place! Your email is an essential communication tool, and it’s important to keep it up to date on your device for seamless connectivity. Whether you’ve switched email providers or simply want to add a new email account, this article will guide you through the process step by step. In this comprehensive guide, we’ll cover everything you need to know to update your email on your iPhone effectively. From configuring settings to troubleshooting common issues, we’ve got you covered. So, grab your iPhone, and let’s get started on ensuring that your email is up to date and ready to go!
Inside This Article
- Reasons to Update Email on iPhone
- Steps to Update Email on iPhone
- Troubleshooting Tips for Updating Email on iPhone
- Conclusion
- FAQs
Reasons to Update Email on iPhone
Updating your email settings on your iPhone can provide several benefits and improve your overall email experience. Here are some key reasons why you should consider updating your email on iPhone:
1. Sync Across Devices: By updating your email on iPhone, you ensure that your emails are synced across all your devices. This means that any changes you make, such as deleting or archiving emails, will be reflected on your other devices as well. This allows for a seamless email management experience, no matter which device you’re using.
2. Enhanced Security: With regular email updates, you can take advantage of the latest security features and patches offered by email providers. This helps protect your sensitive information from potential threats, keeping your emails and personal data secure.
3. Access to New Features: Email providers often release updates that introduce new features and functionalities. By updating your email on iPhone, you can take advantage of these new features, such as smart folders, improved search capabilities, and advanced filtering options, to optimize your email management.
4. Improved Performance: Outdated email settings can sometimes result in slow performance, including delayed email delivery, lagging when opening emails, or problems with syncing. Updating your email on iPhone ensures that you have the latest settings and configurations, helping to improve the overall performance of your email app.
5. Compatibility with New iOS Versions: As Apple regularly releases new iOS versions, updating your email on iPhone ensures compatibility and prevents any issues or glitches that may arise with older email settings. It ensures that your email app runs smoothly, without any compatibility issues, on the latest iOS version.
6. Auto Configuration: Email updates often come with auto-configuration settings that make it easier to set up and access your email account. This eliminates the need for manual configuration, making the setup process quicker and more convenient.
7. Better Organization: Email updates often offer enhanced organization features, such as the ability to create custom folders, apply labels or tags, and set up rules for sorting incoming emails. By updating your email on iPhone, you can take advantage of these organization tools to keep your inbox tidy and efficiently manage your emails.
Overall, updating your email on iPhone ensures that you have access to the latest features, improved security, and a smoother email experience. It’s a simple yet effective way to stay up-to-date and make the most out of your email app on your iPhone.
Steps to Update Email on iPhone
Updating your email on iPhone is a simple process that allows you to keep your mailbox organized and ensure smooth communication. Here are the steps you need to follow:
- Open the Settings app: Tap on the “Settings” icon, usually located on your home screen.
- Scroll down and tap on “Mail”: Scroll through the settings options until you find the “Mail” option, and tap on it.
- Select “Accounts”: In the Mail settings, you will see a list of options. Tap on “Accounts” to access the accounts linked to your iPhone.
- Choose the email account you want to update: From the list of accounts, select the email account that you want to update. You will be taken to its settings page.
- Update your email information: On the email account settings page, you will find options to update your email address, name, password, and other account details. Tap on the field you want to update and make the necessary changes.
- Save the changes: Once you have made the necessary updates, tap on the “Save” or “Done” button to save the changes to your email account.
That’s it! Your email account on iPhone has been updated with the new information. You will now be able to send and receive emails using the updated email address and other account details.
It’s important to note that the steps may vary slightly depending on the version of iOS you are using on your iPhone. However, the overall process remains similar across different versions.
Updating your email account on iPhone ensures that you stay connected and helps you maintain an organized inbox. So, if you have recently changed your email address or updated your account details, make sure to follow these steps to keep your iPhone up to date.
Troubleshooting Tips for Updating Email on iPhone
Updating your email on your iPhone is a simple process, but sometimes you may encounter issues along the way. Whether it’s a settings problem or a technical glitch, here are some common troubleshooting tips to help you resolve any issues you may face while updating your email on your iPhone.
1. Check your internet connection: Before proceeding with any troubleshooting steps, make sure you have a stable internet connection. Without a reliable connection, your iPhone may not be able to update your email properly.
2. Restart your iPhone: A simple restart can often fix minor software glitches that may be causing issues with updating your email. Press and hold the power button until the “slide to power off” option appears. Slide it to turn off your iPhone, then press and hold the power button again to turn it back on.
3. Verify your email settings: Double-check that your email settings are correct. Go to the Settings app on your iPhone, select “Mail,” and then choose the email account you want to update. Ensure that the username, password, incoming and outgoing mail server settings are accurate.
4. Update your iPhone software: It’s essential to keep your iPhone’s software up to date to avoid compatibility issues. Go to the Settings app, select “General,” and then tap on “Software Update.” If an update is available, follow the on-screen instructions to install it.
5. Remove and re-add your email account: If the previous steps don’t resolve the issue, you may need to remove and re-add your email account on your iPhone. Go to the Settings app, select “Mail,” then tap on “Accounts.” Choose the email account you want to update, and then select “Delete Account.” Once deleted, tap on “Add Account” to reconfigure your email account.
6. Clear cache and data: Clearing the cache and data of the Mail app on your iPhone can help resolve issues related to updating emails. Go to the Settings app, select “General,” then tap on “iPhone Storage.” Scroll down and find “Mail” from the list of apps. Tap on it and select “Offload App” or “Delete App.” Afterward, reinstall the Mail app from the App Store.
7. Contact your email service provider: If none of the above troubleshooting tips work, it may be worth reaching out to your email service provider for further assistance. They may be able to provide specific instructions or settings that are required for updating your email on an iPhone.
By following these troubleshooting tips, you can overcome any hurdles you may encounter while updating your email on your iPhone. Remember to be patient and thorough in your troubleshooting process, and don’t hesitate to seek assistance if needed.
Conclusion
Updating your email on your iPhone is a simple yet essential task that can greatly improve your communication experience. With the step-by-step guide provided in this article, you can easily update your email settings and ensure that you stay connected wherever you go.
Remember to double-check your email settings and credentials to ensure that they are accurate and up to date. Additionally, exploring advanced email features like push notifications, email filters, and syncing options can help you tailor your email experience to your specific needs.
Whether you are adding a new email account or updating an existing one, it’s important to keep your iPhone’s email settings optimized for your convenience. By following the instructions and tips outlined in this article, you can effortlessly update your email on your iPhone and enjoy a seamless communication experience.
FAQs
1. How do I update my email on iPhone?
To update your email on iPhone, follow these steps:
1. Open the Settings app on your iPhone.
2. Scroll down and tap on “Mail” or “Mail, Contacts, Calendars”.
3. Tap on “Accounts”.
4. Select the email account you want to update.
5. Tap on “Email”.
6. Enter your new email address and tap “Save”.
That’s it! Your email address has been updated on your iPhone.
2. Will updating my email on iPhone affect my other devices?
No, updating your email on iPhone will not affect your other devices. Your email account is usually synced across all your devices, so any changes you make on one device will automatically update on the others. However, it’s always a good idea to double-check your email settings on other devices to ensure they are properly synced with the updated email address.
3. Can I have multiple email accounts on iPhone?
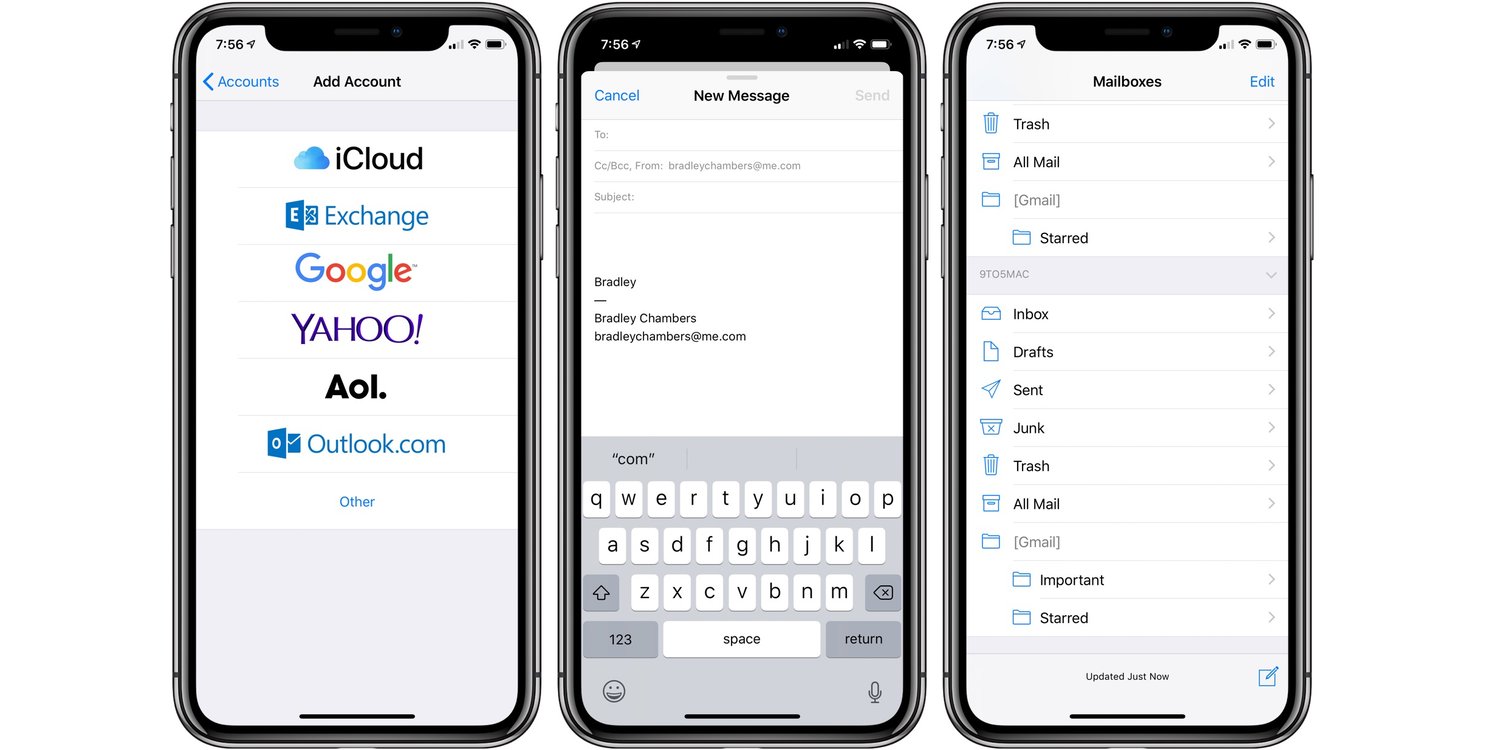
Yes, you can have multiple email accounts on iPhone. The iPhone supports multiple email accounts from different providers such as iCloud, Gmail, Outlook, Yahoo, and more. To add another email account, simply go to “Settings” > “Mail” > “Accounts” > “Add Account”, and follow the on-screen instructions.
4. How do I change the default email account on iPhone?
To change the default email account on iPhone, follow these steps:
1. Open the Settings app on your iPhone.
2. Scroll down and tap on “Mail” or “Mail, Contacts, Calendars”.
3. Tap on “Default Account”.
4. Select the email account you want to set as the default.
Now, whenever you compose a new email or reply to an email, the selected account will be used by default.
5. What should I do if I encounter issues after updating my email on iPhone?
If you encounter any issues after updating your email on iPhone, here are some troubleshooting steps you can try:
1. Double-check the email settings and make sure they are entered correctly.
2. Restart your iPhone to refresh the system.
3. Delete and re-add the email account on your iPhone.
4. Ensure that your internet connection is stable and working properly.
5. Contact your email service provider for further assistance if the issue persists.