
Welcome to the era of seamless connectivity! In our fast-paced world, staying connected to the internet is essential, especially when using our iPhones and iPads. Whether you’re at home, in the office, or on the go, accessing Wi-Fi networks quickly and effortlessly can make all the difference. In this article, we will guide you through the quickest and most efficient methods to connect your iPhone or iPad to Wi-Fi networks in 2023. With these invaluable tips and tricks, you’ll be able to effortlessly connect to the internet and enjoy all the benefits that come with it, from browsing the web to streaming your favorite shows and staying connected with friends and family. So, let’s dive in and discover the secrets to lightning-fast Wi-Fi connection on your iPhone and iPad.
Inside This Article
- Getting Started with Wi-Fi on iPhone & iPad
- Connecting to Wi-Fi Networks Automatically
- Connecting to Wi-Fi Networks Manually
- Troubleshooting Wi-Fi Connection Issues on iPhone & iPad
- – Getting Started with Wi-Fi on iPhone & iPad
- Connecting to Wi-Fi Networks Automatically
- Connecting to Wi-Fi Networks Manually
- Troubleshooting Wi-Fi Connection Issues on iPhone & iPad
- Conclusion
- FAQs
Are you tired of struggling to connect to Wi-Fi networks on your iPhone or iPad? Well, worry no more! In this article, we will guide you through the quickest way to connect to Wi-Fi on your Apple devices in 2023. Whether you’re at home, at work, or on the go, these tips and tricks will help you stay connected effortlessly.
Before we dive into the details, let’s start with the basics. Both the iPhone and iPad come with built-in Wi-Fi capabilities, allowing you to connect to wireless networks for internet access. By connecting to Wi-Fi, you can enjoy faster speeds, save on cellular data, and access features that require an internet connection.
Getting Started with Wi-Fi on iPhone & iPad
To start connecting to Wi-Fi networks quickly, you first need to ensure that Wi-Fi is enabled on your device. Here’s how:
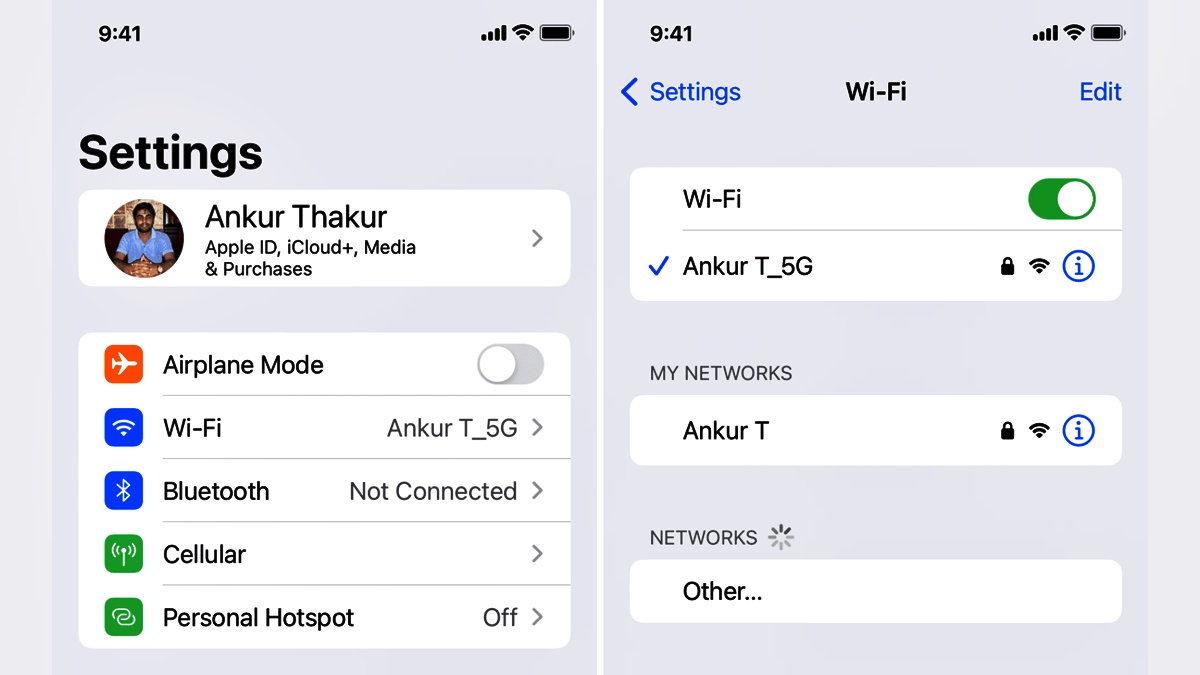
1. Open the “Settings” app on your iPhone or iPad.
2. Scroll down and tap on “Wi-Fi.”
3. Toggle the switch to turn on Wi-Fi if it’s not already enabled. The switch will turn green when Wi-Fi is on.
With Wi-Fi enabled, your device will automatically search for available networks and display them in a list. Now, let’s explore how you can connect to Wi-Fi networks automatically.
Connecting to Wi-Fi Networks Automatically
If you frequently connect to the same Wi-Fi networks, you can set your iPhone or iPad to connect automatically. This way, you won’t need to manually select the network each time. Follow these steps:
1. Open the “Settings” app and go to “Wi-Fi.”
2. Find the Wi-Fi network you want to connect to automatically from the list of available networks.
3. Tap on the network name.
4. Toggle the switch to enable “Auto-Join.” The switch will turn green, indicating that your device will connect to this network automatically whenever it’s in range.
That’s it! Your device will now connect to the selected Wi-Fi network without any manual intervention as long as the network is available. This saves you the hassle of manually connecting each time you’re within range of a known network.
Connecting to Wi-Fi Networks Manually
Although automatic connection is convenient for familiar networks, you will still come across new Wi-Fi networks that require manual connection. Here’s how you can do it:
1. Open the “Settings” app and go to “Wi-Fi.”
2. From the list of available networks, select the one you want to connect to.
3. If the network is secured with a password, enter the password when prompted.
4. Tap on “Join” to connect to the network.
Once connected, your device will remember the network, and it will automatically connect to it whenever it’s in range. Now you can enjoy seamless internet access on your iPhone or iPad!
Troubleshooting Wi-Fi Connection Issues on iPhone & iPad
Sometimes, you may encounter Wi-Fi connection issues on your iPhone or iPad. Here are a few troubleshooting tips to help resolve common problems:
– Restart your device: Sometimes, a simple restart can fix temporary Wi-Fi issues. Press and hold the power button until you see the “Slide to power off” option. Slide to turn off your device, then turn it on again after a few seconds.
– Reset network settings: If restarting didn’t work, you can try resetting your network settings. Go to “Settings,” then “General,” followed by “Reset.” Tap on “Reset Network Settings” and confirm your action. Note that this will clear saved Wi-Fi passwords and other network-related settings.
– Update software: Ensure that your iPhone or iPad is running the latest software version. Updates often include bug fixes and improvements that can resolve Wi-Fi issues. Go to “Settings,” tap on “General,” then “Software Update,” and follow the on-screen instructions to update your device.
By following these steps and troubleshooting tips, you can quickly connect to Wi-Fi networks on your iPhone or iPad. Stay connected and enjoy all the benefits of a reliable internet connection!
– Getting Started with Wi-Fi on iPhone & iPad
Welcome to the world of wireless connectivity on your iPhone and iPad! Connecting to Wi-Fi networks not only gives you access to the internet but also enables fast and reliable data transfer. In this guide, we will walk you through the process of getting started with Wi-Fi on your iPhone and iPad, so you can enjoy all the benefits of a wireless connection.
To begin, make sure your device is powered on and unlocked. On your home screen, locate and tap on the “Settings” app. It’s usually represented by a gear icon.
Once you’re in the Settings menu, look for the “Wi-Fi” option. It’s typically located near the top, just below the Airplane Mode option. Tap on “Wi-Fi” to access the Wi-Fi settings.
On the Wi-Fi settings screen, you’ll see a list of available networks under the “Choose a Network” section. These are the Wi-Fi networks within range of your device. It may take a few seconds for the list to populate.
To connect to a Wi-Fi network, simply tap on its name in the list. If the network is secured with a password, you’ll be prompted to enter it. Once you’ve entered the correct password, tap “Join” to connect.
Your device will now attempt to connect to the selected network. If the connection is successful, the Wi-Fi network name will be displayed at the top of the Wi-Fi settings screen, and a checkmark icon will appear next to it.
It’s important to note that some Wi-Fi networks may require additional steps for authentication or agreement to terms and conditions. If prompted, follow the on-screen instructions to complete the connection process.
Once connected, your iPhone or iPad will automatically remember the Wi-Fi network and connect to it whenever it’s in range. This ensures that you can seamlessly switch between Wi-Fi networks without having to repeatedly enter passwords.
If you ever want to disconnect from a Wi-Fi network, simply return to the Wi-Fi settings screen and tap on the network name. Then, tap on “Forget This Network” to remove it from your device’s memory. You can always reconnect to the network later if needed.
That’s it! You’re now well-equipped with the knowledge to get started with Wi-Fi on your iPhone and iPad. Enjoy the freedom and convenience of a wireless connection, and stay connected wherever you go!
Connecting to Wi-Fi Networks Automatically
One of the conveniences of modern smartphones and tablets like the iPhone and iPad is the ability to automatically connect to Wi-Fi networks. By enabling this feature, your device will automatically connect to saved Wi-Fi networks whenever they are in range. This eliminates the hassle of manually selecting and entering Wi-Fi passwords every time you want to connect.
To set up your iPhone or iPad to connect to Wi-Fi networks automatically, follow these easy steps:
- Open the Settings app on your device.
- Scroll down and tap on Wi-Fi.
- Make sure that the Wi-Fi switch is turned on.
- Next, tap on the “Auto-Join” option.
- Toggle the switch next to “Auto-Join” to enable the feature.
Once you have completed these steps, your device will automatically connect to saved Wi-Fi networks whenever they are within range. This is particularly useful when you frequently visit locations with Wi-Fi networks, such as your home, office, or favorite coffee shop.
It’s important to note that your device will prioritize connecting to networks that have been previously joined. If you have multiple saved networks in the vicinity, your device will automatically connect to the one with the strongest signal and highest priority.
In addition, keep in mind that your device will only automatically connect to open, password-free networks or networks for which you have previously entered the correct password. If you attempt to connect to a new Wi-Fi network that requires a password, you will still need to manually enter the password the first time you connect.
Overall, enabling automatic Wi-Fi connection on your iPhone or iPad is a time-saving feature that eliminates the need for manual intervention. With this feature turned on, you can effortlessly connect to your favorite Wi-Fi networks whenever you are within range, providing a seamless and efficient internet experience.
Connecting to Wi-Fi Networks Manually
While connecting to Wi-Fi networks automatically is convenient, there may be instances when you need to connect to a network manually on your iPhone or iPad. Whether you’re in a public space, at a friend’s house, or setting up a new Wi-Fi network, here’s how you can manually connect to Wi-Fi on your device.
1. Start by unlocking your iPhone or iPad and opening the Settings app. You can easily find the Settings app on your device’s home screen; it resembles a gear icon.
2. In the Settings app, scroll down and tap on “Wi-Fi.” This will take you to the Wi-Fi settings page.
3. On the Wi-Fi settings page, make sure the Wi-Fi toggle is turned on. If it’s already on, proceed to the next step. If it’s off, tap on the toggle to enable Wi-Fi.
4. Once Wi-Fi is turned on, your device will begin scanning for available Wi-Fi networks. Wait for a moment until the list of detected networks populates on the screen.
5. In the list of available networks, locate the network you want to connect to. The network names will appear as a list of SSIDs (Service Set Identifiers).
6. Tap on the network name you wish to join. If the network is secured with a password, you will be prompted to enter the password. Type in the password using the on-screen keyboard. Make sure to enter it correctly as passwords are case-sensitive.
7. After entering the password, tap on the “Join” button. Your device will attempt to connect to the chosen Wi-Fi network.
8. If the password is correct and the connection is successful, you will see a checkmark next to the network name, indicating that your device is connected. You can now enjoy the benefits of a manually connected Wi-Fi network.
It’s worth mentioning that some Wi-Fi networks may require additional authentication or configuration settings. In such cases, you may be prompted to fill in additional details or choose a specific authentication method to connect to the network. Follow the on-screen instructions to complete the connection process.
Keep in mind that your device will remember the networks you manually connect to and automatically connect to them in the future if they are available. If you no longer want your device to automatically connect to a specific network, you can simply forget that network from the Wi-Fi settings page.
Now that you know how to manually connect to Wi-Fi networks on your iPhone or iPad, you can easily stay connected even in situations where automatic connections are not possible.
Troubleshooting Wi-Fi Connection Issues on iPhone & iPad
While connecting to Wi-Fi networks on your iPhone or iPad is usually a seamless experience, there may be instances where you encounter connection issues. If you’re facing trouble with your Wi-Fi connection on your Apple device, here are some troubleshooting steps you can take to get back online.
1. Restart your device: Often, a simple restart can resolve temporary connectivity issues. Press and hold the power button on your device, then slide to power off. After a few seconds, turn it back on and see if the Wi-Fi connection improves.
2. Check your Wi-Fi signal: Ensure that you are within the range of your Wi-Fi network and that the signal is strong. You can do this by moving closer to the Wi-Fi router or using the Wi-Fi settings on your device to see the signal strength.
3. Forget and reconnect to the network: Sometimes, forgetting the Wi-Fi network and reconnecting can help resolve connection issues. Go to the Settings app on your device, tap on Wi-Fi, and then tap on the network you’re having trouble with. Tap Forget This Network, confirm your action, and then reconnect to the network.
4. Reset network settings: If you’re still facing problems, you can try resetting your network settings. Go to Settings, tap on General, and then tap on Reset. Choose Reset Network Settings and enter your device passcode if prompted. Keep in mind that this will remove saved Wi-Fi passwords, so make sure you have them handy.
5. Update your device: Updating your iPhone or iPad to the latest iOS version can often fix bugs and improve overall connectivity. Go to Settings, tap on General, and then tap on Software Update. If an update is available, follow the on-screen instructions to install it.
6. Router troubleshooting: If the issue persists, it could be related to your Wi-Fi router. Restart the router by unplugging it from power, waiting for a few seconds, and then plugging it back in. You can also check if there are any firmware updates available for your router and install them if needed.
7. Contact your internet service provider: If none of the above steps resolve your Wi-Fi connection issues, it’s possible that the problem is with your internet service provider. Get in touch with their support team and provide them with details about the problem you’re facing. They should be able to guide you further and assist with troubleshooting.
By following these troubleshooting steps, you should be able to resolve most Wi-Fi connection issues on your iPhone or iPad. Remember to double-check your network settings and ensure that you have the correct Wi-Fi password. If the problem persists, don’t hesitate to reach out for further assistance.
Conclusion
In conclusion, connecting to Wi-Fi on your iPhone and iPad is a breeze when you know the right steps. Whether you’re at home, at work, or on the go, having a reliable and fast Wi-Fi connection is essential for staying connected and getting things done. By following the tips and tricks mentioned in this article, you can quickly connect to Wi-Fi networks, optimize your wireless browsing experience, and keep your internet usage secure.
Remember, keeping your device updated, ensuring strong Wi-Fi signal strength, and managing your network settings will go a long way in improving your connectivity. So, next time you’re out and about or need to connect in a new location, be confident in your ability to find, connect, and enjoy Wi-Fi on your iPhone and iPad with ease.
FAQs
Here are some frequently asked questions about connecting to Wi-Fi on iPhone and iPad:
1. How do I connect to Wi-Fi on my iPhone or iPad?
To connect to Wi-Fi on your iPhone or iPad, follow these steps:
1. Open the Settings app.
2. Tap on Wi-Fi.
3. Toggle the Wi-Fi switch to the on position. Your device will automatically search for available Wi-Fi networks.
4. Tap on the desired network name from the list of available networks.
5. If prompted, enter the Wi-Fi password and tap on Join.
Your device will connect to the Wi-Fi network, and the Wi-Fi icon will appear in the top-left corner of the screen.
2. How do I forget a Wi-Fi network on my iPhone or iPad?
To forget a Wi-Fi network on your iPhone or iPad, follow these steps:
1. Open the Settings app.
2. Tap on Wi-Fi.
3. Under the “MY NETWORKS” section, tap on the information (i) icon next to the network you want to forget.
4. Tap on Forget This Network.
A pop-up will appear asking you to confirm the action. Tap on Forget to remove the network from your device’s memory.
3. How do I automatically connect to a known Wi-Fi network on my iPhone or iPad?
To automatically connect to a known Wi-Fi network on your iPhone or iPad, follow these steps:
1. Open the Settings app.
2. Tap on Wi-Fi.
3. Make sure the Wi-Fi switch is turned on.
4. Under the “MY NETWORKS” section, tap on the network you want to automatically connect to.
5. Tap on Auto-Join.
Your device will now automatically connect to the selected Wi-Fi network whenever it is in range.
4. How do I troubleshoot Wi-Fi connection issues on my iPhone or iPad?
If you’re experiencing Wi-Fi connection issues on your iPhone or iPad, try the following troubleshooting steps:
1. Restart your device and your Wi-Fi router.
2. Make sure you’re within range of the Wi-Fi network.
3. Check if other devices can connect to the same Wi-Fi network.
4. Restart your Wi-Fi router and modem.
5. Update your device’s software to the latest version.
6. Forget the Wi-Fi network and reconnect to it.
7. Reset your network settings by going to Settings > General > Reset > Reset Network Settings.
If the issue persists, you may need to contact your internet service provider or Apple Support for further assistance.
5. Can I connect to a hidden Wi-Fi network on my iPhone or iPad?
Yes, you can connect to a hidden Wi-Fi network on your iPhone or iPad. Follow these steps:
1. Open the Settings app.
2. Tap on Wi-Fi.
3. Scroll down and tap on Other.
4. Enter the network name (SSID) of the hidden network.
5. Select the security type and enter the password, if required.
6. Tap on Join.
Your device will attempt to connect to the hidden Wi-Fi network. If successful, the Wi-Fi icon will appear in the top-left corner of the screen.