
Mobile phones have become an integral part of our daily lives, serving as our constant companion in this digital age. With the ever-evolving technology, smartphones offer a plethora of features and functions to cater to our needs. One such feature that enhances accessibility for individuals with disabilities is Switch Control. But what exactly is Switch Control, and how can you utilize it on your iPhone or iPad? In this article, we will delve into the world of Switch Control, exploring its definition, purpose, and step-by-step instructions on how to utilize this feature to its fullest potential. Whether you have a physical disability or simply want to explore new means of interacting with your device, Switch Control offers a remarkable solution. So, let’s dive in and discover the amazing world of Switch Control on your iOS device.
Inside This Article
- What is Switch Control?
- How to Enable Switch Control on iPhone and iPad
- Configuring Switch Control Settings
- Using Switch Control to Navigate your Device
- Customizing Switch Control Options
- Creating Custom Switches
- Using Switch Control with AssistiveTouch
- Troubleshooting Switch Control Issues
- Conclusion
- FAQs
What is Switch Control?
Switch Control is an accessibility feature available on iPhone and iPad that allows individuals with limited mobility to control their devices using switches instead of physical touch or gestures. It offers a more accessible and inclusive way for people with motor disabilities to interact with their devices and perform various tasks.
With Switch Control, users can assign switches to different functions, such as tapping, scrolling, navigating menus, and more. These switches can be connected to the device via Bluetooth or USB, or even be virtual switches displayed on the device’s screen.
This feature is especially beneficial for those with conditions like cerebral palsy, muscular dystrophy, or spinal cord injuries, as it provides a means to independently use their iPhone or iPad and engage with digital content and apps.
Switch Control offers a customizable and flexible interface, allowing users to set up and personalize the switch actions according to their specific needs and preferences.
Overall, Switch Control opens up a world of possibilities for individuals with mobility impairments, empowering them to utilize the full functionality of their devices and enhance their digital experience.
How to Enable Switch Control on iPhone and iPad
If you have an iPhone or iPad and want to access your device using Switch Control, you’ll need to enable this feature. Switch Control is an accessibility function that allows users with physical and motor disabilities to control their iOS devices by using switches, such as external buttons, gestures, or even the device’s touchscreen itself. Enabling Switch Control is a straightforward process, and in this article, we’ll guide you through the steps to get it up and running on your iPhone or iPad.
To enable Switch Control on your iPhone or iPad, follow these steps:
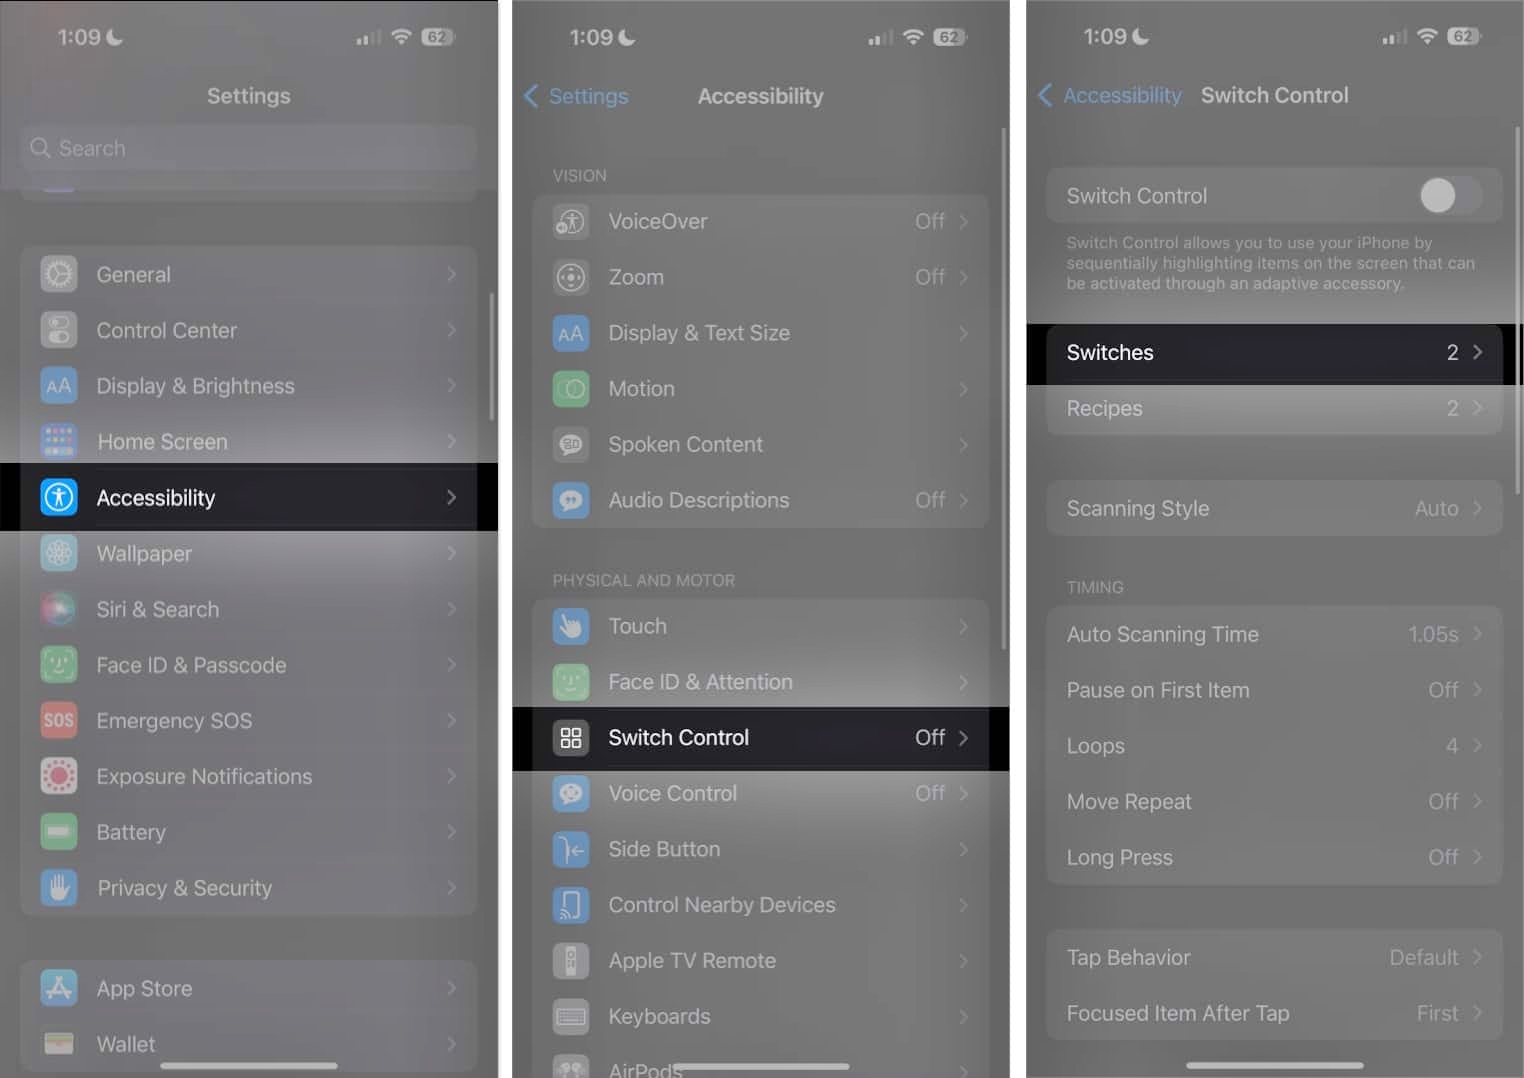
- Open the Settings app on your iPhone or iPad.
- Scroll down and tap on “Accessibility.”
- Tap on “Switch Control,” located under the “Physical and Motor” section.
- Ensure that the “Switch Control” toggle switch is turned on. If it is off, tap on the switch to enable it.
Once you have followed these steps and enabled Switch Control, you are ready to configure the settings and customize the feature based on your preferences. Switch Control offers a range of options that allow you to navigate through your device, perform actions, and even create custom switches. So, let’s delve into the next section to explore configuration options for Switch Control.
Configuring Switch Control Settings
Switch Control is a powerful accessibility feature on iPhone and iPad that allows users to control their device using customized switches. To make the most out of Switch Control, it’s important to configure the settings according to your needs. Here’s how you can configure Switch Control settings on your device:
1. Open the “Settings” app on your iPhone or iPad.
2. Scroll down and tap on “Accessibility.”
3. In the Accessibility menu, tap on “Switch Control.”
4. You will see a list of options under the “Switches” section. This is where you can configure the individual switches used for controlling different actions.
5. To customize a switch, tap on one of the listed switches, such as “Camera” or “Play/Pause.”
6. In the switch customization screen, you have the option to assign a new action or choose from existing actions that Switch Control can perform.
7. Tap on “Assign New Action” to create a custom action for the switch. You can choose functions like “Open App,” “Scroll,” or “Zoom.”
8. After selecting an action, you can further refine it by adjusting the settings. For example, if you choose “Scroll,” you can specify the scrolling direction, speed, and distance.
9. Repeat steps 5 to 8 for each switch you want to customize.
10. In addition to configuring individual switches, you can also adjust global settings for Switch Control. These settings include things like switch repeat intervals, timing options, and audio feedback.
11. To access the global settings, go back to the main Switch Control menu and scroll down to the “Settings” section.
12. Tap on “Switches” to modify switch timing and repeat options, or tap on “Audio” to configure audio feedback settings for Switch Control.
13. Once you have configured the settings to your liking, exit the Settings app, and you’re ready to use Switch Control with your personalized configurations.
Configuring the Switch Control settings ensures that the feature is tailored to your specific needs, making it easier and more efficient to navigate and control your iPhone or iPad. Take some time to explore the options and customize the switches according to your preferences.
Using Switch Control to Navigate your Device
Switch Control is a powerful accessibility feature on iPhone and iPad that allows individuals with limited mobility or dexterity to navigate their devices using alternative input methods. With Switch Control, users can perform various actions, such as scrolling, tapping, and selecting, by using external switches or by using the screen itself as a switch.
Once you have enabled Switch Control on your device, you can start using it to navigate through different elements and interact with apps. Here’s how you can use Switch Control to navigate your device:
- Activate Switch Control: To activate Switch Control, you need to press the switch or perform the designated switch action. Once activated, you will notice a rectangular box highlighting different elements on the screen. This box is referred to as the “scanning cursor”.
- Navigate through elements: The scanning cursor will move through different elements on the screen, such as icons, buttons, or text fields. To move the cursor, you can use the switch control feature to step through the elements in a predefined order. As the cursor moves, you can hear voice feedback or see visual indicators to help you understand the current location.
- Select an element: When the scanning cursor reaches the desired element, you can perform the switch action to select it. The action can be configured to perform a tap, double-tap, or any other predefined action.
- Perform actions: Once you have selected an element, you can perform various actions based on the available options. For example, if you have selected an app icon, you can perform a tap to open the app. If you have selected a text field, you can use switch control to enter text by scanning through letters or by using predefined phrases.
Switch Control provides a customizable and adaptable way to navigate and interact with your device. It allows you to move through different elements at your own pace and perform actions efficiently. By configuring the switch control settings and creating custom switches, you can enhance the usability and effectiveness of switch control on your device.
It’s important to note that Switch Control works seamlessly with most apps and interfaces, but some apps may have specific accessibility features or limitations. If you encounter any issues or limitations while using Switch Control with a particular app, you can check the app’s accessibility settings or contact the developer for further assistance.
Overall, Switch Control is a valuable accessibility feature that opens up new possibilities for individuals with limited mobility or dexterity. It empowers users to interact with their devices independently and efficiently, enhancing their overall digital experience.
Customizing Switch Control Options
Switch Control offers a range of customization options to tailor the experience to your specific needs. Here are some ways you can customize Switch Control on your iPhone or iPad:
1. Adjusting the Scanning Style: Switch Control allows you to choose between different scanning styles, such as automatic scanning, manual scanning, or step scanning. Automatic scanning automatically moves the cursor between items on the screen, while manual scanning requires you to trigger each action. Step scanning provides a combination of both, allowing you to control the pace of the scanning.
2. Modifying the Switch Activation Method: You have the flexibility to choose how you activate the switches. You can set it to activate with a tap, a long hold, a simple gesture, or even the device’s accelerometer. Experiment with different methods to find the one that works best for you.
3. Adjusting the Timing Options: Switch Control allows you to modify the timing options to suit your preference. You can set the scanning speed, the hold duration needed to trigger an action, and the delay before scanning starts. Personalizing these timing options can enhance your overall experience with Switch Control.
4. Customizing Audio and Visual Feedback: To make Switch Control more accessible, you can customize the audio and visual feedback. You can enable or disable spoken feedback, adjust the volume, and even choose from different voice options. Additionally, you can customize the visual cues, such as highlighting or dimming the selected area. These adjustments can make it easier to identify where the cursor is located during scanning.
5. Adding Switch Recipes: Switch Control allows you to create custom switch recipes, which are combinations of actions triggered by specific switch activations. For example, you can create a switch recipe that mutes the volume and opens a specific app simultaneously. This feature empowers you to personalize the device’s functionality based on your specific needs.
6. Creating Head Movement Control: If you have an iPhone or iPad with Face ID, you can take advantage of the head movement control option in Switch Control. This feature tracks your head movement using the device’s front camera and allows you to trigger actions by simply moving your head. It provides an alternative control method for individuals who may not be able to use physical switches with their device.
By customizing these options, you can enhance your experience with Switch Control and make it more intuitive and efficient for your individual needs and preferences. Take the time to explore the settings and experiment with different customization options to find what works best for you.
Creating Custom Switches
Switch Control on iPhone and iPad allows you to create custom switches, which can be incredibly useful for individuals with specific accessibility needs. With custom switches, you can configure different gestures or actions to perform specific functions on your device.
To create a custom switch, follow these steps:
- Open the Settings app on your iPhone or iPad.
- Tap on “Accessibility.”
- Scroll down and select “Switch Control.”
- Tap on “Switches,” and then tap on “Add a New Switch.”
- Choose the type of switch you wish to create. You have several options to choose from, including “Screen,” “External,” and “Camera.”
- Follow the on-screen prompts to set up your custom switch. This may involve performing a specific gesture, connecting an external switch, or using the device’s camera to detect head movements or facial expressions.
- Once the switch is configured, you can assign it to perform a specific action on your device, such as opening an app, navigating menus, or activating a certain feature.
Custom switches provide a flexible and personalized way to interact with your iPhone or iPad. They allow individuals with physical disabilities or limited motor skills to access and control their devices with greater ease and efficiency.
It is important to note that the options and capabilities for creating custom switches may vary depending on the device model and the version of iOS or iPadOS you are using. Make sure to check the specific options available for your device and follow the instructions accordingly.
By creating custom switches, you can truly tailor the accessibility experience on your iPhone or iPad to meet your unique needs. Explore the different options and configurations available, and feel empowered to make your device work best for you.
Using Switch Control with AssistiveTouch
Switch Control is a powerful accessibility feature on iPhones and iPads that allows users with physical disabilities to control their device using adaptive switches. When combined with AssistiveTouch, another accessibility feature, it becomes even more versatile and user-friendly. In this section, we will explore how to use Switch Control in conjunction with AssistiveTouch.
AssistiveTouch is a feature that creates a virtual button on your device’s screen, providing quick access to important functions. When you enable Switch Control with AssistiveTouch, you can use the virtual button as a switch, allowing you to perform various actions and navigate your device with ease.
To enable Switch Control with AssistiveTouch, follow these steps:
- Open the Settings app on your iPhone or iPad.
- Go to “Accessibility.”
- Tap on “Touch” and then select “AssistiveTouch.”
- Toggle the switch to turn on AssistiveTouch.
- Once AssistiveTouch is enabled, tap on “Devices” and select “Switch Control.”
- Toggle the switch to turn on Switch Control with AssistiveTouch.
Once you have enabled Switch Control with AssistiveTouch, you can start using it to control your device. Here are some key actions you can perform:
- Single Tap: Tap the AssistiveTouch button once to perform a single tap on your screen.
- Double Tap: Quickly tap the AssistiveTouch button twice to perform a double tap on your screen.
- Scrolling: Swipe up or down on the AssistiveTouch button to scroll through pages or lists.
- Pinch and Zoom: Use two fingers to pinch or expand on the AssistiveTouch button to zoom in or out on your screen.
- Custom Actions: You can configure custom actions within Switch Control to perform specific tasks based on your needs.
Switch Control with AssistiveTouch offers a wide range of customization options. You can adjust settings like the speed of actions, the size and position of the AssistiveTouch button, and the sensitivity of switches. Experiment with these settings to find the optimal configuration for your comfort and accessibility.
Creating custom switches within Switch Control is another advanced feature that enhances its functionality with AssistiveTouch. You can assign specific trigger actions to different switches, allowing you to navigate your device more efficiently.
If you experience any issues or have trouble using Switch Control with AssistiveTouch, you can troubleshoot them by checking your settings, calibrating switches, or adjusting the sensitivity settings.
Troubleshooting Switch Control Issues
Switch Control is a powerful accessibility feature on iPhone and iPad that allows individuals with motor disabilities to control their device using custom input methods. While Switch Control is designed to be user-friendly and intuitive, there may be instances where you encounter issues or face challenges. Here are some troubleshooting tips to help resolve common Switch Control issues:
- Unresponsive switches: If your switches are not responding when pressed, first ensure that the Switch Control feature is enabled. You can do this by going to Settings > Accessibility > Switch Control and ensuring that the toggle switch is turned on. If the feature is already enabled, try restarting your device and checking if the switches work properly.
- Inaccurate switch mapping: Switch Control relies on accurately mapping your physical switches or gestures to specific actions on the device. If you notice that the switch mapping is incorrect or inconsistent, you can recalibrate the switches by going to Settings > Accessibility > Switch Control > Switches and selecting the switch you want to recalibrate. Follow the on-screen instructions to ensure accurate switch mapping.
- Slow or laggy performance: If Switch Control seems to be slow or lagging, it could be due to a heavy workload or background processes on your device. Try closing any unnecessary apps running in the background and restarting your device. Additionally, reducing the number of active switches or custom gestures may help improve performance.
- Conflicts with other accessibility features: Sometimes, Switch Control may conflict with other accessibility features or assistive technologies enabled on your device. If you are experiencing issues, go to Settings > Accessibility > Accessibility Shortcut and ensure that only the necessary features are selected. This can help avoid conflicts and improve the overall functionality of Switch Control.
- Incorrect device gestures: Switch Control relies on gestures to navigate the device interface. If you find that the device is not responding to your gestures or is misinterpreted, ensure that you are using the correct gestures as defined in the Switch Control settings. You can review and customize gestures by going to Settings > Accessibility > Switch Control > Gestures.
- Bluetooth connectivity issues: If you are using Bluetooth switches or devices with Switch Control and experience connectivity issues, make sure that the devices are properly paired and within range of the device. Disconnecting and reconnecting the Bluetooth devices or restarting the Bluetooth connection may help resolve any connectivity problems.
If you have tried these troubleshooting tips and are still experiencing issues with Switch Control, it is advisable to seek assistance from Apple Support or visit an authorized service center. They can provide further guidance and help identify any underlying hardware or software issues that may be affecting Switch Control functionality.
Remember, Switch Control is designed to enhance accessibility and empower individuals with motor disabilities. With proper troubleshooting and support, you can fully utilize the capabilities of Switch Control and enjoy a more inclusive and convenient digital experience on your iPhone or iPad.
Conclusion
Switch Control is a powerful accessibility feature available on iPhone and iPad that can greatly enhance the user experience for individuals with physical and motor disabilities. By allowing users to control their device using customized switch inputs, Switch Control opens up a world of possibilities for those who may have difficulty interacting with a touchscreen.
With Switch Control, users can navigate through menus, launch apps, type, and perform a wide range of tasks on their devices, all with the help of external switch accessories or the device’s built-in functions. This feature offers a high level of customization, allowing users to tailor the settings to meet their specific needs.
Whether it’s a single switch, a joystick, or a series of switches, Switch Control empowers individuals to take full advantage of their iPhone or iPad, enabling them to communicate, stay connected, and access information with ease. It’s a testament to the ongoing efforts of Apple to make their products as inclusive as possible, ensuring that everyone can enjoy the benefits of technology.
So, if you or someone you know would benefit from Switch Control, don’t hesitate to explore this amazing accessibility feature and unlock a whole new world of possibilities on your iPhone or iPad.
FAQs
1. What is Switch Control?
Switch Control is an accessibility feature available on iPhone and iPad that allows users with physical disabilities to navigate and control their devices using switches, gestures, or keyboard commands. It offers a customizable interface that can be tailored to individual needs and preferences.
2. How do I enable Switch Control on my iPhone or iPad?
To enable Switch Control on your iPhone or iPad, go to the “Settings” app, tap on “Accessibility,” then select “Switch Control” from the list of options. Toggle the switch to enable it. You can also customize the settings to suit your specific requirements.
3. What types of switches can I use with Switch Control?
Switch Control supports a wide range of switches, including external Bluetooth switches, accessibility switches, and even the device’s own screen as a switch. Depending on your needs, you can connect multiple switches and assign different functions to each switch.
4. How can I customize Switch Control settings?
To customize Switch Control settings, go to the “Settings” app, tap on “Accessibility,” then select “Switch Control.” From there, you can configure switch actions, adjust switch settings, create custom gestures, and set up scanning options. Experiment with different settings to find what works best for you.
5. Can I use Switch Control with third-party apps?
Yes, Switch Control is designed to work with both Apple’s built-in apps and many third-party apps. However, app developers need to include support for accessibility features like Switch Control. If a specific app does not work well with Switch Control, you can reach out to the app developer or explore alternative apps that offer better accessibility.