
Configuring wireless settings on your iPad is essential to ensure seamless internet connectivity and access to various online services. Whether you’re setting up a new iPad or troubleshooting connectivity issues, knowing how to configure iPad wireless settings is crucial. With the advancements in technology, iPads come equipped with versatile wireless capabilities that allow you to connect to Wi-Fi networks effortlessly.
In this comprehensive guide, we will walk you through the step-by-step process of configuring your iPad’s wireless settings. From connecting to a Wi-Fi network to managing network preferences, we have you covered. By the end of this article, you’ll have the knowledge and tools to optimize your iPad’s wireless connectivity and enjoy uninterrupted browsing, streaming, and communication.
So, grab your iPad, buckle up, and let’s dive into the world of configuring wireless settings on your iPad!
Inside This Article
- Connecting to a Wi-Fi Network
- Adjusting Wi-Fi Settings
- Troubleshooting Wi-Fi Connection Issues
- Advanced Wireless Configuration Options
- Conclusion
- FAQs
Connecting to a Wi-Fi Network
One of the first things you’ll need to do when setting up your iPad is to connect it to a Wi-Fi network. This will allow you to access the internet and enjoy various online services and features. Here’s how you can connect your iPad to a Wi-Fi network:
- Unlock your iPad and go to the Home screen.
- Tap on the “Settings” app, which is represented by a gear icon.
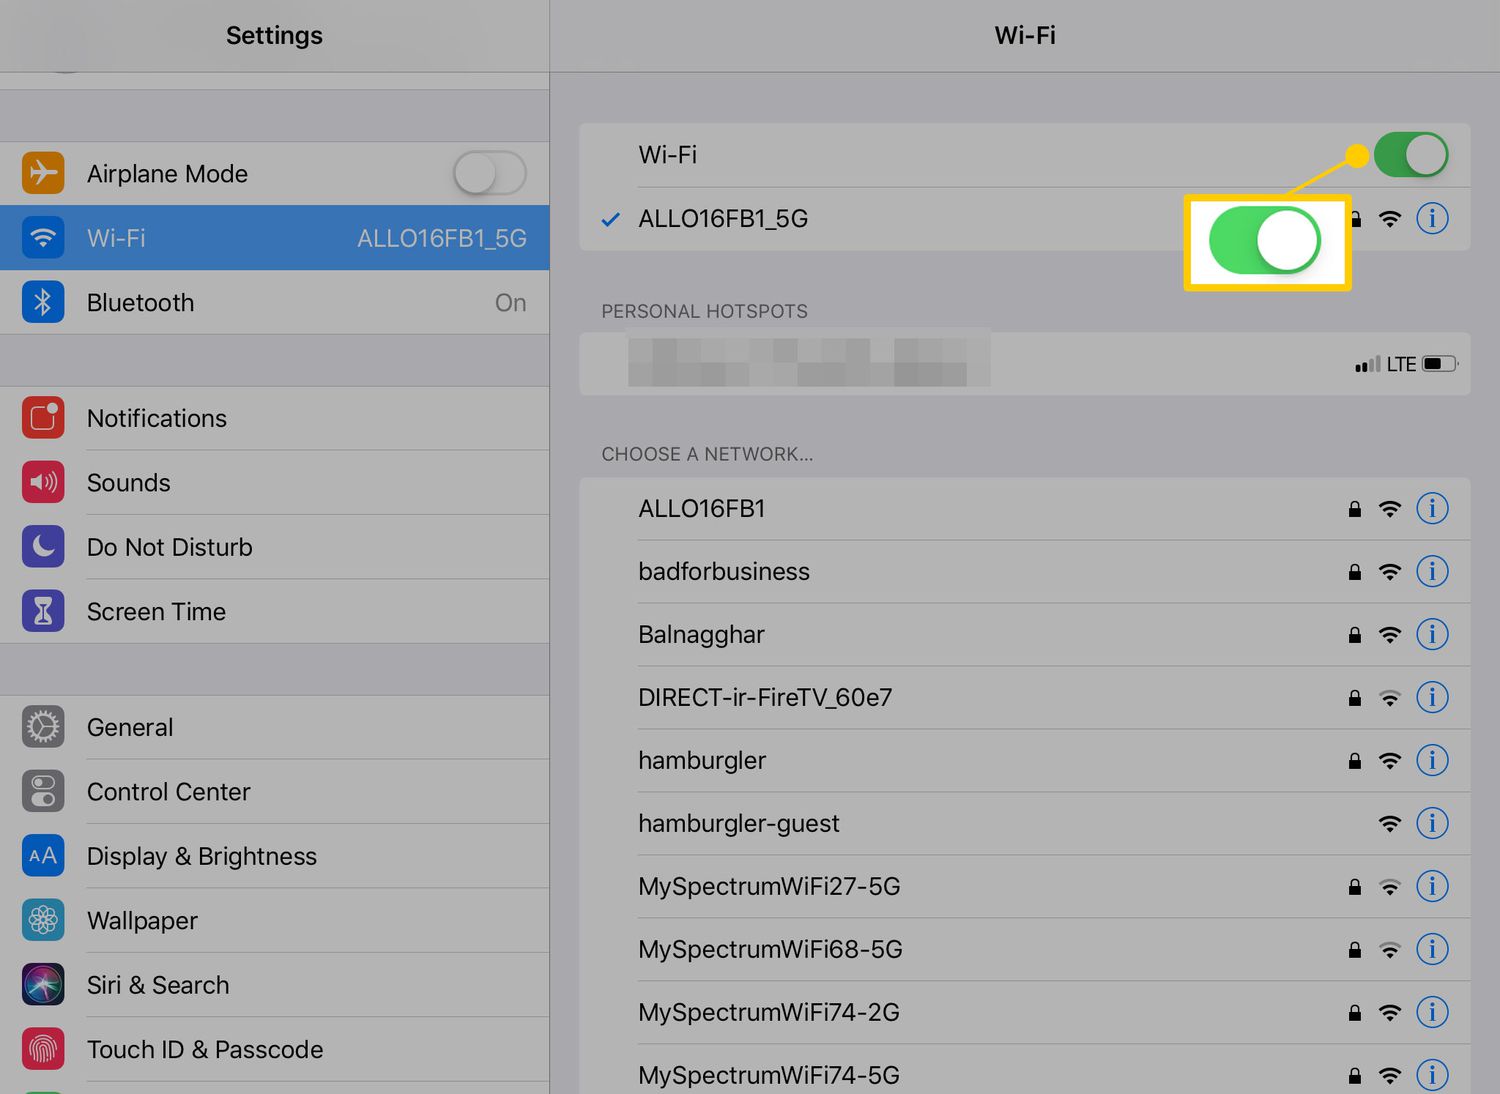
- In the Settings menu, look for the “Wi-Fi” option and tap on it.
- The Wi-Fi screen will display a list of available networks. Tap on the network you want to connect to.
- If the network is secured, you will be prompted to enter the password. Type in the correct password and tap “Join”.
- Your iPad will now attempt to connect to the selected Wi-Fi network. Once connected, you will see a checkmark next to the network name.
It is important to note that if you are connecting to a public Wi-Fi network, such as in a cafe or airport, you might need to agree to the network’s terms and conditions or enter additional information before you can connect.
Once your iPad is connected to a Wi-Fi network, it will automatically reconnect whenever that network is available. This means you won’t have to manually connect every time you want to use the internet.
If you experience any issues connecting to a Wi-Fi network, try the following troubleshooting steps:
- Restart your iPad and try connecting again.
- Move closer to the Wi-Fi router to ensure a stronger signal.
- Check if other devices can connect to the same Wi-Fi network to rule out any network issues.
- Reset your Wi-Fi router by powering it off and on again.
- If none of these steps work, you may need to contact your internet service provider or the network administrator for further assistance.
Now that you know how to connect your iPad to a Wi-Fi network, you can start enjoying all the online capabilities of your device. Whether it’s browsing the web, downloading apps, or streaming videos, having a reliable Wi-Fi connection is essential for a great iPad experience.
Adjusting Wi-Fi Settings
When it comes to configuring your iPad’s wireless settings, there are a few key adjustments you can make to optimize your Wi-Fi experience. Let’s take a look at some of the essential settings you should be aware of:
1. Enable Auto-Join: By default, your iPad will automatically join known Wi-Fi networks. However, if you want more control over which networks your device connects to, you can disable this feature. Simply go to your Wi-Fi settings, find the network you want to adjust, and toggle off the “Auto-Join” option.
2. Forget a Network: If you no longer want your iPad to connect to a specific Wi-Fi network, you can simply forget it. Head to the Wi-Fi settings, locate the network in the list of available networks, and tap on the (i) icon next to it. From there, you can choose to “Forget This Network” and your iPad will no longer connect to it automatically.
3. Modify DNS Settings: DNS (Domain Name System) allows your device to translate web addresses into IP addresses. In some cases, you may want to use custom DNS servers to improve stability or access certain restricted content. To change DNS settings, go to Wi-Fi settings, tap on the (i) icon next to the network, and select “Configure DNS.” From there, you can enter your preferred DNS server addresses.
4. Wi-Fi Assist: Wi-Fi Assist is a feature that helps your device switch to a cellular data connection when the Wi-Fi signal is weak. If you want to disable this feature to avoid unexpected data usage, go to your Wi-Fi settings, scroll down, and toggle off the “Wi-Fi Assist” option.
5. Personal Hotspot: If you want to share your iPad’s internet connection with other devices, you can set up a personal hotspot. Simply navigate to the Wi-Fi settings and tap on “Personal Hotspot.” From there, you can turn on the hotspot and set a password to secure the connection.
6. VPN Configuration: If you use a VPN (Virtual Private Network) to protect your online privacy or access region-restricted content, you can configure it in the Wi-Fi settings. Tap on the (i) icon next to the network you want to use with the VPN, select “Configure Proxy,” and enter the necessary VPN details.
These are just a few examples of the Wi-Fi settings you can adjust on your iPad. Feel free to explore the settings menu further to customize your wireless experience according to your needs and preferences.
Troubleshooting Wi-Fi Connection Issues
Having trouble with your iPad’s Wi-Fi connection? Don’t worry, we’ve got you covered. Here are some common troubleshooting steps to help you get your iPad back online and connected to Wi-Fi.
1. Check the Wi-Fi Signal: Start by checking the Wi-Fi signal on your iPad. Make sure you are within range of the Wi-Fi network and that the signal is strong enough. If the signal is weak, try moving closer to the router or access point.
2. Restart Your Router: Sometimes, all it takes is a simple router restart. Unplug your router from the power source, wait for a few seconds, and then plug it back in. This can often resolve connectivity issues and refresh the Wi-Fi connection.
3. Forget and Reconnect to the Network: If restarting the router doesn’t work, try forgetting the Wi-Fi network on your iPad and then reconnecting to it. Go to “Settings,” select “Wi-Fi,” and tap on the network you want to forget. Then, tap on “Forget This Network.” After that, search for the network again and enter the password to reconnect.
4. Reset Network Settings: If you’re still experiencing Wi-Fi issues, you may need to reset your network settings. Go to “Settings,” select “General,” and tap on “Reset.” Choose “Reset Network Settings” and confirm your choice. Be aware that this will remove any saved Wi-Fi passwords, so make sure you have them handy.
5. Update iOS: Make sure that your iPad is running the latest version of iOS. Apple frequently releases updates that include bug fixes and improvements, which may help resolve Wi-Fi connectivity issues. To check for updates, go to “Settings,” select “General,” and tap on “Software Update.”
6. Check Other Devices: If other devices are experiencing Wi-Fi issues as well, the problem may be with your router or internet service provider. Check if other devices, such as smartphones or laptops, can connect to the Wi-Fi network. If they can’t, contact your ISP for further assistance.
7. Contact Apple Support: If you’ve tried all the above steps and are still unable to troubleshoot the Wi-Fi connection issue, it may be time to reach out to Apple Support. They can provide further guidance and assistance tailored to your specific situation.
By following these troubleshooting steps, you should be able to resolve most Wi-Fi connection issues on your iPad. Stay connected and enjoy seamless internet browsing, streaming, and downloading on your device!
Advanced Wireless Configuration Options
When it comes to configuring wireless settings on your iPad, there are a few advanced options that can help you optimize your wireless connection. These options allow you to take control of your wireless network and ensure a fast and stable connection. Let’s take a look at some of these advanced wireless configuration options:
- Channel Selection: By default, your iPad will automatically select the best channel for your Wi-Fi network. However, in some cases, manually selecting a specific channel can improve performance. You can access this option in the Wi-Fi settings menu and experiment with different channels to find the one that works best for your network.
- Security Options: It is crucial to secure your Wi-Fi network to protect it from unauthorized access. The iPad offers various security options, including WPA2 (Wi-Fi Protected Access 2), which is the most secure option available. Ensure to enable WPA2 encryption to keep your network safe from intruders.
- DNS Configuration: The Domain Name System (DNS) translates website addresses into IP addresses, allowing your iPad to connect to the internet. By default, your iPad will use the DNS provided by your internet service provider (ISP). However, you can manually configure DNS settings to use a different DNS server, such as Google DNS or OpenDNS, which can sometimes provide faster and more reliable connections.
- Static IP Address: By default, your iPad will obtain its IP address automatically from the router using DHCP (Dynamic Host Configuration Protocol). However, if you have a specific need for a static IP address, you can manually configure it in the Wi-Fi settings menu. This can be useful for certain applications or network configurations that require a consistent IP address.
- MAC Address Filtering: MAC address filtering allows you to specify which devices are allowed to connect to your Wi-Fi network based on their unique MAC addresses. This can provide an additional layer of security by only permitting authorized devices to access your network. You can enable MAC address filtering in your router’s settings and add the MAC addresses of the devices you want to allow.
These advanced wireless configuration options give you more control over your iPad’s Wi-Fi settings and can help you optimize your wireless connection. Experiment with these options to find the best settings for your network and enjoy a fast and stable internet experience on your iPad.
In conclusion, configuring wireless settings on your iPad is a simple yet essential process that allows you to connect to Wi-Fi networks and enjoy seamless internet access. By following the steps outlined in this article, you can easily set up and manage your wireless connection on your iPad.
FAQs
Q: How do I configure wireless connectivity on my iPad?
A: Configuring wireless connectivity on your iPad is a seamless process. Simply follow these steps:
- Go to the Settings app on your iPad.
- Select Wi-Fi from the left-hand menu.
- Toggle the Wi-Fi switch to ON.
- A list of available Wi-Fi networks will appear. Select the desired network name.
- If the network is password protected, enter the password and tap Join.
- If the network requires a username and password, you will need to enter these details as well.
- Your iPad will then attempt to connect to the selected Wi-Fi network.
Q: How do I troubleshoot wireless connectivity issues on my iPad?
A: If you are experiencing issues with your iPad’s wireless connectivity, try the following troubleshooting tips:
- Ensure that Airplane Mode is turned off in the Settings app.
- Make sure that the Wi-Fi router is powered on and working properly.
- Check if other devices can connect to the same Wi-Fi network.
- Restart your iPad by holding down the power button until the slide to power off appears, and then slide to power off. Wait a few seconds, then press and hold the power button again until the Apple logo appears.
- Reset your iPad’s network settings by going to Settings > General > Reset > Reset Network Settings. This will remove saved Wi-Fi passwords and other network-related configurations, so make sure to have them handy.
Q: How do I forget a Wi-Fi network on my iPad?
A: If you no longer want your iPad to automatically connect to a specific Wi-Fi network, follow these steps to forget the network:
- Go to the Settings app on your iPad.
- Select Wi-Fi from the left-hand menu.
- Tap the info (i) icon next to the Wi-Fi network you want to forget.
- Tap Forget This Network.
- A confirmation pop-up will appear. Tap Forget to confirm.
- Your iPad will no longer connect to the forgotten Wi-Fi network automatically.
Q: Can I connect my iPad to a hidden Wi-Fi network?
A: Yes, you can connect your iPad to a hidden Wi-Fi network. To do so, follow these steps:
- Go to the Settings app on your iPad.
- Select Wi-Fi from the left-hand menu.
- Tap Other… at the top of the list of available networks.
- Enter the name of the hidden network in the SSID field.
- Select the security type for the hidden network.
- If the network is password protected, enter the password in the Password field.
- Tap Join.
- Your iPad will attempt to connect to the hidden Wi-Fi network.
Q: How do I check the Wi-Fi signal strength on my iPad?
A: To check the Wi-Fi signal strength on your iPad, follow these steps:
- Swipe down from the top-right corner of the screen to open Control Center.
- Look for the Wi-Fi icon at the top-left corner of the Control Center.
- The number of bars next to the Wi-Fi icon indicates the signal strength. More bars indicate a stronger signal.