
Are you wondering how to connect your iPad to a wireless network? Whether you’re at home, at work, or on the go, having a reliable and speedy internet connection is essential for getting the most out of your iPad. In this article, we will guide you through the step-by-step process of connecting your iPad to a wireless network, ensuring that you can browse the web, stream videos, and download apps with ease. With the increasing reliance on wireless connectivity in our daily lives, knowing how to connect your iPad to a wireless network is a valuable skill. So, let’s get started and get your iPad connected to the world of endless online possibilities.
Inside This Article
- Connecting to a Wireless Network on an iPad
- Step 1: Accessing Wi-Fi Settings – Opening the Settings app – Tapping on Wi-Fi option in the left sidebar
- Step 2: Selecting a Wireless Network – Scanning for Available Wi-Fi Networks – Choosing the Desired Network from the List
- Step 3: Entering Network Password (if needed)
- Step 4: Verifying the Connection – Checking the Wi-Fi symbol in the top bar of the iPad screen – Confirming the connection by accessing an internet-based app or website
- Conclusion
- FAQs
Connecting to a Wireless Network on an iPad
When it comes to using your iPad, connecting to a wireless network is an essential step to gain access to the internet and all its wonders. Whether you’re at home, in a café, or traveling, you’ll want to follow these simple steps to get your iPad connected and ready for browsing, streaming, and more.
Step 1: Accessing Wi-Fi Settings
The first step is to open the Settings app on your iPad. Look for the icon that resembles a gear and tap on it. Once you’re in the Settings app, you’ll find various options on the left sidebar. Look for the Wi-Fi option, usually indicated by the Wi-Fi symbol, and tap on it.
Step 2: Selecting a Wireless Network
Now that you’re in the Wi-Fi settings, your iPad will start scanning for available Wi-Fi networks in the area. You’ll see a list of networks appear on the screen. Look for the name of the network you want to connect to and tap on it. If the network is protected by a password, you may be prompted to enter it.
Step 3: Entering Network Password (if needed)
If the network you selected is password-protected, a dialog box will appear asking you to enter the password. Make sure you type in the correct password for the network. Passwords are case-sensitive, so pay attention to uppercase and lowercase letters. Once you’ve entered the password, tap on the “Join” or “Connect” button to establish the connection.
Step 4: Verifying the Connection
After establishing the connection, you’ll want to make sure your iPad is successfully connected to the wireless network. Check the top bar of your iPad screen for the Wi-Fi symbol, which looks like radio waves. If you see the symbol and it’s filled in, that means you’re connected to the network. To confirm the connection, open an internet-based app or website and ensure that it loads properly.
With these simple steps, you can connect your iPad to a wireless network and enjoy all the benefits of being online. Whether you need to check emails, browse social media, stream music and videos, or access important information, a stable and secure wireless connection is the key. So, go ahead and get your iPad connected to the Wi-Fi network and experience the endless possibilities it offers.
Step 1: Accessing Wi-Fi Settings – Opening the Settings app – Tapping on Wi-Fi option in the left sidebar
Connecting an iPad to a Wi-Fi network allows you to access the internet, download apps, stream videos, and much more. To get started, you need to access the Wi-Fi Settings on your iPad. Follow these simple steps:
-
First, locate the Settings app on your iPad. It can usually be found on your home screen, represented by a gray icon with gears.
-
Tap on the Settings app to open it. This will take you to the main settings menu, where you can configure various aspects of your iPad.
-
Once inside the Settings app, you will see a list of options on the left sidebar. Scroll down until you find the option labeled “Wi-Fi.”
-
Tap on the Wi-Fi option to access the Wi-Fi settings.
By following these steps, you will successfully access the Wi-Fi settings on your iPad. Now you can proceed to the next step of connecting to a wireless network.
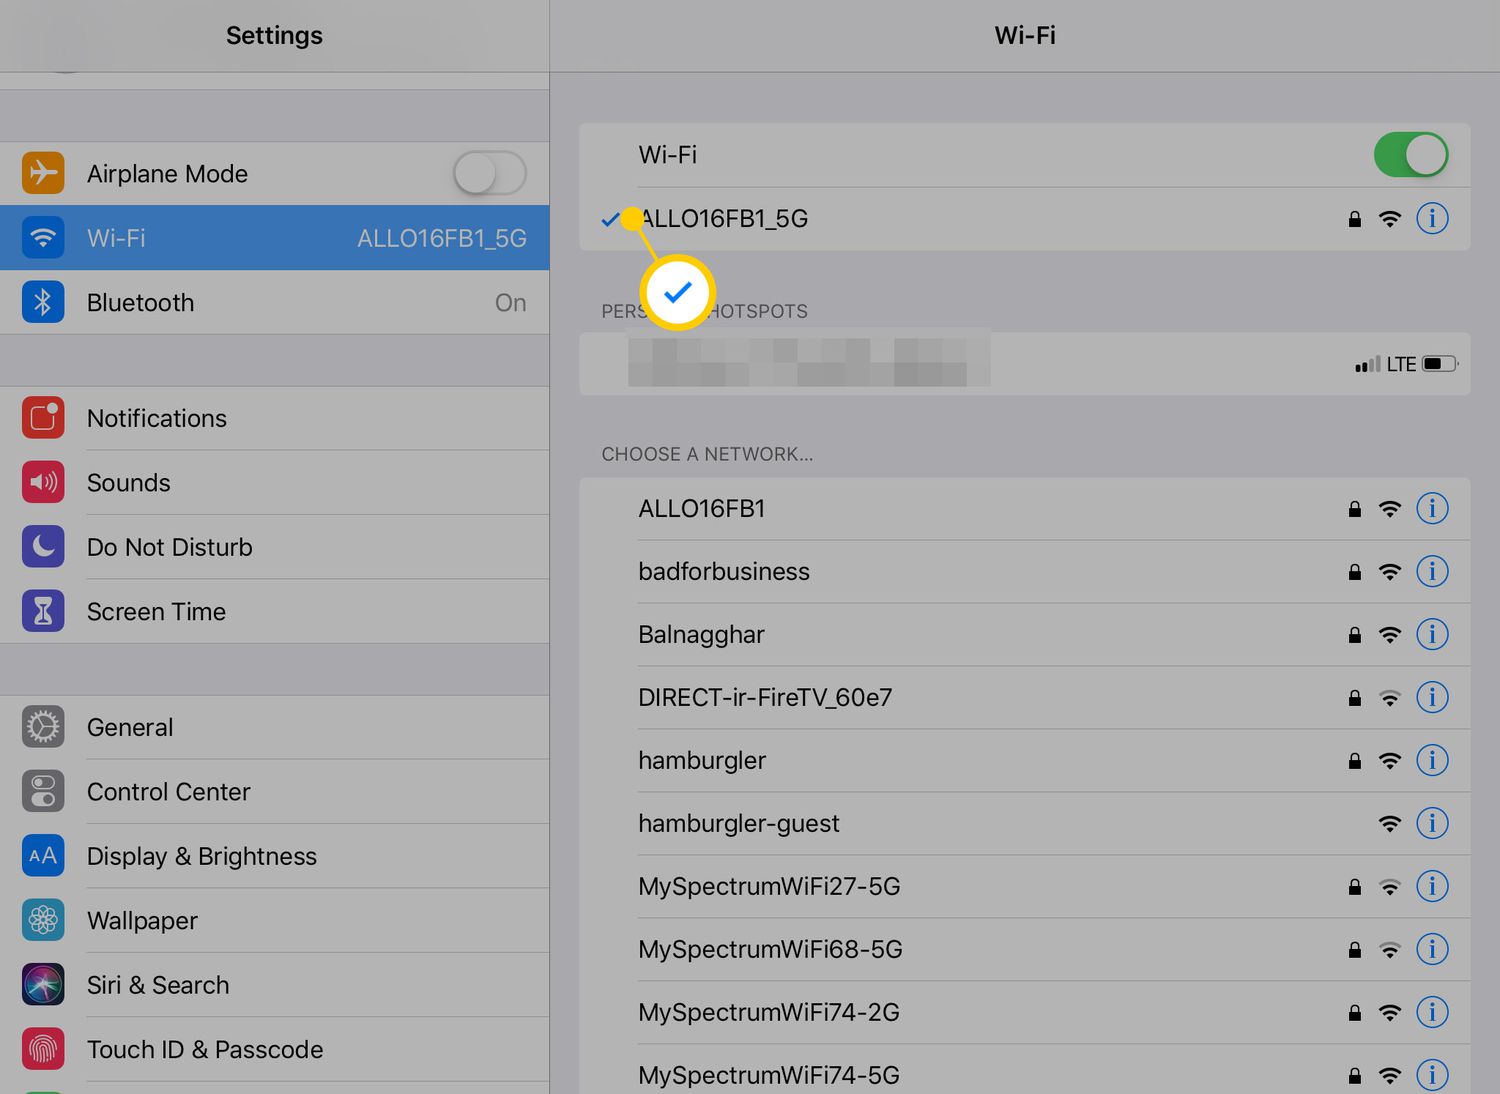
Step 2: Selecting a Wireless Network – Scanning for Available Wi-Fi Networks – Choosing the Desired Network from the List
After accessing the Wi-Fi settings on your iPad, the next step is to scan for available Wi-Fi networks. This will allow you to see a list of all the networks within range.
The iPad will automatically start scanning for networks as soon as you open the Wi-Fi settings. You will see a list of network names (often called SSIDs) appear on the screen. These are the Wi-Fi networks that are accessible to your iPad in its current location.
Take a moment to carefully look through the list of networks. You might see a mix of familiar household names, such as “Home WiFi” or “OfficeNetwork,” as well as other networks that belong to nearby businesses or public places like coffee shops and libraries.
To choose the desired network, simply tap on its name in the list. The name will usually be displayed with the strongest networks at the top. If you don’t see the network you’re looking for, try scrolling through the list or waiting a few moments for additional networks to appear.
Keep in mind that some Wi-Fi networks may be password-protected, indicated by a lock icon next to their name. If you’re trying to connect to a network that requires a password, you will need to enter it in the next step before establishing the connection.
Step 3: Entering Network Password (if needed)
Once you have selected the desired wireless network from the available options, you may need to enter the network password to establish the connection. This step ensures the security of your network and prevents unauthorized access.
To enter the network password, simply tap on the password field on your iPad’s screen. A virtual keyboard will appear, allowing you to type in the correct password. Make sure to enter the password accurately, as any mistakes can prevent the connection from being established.
After typing in the password, you will see the “Join” or “Connect” button on the screen. Tap on this button to proceed with the connection process. Once the iPad verifies the entered password, it will attempt to establish a connection to the chosen network.
It is important to note that some networks may have additional security measures in place. In such cases, you may be required to provide additional information, such as a username or a secondary password. If prompted, make sure to enter the necessary details correctly to successfully connect to the network.
Upon successful authentication, your iPad will establish a connection with the network, and you will be able to access the internet and other network resources. To ensure that the connection has been established, you can check the Wi-Fi symbol in the top bar of your iPad’s screen. If the symbol appears filled or has signal bars, it indicates a successful connection.
Now that you have entered the correct password and tapped “Join” or “Connect,” you can enjoy the benefits of a wireless internet connection on your iPad. You can open internet-based apps, browse websites, stream videos, and stay connected wherever you go.
Step 4: Verifying the Connection – Checking the Wi-Fi symbol in the top bar of the iPad screen – Confirming the connection by accessing an internet-based app or website
Once you have successfully connected your iPad to the wireless network, it’s important to verify the connection to ensure a stable and reliable internet connection. The verification process is simple and can be done in just a few steps.
The first thing you should do is take a look at the top bar of your iPad screen. You will notice a Wi-Fi symbol that indicates the current status of your connection. The symbol typically appears as a series of curved lines resembling the signal strength of a wireless network. If the symbol is filled with white or gray color, it means your iPad is successfully connected to the network.
However, if the Wi-Fi symbol is not visible or appears grayed out, it indicates that your iPad is not connected to a network. In this case, you may need to go back to the previous steps and ensure that you have selected the correct network and entered the password correctly. You can also try restarting your iPad or resetting your network settings if the issue persists.
Once you have confirmed the presence of the Wi-Fi symbol, the next step is to test the connection by accessing an internet-based app or website. Open any app that requires an internet connection, such as Safari, Mail, or any other app that you regularly use to browse the web or check emails. If the app or website loads successfully, it means that your iPad is connected to the internet and the connection is functioning properly.
If you encounter any issues while trying to access the internet, there are a few troubleshooting steps you can try. Firstly, check if the Wi-Fi network you are connected to has a stable internet connection. You can do this by testing the connection on another device or asking others who are connected to the same network. If the issue persists, try restarting your iPad and the Wi-Fi router to reset the network connection.
If none of these steps resolve the issue, it is recommended to contact your internet service provider or Apple Support for further assistance. They can help you identify and troubleshoot any underlying issues that may be affecting your Wi-Fi connection.
Verifying the connection is an essential step to ensure that your iPad is properly connected to the wireless network and that you can access the internet without any interruptions. By following these simple steps, you can stay connected and enjoy all the benefits of a reliable Wi-Fi connection on your iPad.
Conclusion
In conclusion, connecting your iPad to a wireless network is a straightforward process that allows you to enjoy the full potential of your device. By following the steps outlined in this article, you can easily establish a secure and reliable connection to the internet. Whether you need to browse the web, stream media, or download apps, having your iPad connected to a wireless network ensures a seamless and hassle-free experience.
Remember to select the appropriate network, enter the correct password, and keep your device up to date to maintain a fast and stable connection. If you encounter any connectivity issues, troubleshooting steps like resetting your network settings or contacting your internet service provider can help resolve the problem. With a reliable wireless network connection, your iPad becomes a versatile and powerful tool for productivity, communication, and entertainment.
FAQs
1. Can I connect my iPad to any wireless network?
Yes, you can connect your iPad to any wireless network that is within range and has proper security credentials. The iPad supports both 2.4GHz and 5GHz Wi-Fi networks, allowing you to connect to a wide range of networks.
2. How do I connect my iPad to a wireless network?
To connect your iPad to a wireless network, follow these steps:
- Open the Settings app on your iPad.
- Select Wi-Fi from the list of options.
- Toggle the Wi-Fi switch to turn it on, if it’s not already enabled.
- Your iPad will automatically scan for available networks. Select the network you want to connect to from the list.
- If the network requires a password, enter it when prompted.
- Once the correct credentials are entered, your iPad will connect to the wireless network.
3. How can I improve the Wi-Fi signal on my iPad?
If you’re experiencing weak or unstable Wi-Fi signal on your iPad, you can try the following tips to improve it:
- Move closer to the Wi-Fi router or access point.
- Make sure there are no physical obstructions between your iPad and the router.
- Restart your Wi-Fi router and the iPad.
- Check if there are any software updates available for your iPad and install them.
- Reset network settings on your iPad (Settings > General > Reset > Reset Network Settings).
- If all else fails, consider contacting your internet service provider for further assistance.
4. Why does my iPad keep disconnecting from the Wi-Fi network?
There can be various reasons why your iPad keeps disconnecting from the Wi-Fi network. Some possible causes include:
- Interference from other electronic devices.
- Outdated router firmware.
- Network congestion.
- Weak Wi-Fi signal.
- Software glitches on your iPad.
To troubleshoot the issue, try the following steps:
- Move closer to the Wi-Fi router.
- Restart your Wi-Fi router.
- Forget the Wi-Fi network on your iPad and re-establish the connection.
- Update the firmware of your router.
- Reset network settings on your iPad.
5. How do I forget a Wi-Fi network on my iPad?
If you want to remove a Wi-Fi network from your iPad, follow these steps:
- Open the Settings app on your iPad.
- Select Wi-Fi from the list of options.
- Tap on the (i) icon next to the network you want to forget.
- Tap on “Forget This Network”.
- Confirm by tapping on “Forget” in the pop-up message.