
Connecting to other computers on a wireless network has become an essential skill in our digitally connected world. Whether you need to share files, collaborate on projects, or simply access resources on different devices, knowing how to establish a connection can greatly enhance your productivity and convenience.
With the proliferation of wireless networks, it’s now easier than ever to connect to other computers without the constraint of physical cables. However, navigating the intricacies of wireless networking can be daunting, especially for those new to the concept.
This article aims to demystify the process, providing you with step-by-step instructions on how to connect to other computers on a wireless network. From understanding the basics of network settings to troubleshooting common connection issues, we’ll cover it all to ensure you can effortlessly connect and collaborate with ease.
Inside This Article
- Connecting to a Wireless Network
- Finding the IP Address of the Target Computer
- Establishing a Remote Desktop Connection
- Sharing Files and Folders on the Network
- Conclusion
- FAQs
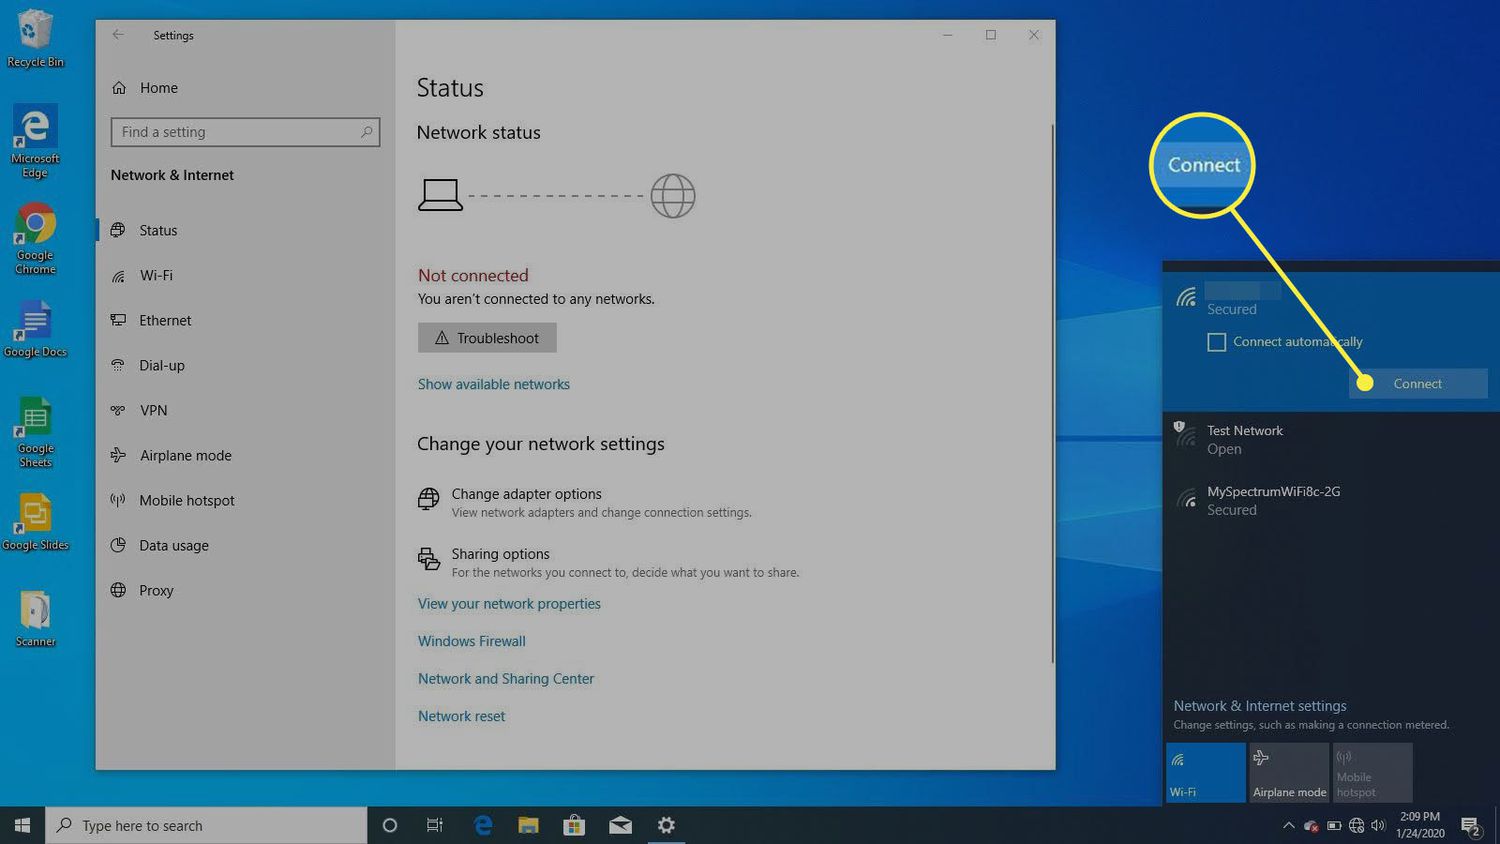
Connecting to a Wireless Network
Connecting to a wireless network is essential for accessing the internet and communicating with other devices in your vicinity. Whether you are using a laptop, smartphone, or any other wireless-enabled device, the process is straightforward. Follow the steps below to connect to a wireless network:
- Ensure that your wireless device is turned on and has the necessary wireless functionality.
- Click on the network icon located in the taskbar or go to Settings and select the Wi-Fi option.
- A list of available wireless networks in your area will be displayed. Select the network you want to connect to.
- If the network is secured, you will be prompted to enter the password. Type in the correct password and click on Connect.
- After a few moments, your device will establish a connection to the wireless network, and you will be able to access the internet.
It is important to note that some wireless networks may have additional security measures in place, such as MAC address filtering or hidden SSID. If you encounter any issues connecting to a network, you may need to consult the network administrator or refer to the device’s user manual for further instructions.
Once you are connected to a wireless network, you can enjoy all the benefits it offers, such as browsing the web, streaming media, and accessing network resources. Make sure to keep your device’s wireless settings updated and secure to protect your privacy and ensure a reliable connection.
Finding the IP Address of the Target Computer
When connecting to another computer on a wireless network, it is essential to know the IP address of the target computer. The IP address acts as a unique identifier for the computer, allowing it to communicate with other devices on the network. Here are a few methods to find the IP address of the target computer:
1. Using Command Prompt:
One way to find the IP address is by using the Command Prompt utility. Open the Command Prompt by pressing the Windows key + R, then typing “cmd” and hitting enter. In the Command Prompt window, type “ipconfig” and press enter. Look for the “IPv4 Address” or “Default Gateway” entry, which should display the IP address of the computer on the wireless network.
2. Using Network Settings:
On Windows computers, you can access the network settings to find the IP address. Go to the Control Panel, then choose “Network and Internet” followed by “Network and Sharing Center.” Click on the name of the wireless network under the “Active Network” section. In the pop-up window, click on the “Details” button. The IP address will be listed next to “IPv4 Address.”
3. Using Network Utility:
On Mac computers, you can use the Network Utility tool to find the IP address. Open the Spotlight search by pressing Command + Space, then type “Network Utility” and hit enter. In the Network Utility window, select the “Info” tab and choose the network interface you are connected to. The IP address will be listed next to “IPv4 Address.”
By following the steps outlined above, you can easily find the IP address of the target computer on a wireless network. It is important to note that the IP address may change if the computer is connected to a different network, so it’s advisable to check for the IP address each time you connect to a new network.
Establishing a Remote Desktop Connection
One of the most convenient ways to connect to other computers on a wireless network is through a Remote Desktop Connection. This feature allows you to access and control a remote computer as if you were sitting right in front of it. Whether you want to assist a colleague with a technical issue or access files from your home computer while on the go, a Remote Desktop Connection can be a lifesaver.
The first step in establishing a Remote Desktop Connection is to ensure that both the target computer (the one you want to connect to) and the local computer (the one you are connecting from) have the necessary settings enabled. On the target computer, go to the System Properties menu by right-clicking on the “This PC” or “My Computer” icon and selecting “Properties.”
In the System Properties menu, navigate to the “Remote” tab and check the box that says “Allow remote connections to this computer.” You may also want to adjust the settings for remote connections to specify who can connect or require a secure connection. Once you have made the necessary changes, click “OK” to save the settings.
Next, on the local computer, open the Remote Desktop Connection application. This can usually be found in the “Accessories” or “Windows Accessories” folder in the Start menu. Alternatively, you can type “Remote Desktop Connection” into the search bar and select the appropriate option from the results.
With the application open, enter the IP address or hostname of the target computer in the “Computer” field. If you are unsure of the IP address, you can find it by going to the target computer and typing “ipconfig” in the command prompt. Look for the “IPv4 Address” under the network adapter you are using for the wireless connection.
Once you have entered the IP address or hostname, click “Connect” to establish the connection. You may be prompted to enter your username and password for the target computer. If so, input the correct credentials and click “OK.”
If everything is set up correctly, you should now be connected to the target computer via Remote Desktop Connection. You will see the desktop of the remote computer displayed on your local computer’s screen, and you can begin interacting with it as if you were physically present.
Remember to log out or disconnect from the Remote Desktop Connection when you are finished to ensure the security of both computers. You can do this by clicking the “X” button on the application or selecting “Disconnect” from the “Start” menu on the remote computer.
Establishing a Remote Desktop Connection is a powerful feature that allows you to conveniently access and control other computers on a wireless network. It can save you time and effort by eliminating the need to physically be in front of each computer. Just make sure to follow the necessary steps to enable remote connections and input the correct IP address or hostname, and you’ll be well on your way to seamless remote access.
Sharing Files and Folders on the Network
Sharing files and folders on a wireless network allows you to conveniently access and transfer data between different computers. This feature is especially useful for collaboration in a home or office setting, where multiple users need to share files and work on common projects. Here are some steps to help you easily share files and folders on your network.
Step 1: Enable File and Printer Sharing
First, you need to ensure that file and printer sharing is enabled on your computer. To do this, go to the Control Panel and open the “Network and Sharing Center” settings. From there, click on “Change advanced sharing settings”. Make sure that the option for “Turn on file and printer sharing” is checked.
Step 2: Select the Files and Folders to Share
Next, you need to choose which files and folders you want to share. Right-click on the desired file or folder and select “Properties”. In the properties window, navigate to the “Sharing” tab. Click on the “Share” button and choose the users or devices with whom you want to share the files or folders.
Step 3: Set Permissions
Once you have selected the users or devices to share the files or folders with, you can set permissions to control what they can do with the shared files. There are different levels of permissions, such as allowing read-only access or granting full control. Choose the appropriate level of permissions based on your requirements.
Step 4: Access Shared Files and Folders
Now that you have shared the files and folders, other users on the network can easily access them. They can navigate to the shared folder by opening their File Explorer and selecting the network location. From there, they can browse and access the shared files and folders, provided they have the necessary permissions.
Step 5: Advanced Sharing Options
If you require more advanced sharing options, you can explore additional settings in the “Advanced sharing” section of the file or folder properties window. Here, you can customize the share name, set offline access options, and configure other advanced sharing options according to your needs.
By following these steps, you can easily share files and folders on your wireless network. It’s a convenient way to collaborate and transfer data between different devices, making your work and personal life more efficient.
Conclusion
Connecting to other computers on a wireless network can greatly improve productivity, convenience, and collaboration. By following the steps outlined in this guide, you can easily establish connections with other devices and share files, resources, and even screens. The ability to connect wirelessly opens up a world of possibilities, allowing you to work seamlessly across devices and collaborate effortlessly with others.
With the ever-increasing reliance on wireless networks, understanding how to connect to other computers on these networks is a valuable skill. Whether you are at home, in the office, or on the go, having the ability to connect wirelessly provides you with the flexibility to access and share information whenever you need it.
By leveraging the power of wireless connectivity, you can streamline your workflow, improve communication, and simplify collaboration. So, now that you have learned how to connect to other computers on a wireless network, go ahead and put your newfound knowledge to use. Enjoy the freedom and convenience that wireless networking brings!
FAQs
1. How do I connect to another computer on a wireless network?
To connect to another computer on a wireless network, you can use various methods. Here are a few common options:
– If the computers are running on Windows, you can use the built-in “Network and Sharing Center” to add the computer to your network.
– If you are using a Mac, you can go to System Preferences, select “Sharing”, and enable the necessary sharing options.
– You can also use third-party software like TeamViewer, AnyDesk, or Windows Remote Desktop to establish a remote connection.
2. Can I connect to a computer on a different network?
Connecting to a computer on a different network can be a bit more complex. If you are trying to connect to a computer outside of your local network, you may need to configure port forwarding on your router to allow incoming connections. Additionally, you will need to know the public IP address or domain name of the target computer. It is recommended to consult the documentation or support resources of the specific remote access software you are using for detailed instructions.
3. What are the security considerations when connecting to another computer wirelessly?
When connecting to another computer wirelessly, it is important to prioritize security. Here are a few key considerations:
– Make sure to use a strong, unique password for any remote access software or services that you use.
– Enable two-factor authentication whenever possible to add an extra layer of security.
– Keep your operating system and remote access software up to date with the latest security patches.
– Be cautious while granting remote access permissions and only allow trusted individuals or devices to connect to your computer.
4. Are there any limitations or restrictions when connecting to another computer wirelessly?
While connecting to another computer wirelessly offers great convenience, there are a few limitations or restrictions to be aware of:
– Network speed and stability may affect the performance of the connection, especially when accessing resources remotely.
– Firewall settings, both on the local and remote computer, can impact the ability to establish a connection.
– Some remote access software may have limitations on file transfer sizes or specific compatibility requirements.
– In certain corporate or enterprise networks, IT policies or restrictions may limit your ability to connect to other computers wirelessly.
5. Is it possible to connect to a computer on a wireless network using a mobile device?
Yes, it is possible to connect to a computer on a wireless network using a mobile device. There are various mobile apps available for remote access, such as Microsoft Remote Desktop, TeamViewer, and VNC Viewer. These apps allow you to access and control your computer remotely using your mobile device. However, keep in mind that the functionality and features may vary depending on the app and the specific devices involved. It is advisable to check the compatibility and usage instructions provided by the app developers.